
Posts in Category: Monitoring
Splunk on CentOS 7
Pre-requisites for the installations – Recommend a proper hostname, firewall and network configuration for the server prior to the installations.
Splunk supports only 64 bit Server Architecture.
Create a Splunk User
It is always recommended to run this application as its dedicated user rather than as root.
Create a user to run this application and create an application folder for the installation.
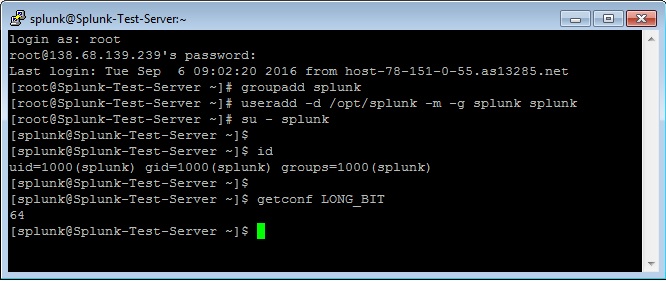
login as: root
root@ Splunk-Test-Server’s password:****
Last login: Tue Sep 6 09:02:20 2016 from host-78-151-0-55.as13285.net
[root@Splunk-Test-Server ~]# groupadd splunk
[root@Splunk-Test-Server ~]# useradd -d /opt/splunk -m -g splunk splunk
[root@Splunk-Test-Server ~]# su – splunk
[splunk@Splunk-Test-Server ~]$
[splunk@Splunk-Test-Server ~]$ id
uid=1000(splunk) gid=1000(splunk) groups=1000(splunk)
[splunk@Splunk-Test-Server ~]$
To Confirm the Server Architecture
[splunk@Splunk-Test-Server ~]$ getconf LONG_BIT
64
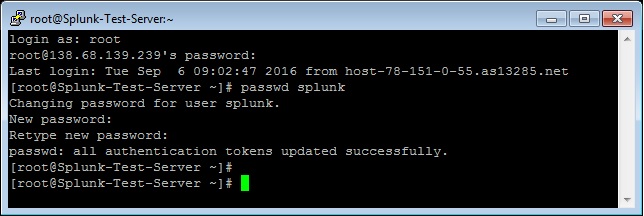
[root@Splunk-Test-Server ~]# passwd splunk
Changing password for user splunk.
New password: ****
Retype new password: ****
passwd: all authentication tokens updated successfully.
[root@Splunk-Test-Server ~]#
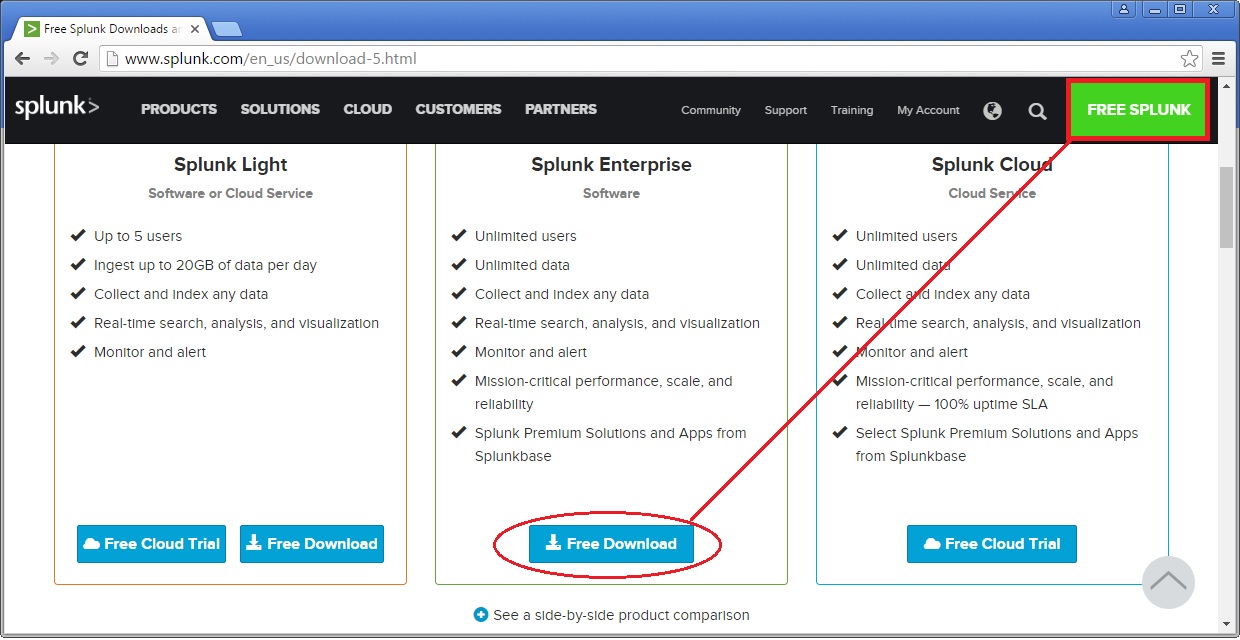
Download and extract the Splunk Enterprise version
Create a Splunk account and download the Splunk software from their official website here.
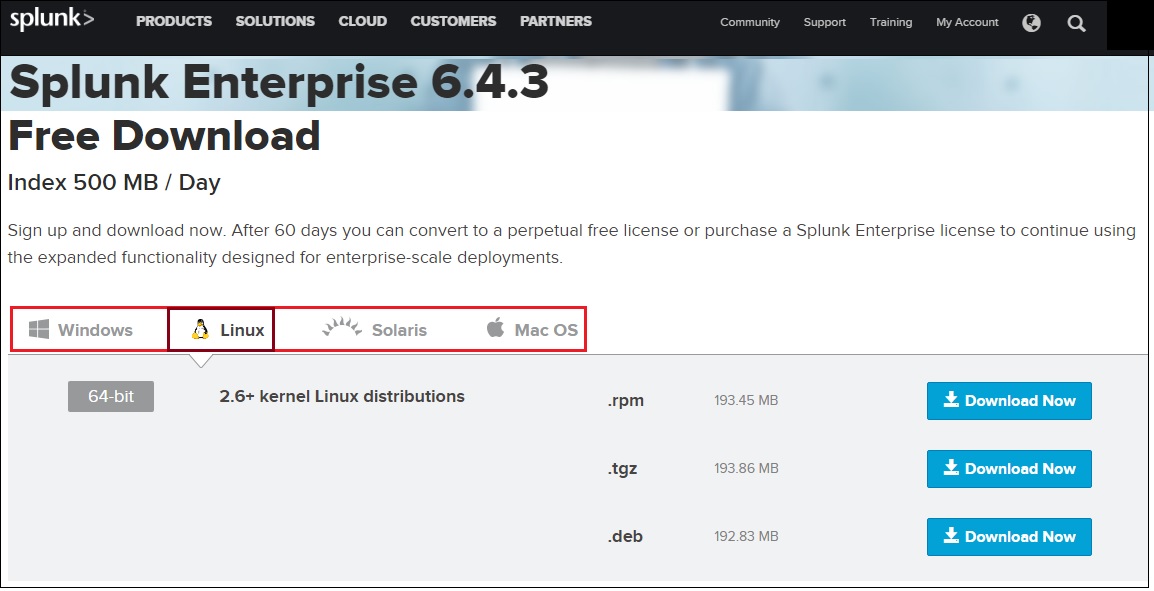
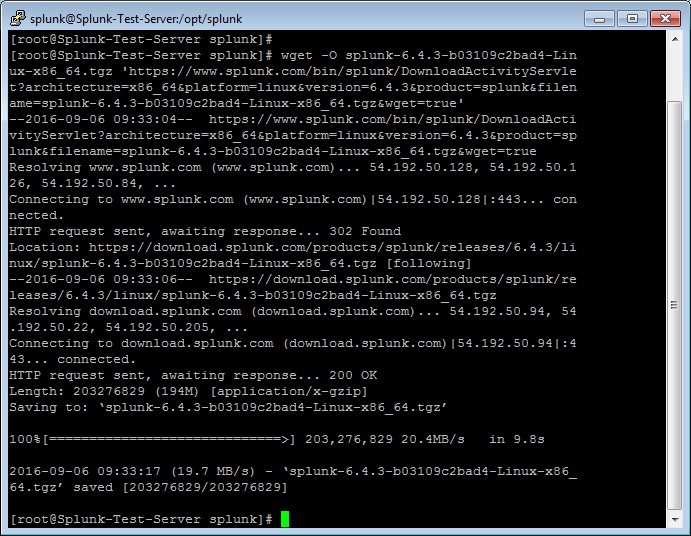
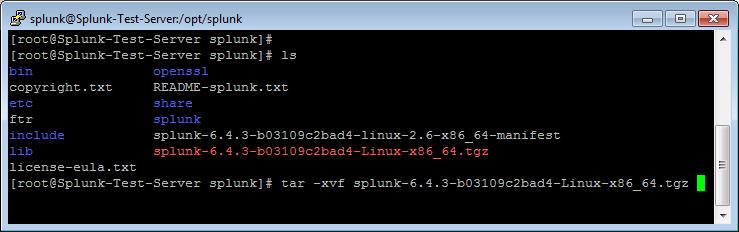
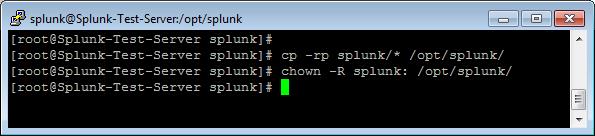
Now extract the tar file and copy the files to the Splunk application folder namely /opt/splunk created.
Splunk Installation
Once the Splunk software is downloaded, you can login to your Splunk user and run the installation script. We will choose the trial license, so it will take it by default.
[root@Splunk-Test-Server splunk]# su – splunk
Last login: Tue Sep 6 09:21:18 UTC 2016 on pts/1
[splunk@Splunk-Test-Server ~]$
[splunk@Splunk-Test-Server ~]$ cd bin/
[splunk@Splunk-Test-Server bin]$ ./splunk start –accept-license
This appears to be your first time running this version of Splunk.
Copying ‘/opt/splunk/etc/openldap/ldap.conf.default’ to ‘/opt/splunk/etc/openldap/ldap.conf’.
Generating RSA private key, 1024 bit long modulus
………………………………………………….++++++
e is 65537 (0x10001)
writing RSA key
Generating RSA private key, 1024 bit long modulus
e is 65537 (0x10001)
writing RSA key
Moving ‘/opt/splunk/share/splunk/search_mrsparkle/modules.new’ to ‘/opt/splunk/share/splunk/search_mrsparkle/modules’.
Splunk> See your world. Maybe wish you hadn’t.
Checking prerequisites…
Checking http port [8000]: open
Checking mgmt port [8089]: open
Checking appserver port [127.0.0.1:8065]: open
Checking kvstore port [8191]: open
Checking configuration… Done.
Creating: /opt/splunk/var/lib/splunk
Creating: /opt/splunk/var/run/splunk
Creating: /opt/splunk/var/run/splunk/appserver/i18n
Creating: /opt/splunk/var/run/splunk/appserver/modules/static/css
Creating: /opt/splunk/var/run/splunk/upload
Creating: /opt/splunk/var/spool/splunk
Creating: /opt/splunk/var/spool/dirmoncache
Creating: /opt/splunk/var/lib/splunk/authDb
Creating: /opt/splunk/var/lib/splunk/hashDb
Checking critical directories… Done
Checking indexes…
Validated: _audit _internal _introspection _thefishbucket history main summary
Done
New certs have been generated in ‘/opt/splunk/etc/auth’.
Checking filesystem compatibility… Done
Checking conf files for problems…
Done
Checking default conf files for edits…
Validating installed files against hashes from ‘/opt/splunk/splunk-6.4.3-b03109c2bad4-linux-2.6-x86_64-manifest’
All installed files intact.
Done
All preliminary checks passed.
Starting splunk server daemon (splunkd)…
Generating a 1024 bit RSA private key
……………………………++++++
writing new private key to ‘privKeySecure.pem’
Signature ok
subject=/CN=Splunk-Test-Server/O=SplunkUser
Getting CA Private Key
writing RSA key
Done
[ OK ]
Waiting for web server at http://127.0.0.1:8000 to be available… Done
If you get stuck, we’re here to help.
Look for answers here: http://docs.splunk.com
The Splunk web interface is at http://Splunk-Test-Server:8000
[splunk@Splunk-Test-Server bin]$
The Splunk web interface is at http://splunk@Splunk-Test-Server:8000
Access your Splunk Web interface at http://IP:8000/ or http://hostname:8000. Confirm the port 8000 is open in your server firewall.
Configuring Splunk Web Interface
This completes installation and now Splunk Service up & running in your server.
Next step is to set-up Splunk Web interface.
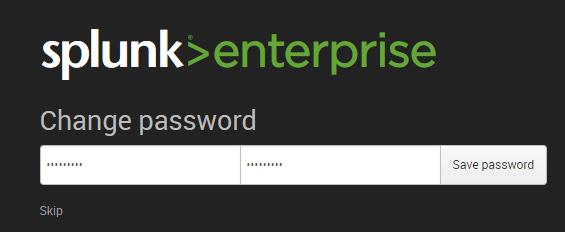
Access Splunk web interface and set administrator password.
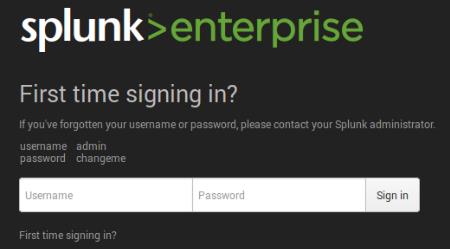
First time when you’re accessing the Splunk interface, you can use the user/password provided in the page which is admin/changeme in this case. Once logged in, on the very next page it will ask to change and confirm your new password.
Now start using the Splunk Dashboard !!
https://www.splunk.com/web_assets/v5/book/Exploring_Splunk.pdf
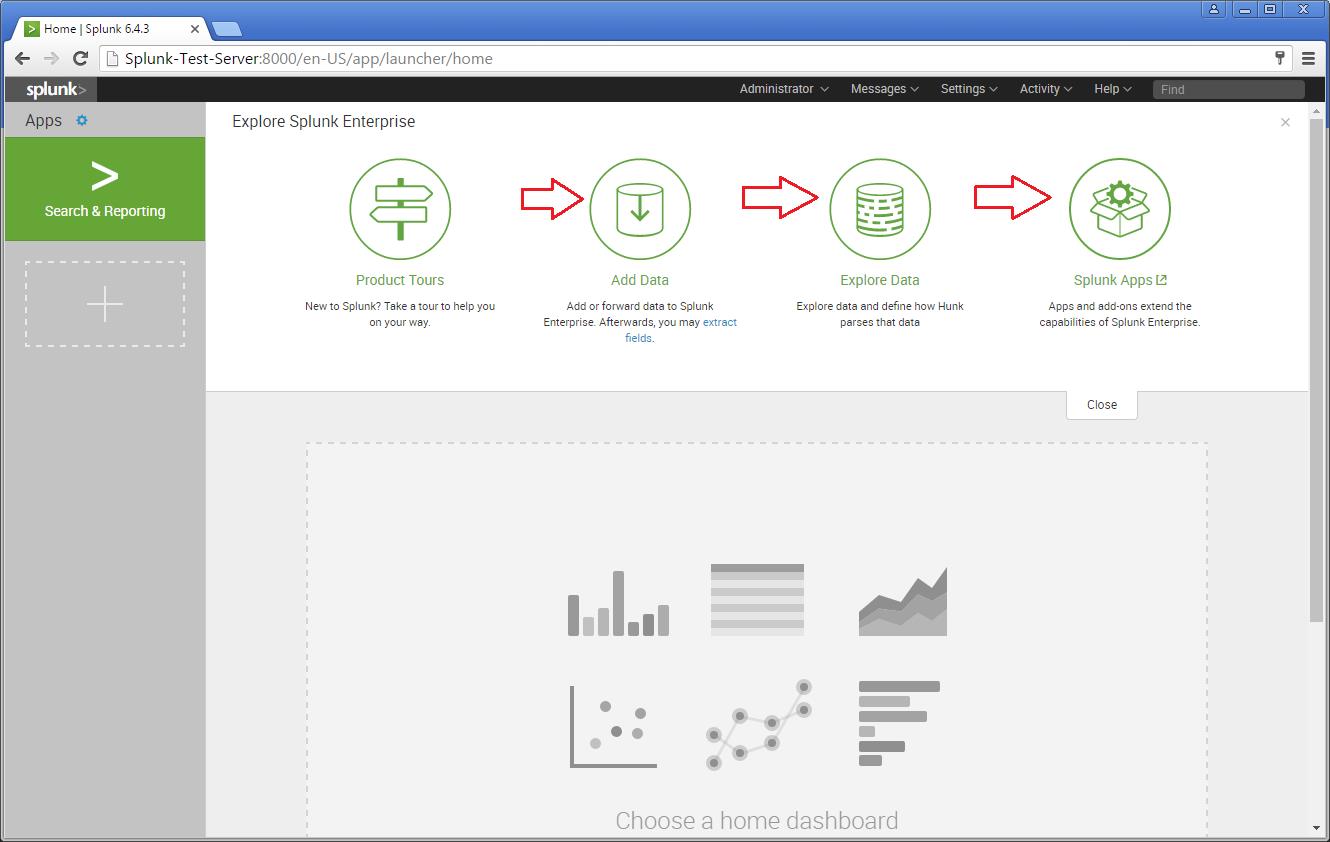
There are different categories listed over in the home page. You can choose the required one and start splunking.

There are different categories listed over in the home page. You can choose the required one and start splunking.
Adding a task
I’m adding an example for a simple task which is been added to the Splunk system. Just see my snapshots to understand how I added it. My task is to add /var/log folder to the Splunk system for monitoring.
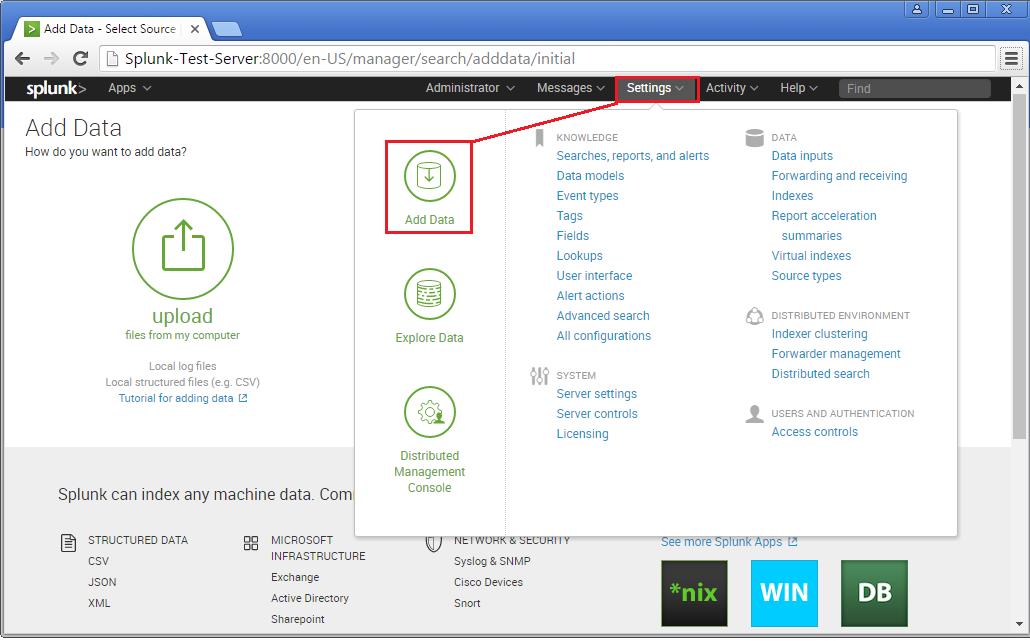
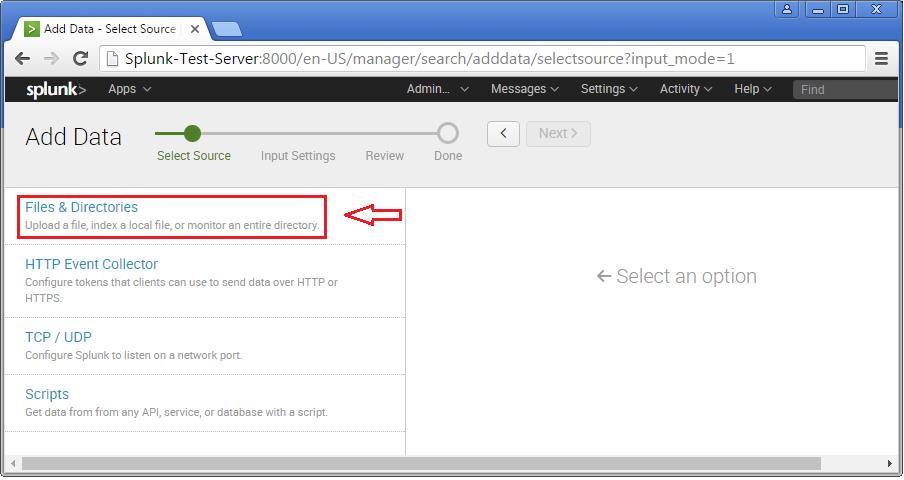
Step 1 >> Open up the Splunk Web interface. Click on the Settings Tab >> Choose the Add Data option.
Step 2 >> The Add Data Tab opens up with three options : Upload, Monitor and Forward. The task here is to monitor a folder, hence will go ahead with Monitor.
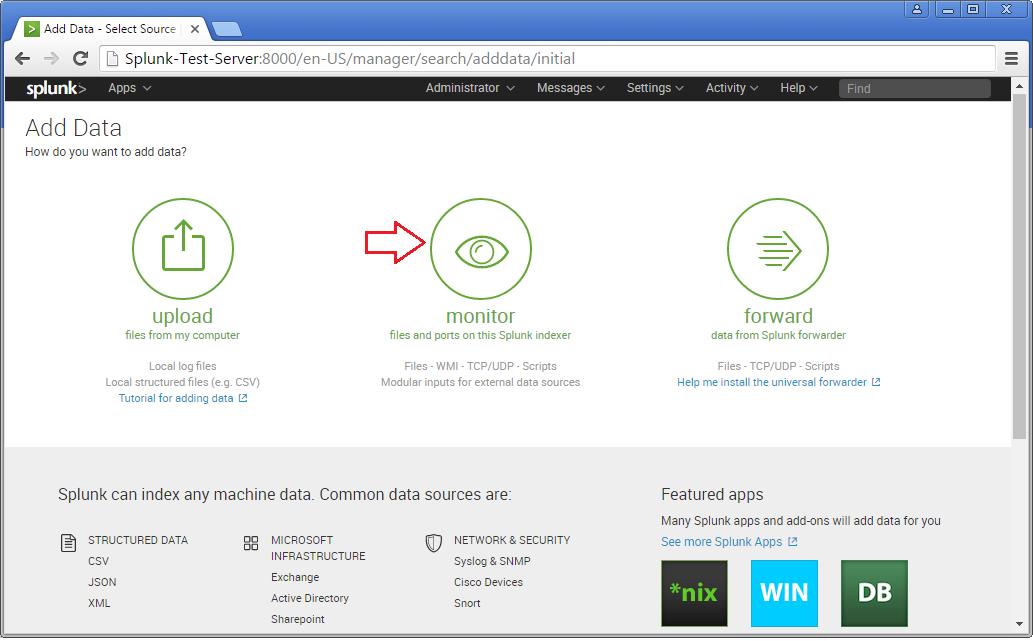
In the Monitor option, there are four categories as below:
File & Directories : To monitor files/folders
HTTP Event Collector : Monitor data streams over HTTP
TCP/UDP : Monitor Service ports
Scripts : Monitor Scripts
Step 3 >> In this example, lets choose the Files & Directories option.
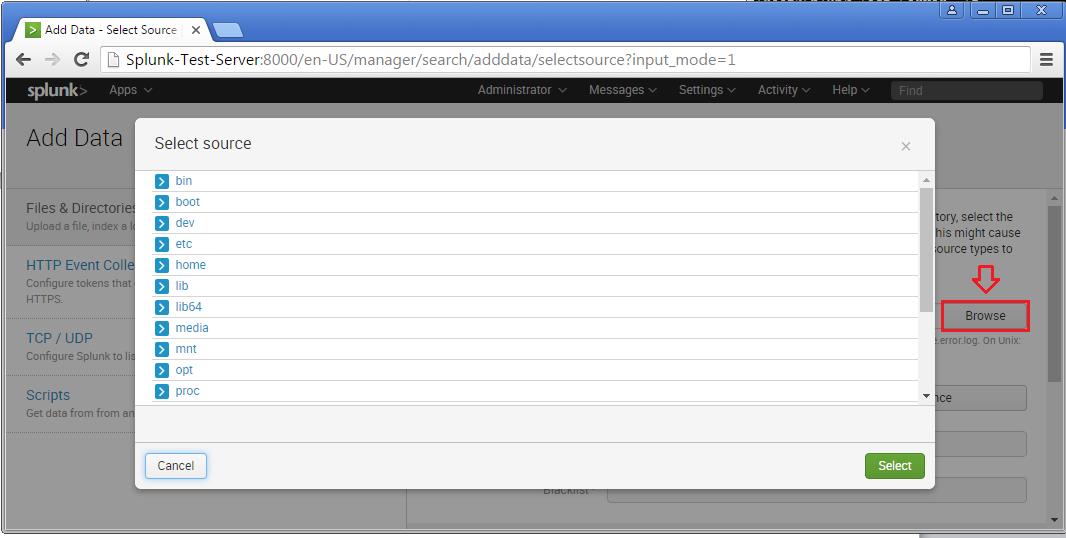
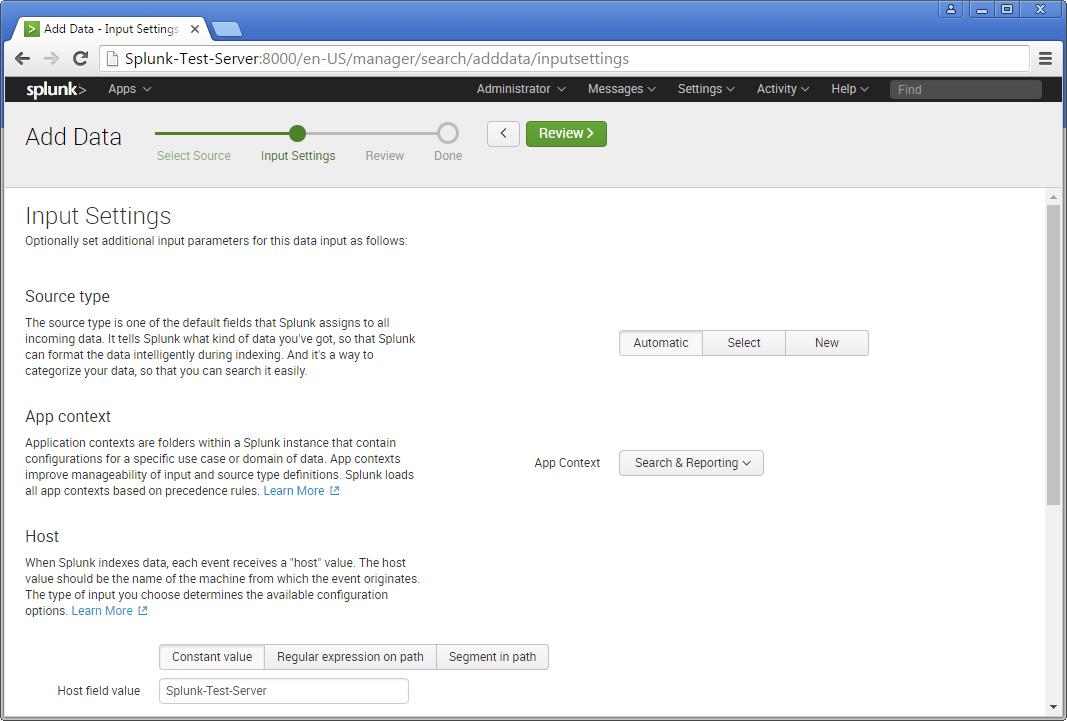
Step 4 >> IN this example choose the exact folder path from the server to monitor. Once you confirm with the settings, you can click Next and Review.
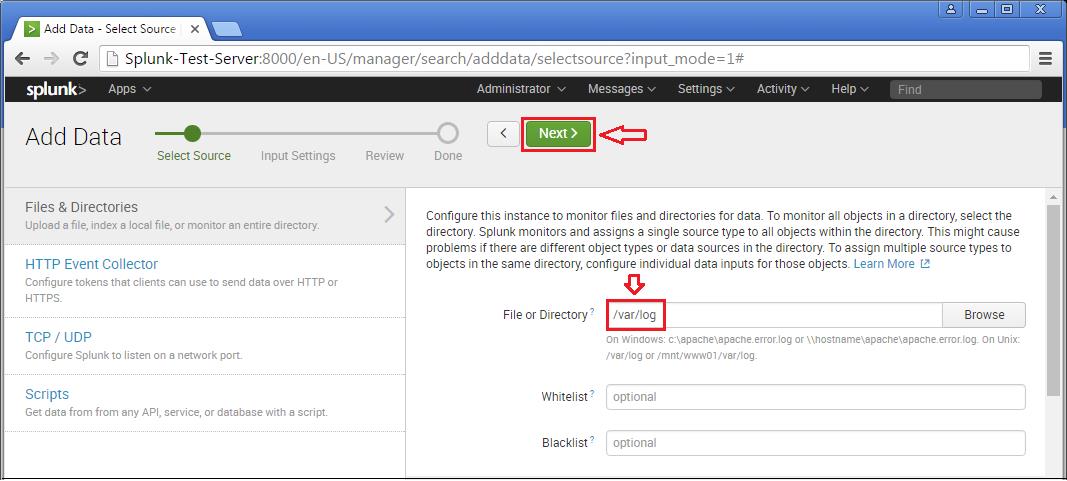
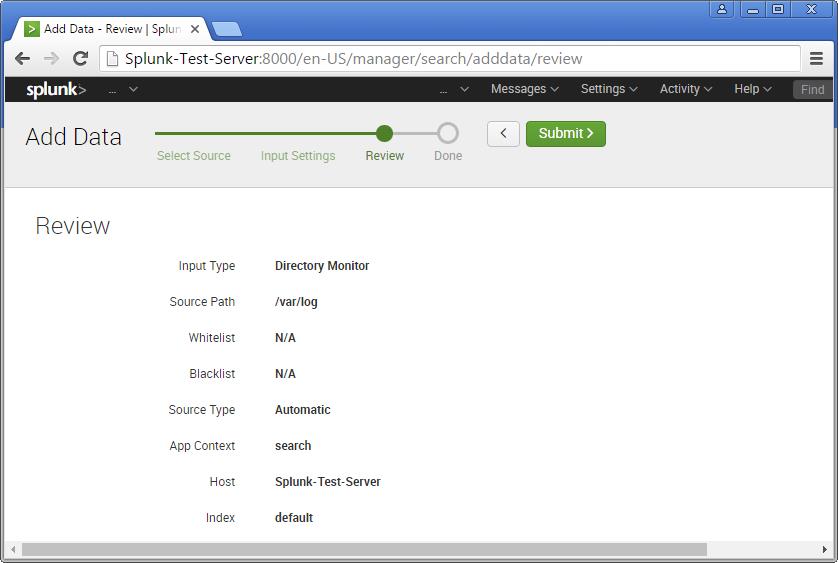
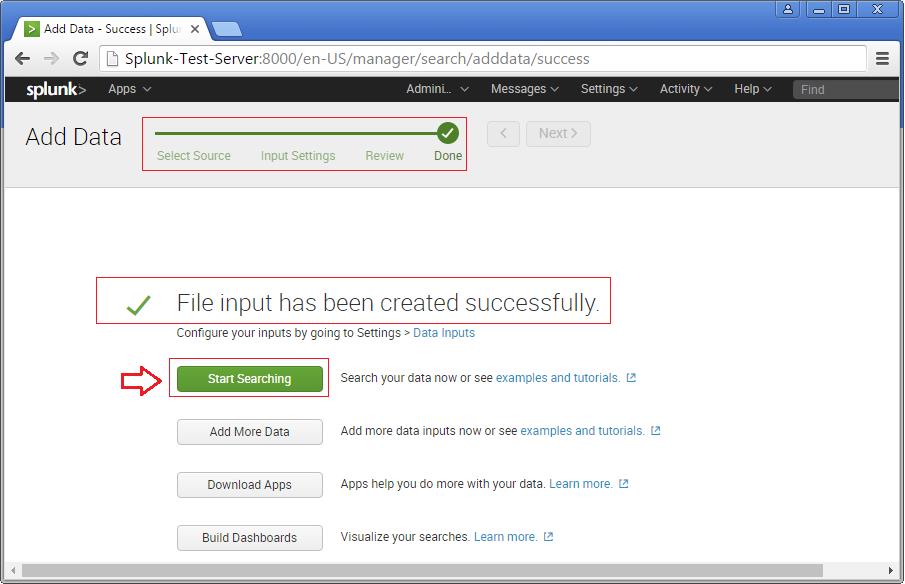
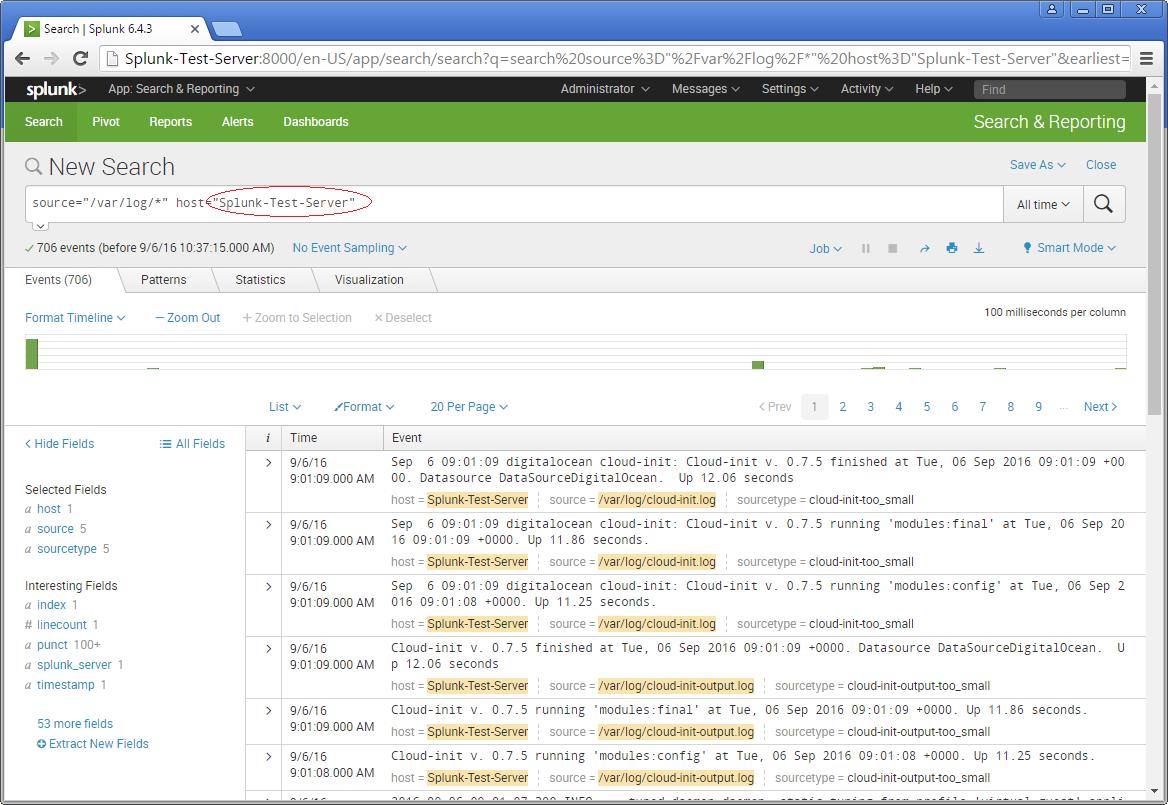
Now you will see the logs on the sample Splunk-Test-Server.
Please consider the above as an example for Splunking. It all depends upon the number of tasks you add to explore your server data. Happy Splunking !!
Install and configure Centreon on CentOS
Nagios is a popular open source computer system and network monitoring software application. It watches hosts and services, alerting users when things go wrong and again when they get better, if required.
Nagios, originally created under the name NetSaint, was written and is currently maintained by Ethan Galstad, along with a group of developers actively maintaining both official and unofficial plugins. N.A.G.I.O.S. is a recursive acronym: “Nagios Ain’t Gonna Insist On Sainthood”, “Sainthood” being a reference to the original name of the software, which was changed in response to a legal challenge by owners of a similar trademark. “Agios” is also Greek for ‘saint’.
Nagios was originally designed to run under GNU/Linux, but also runs well on other Unix variants. It is free software, licensed under the terms of the GNU General Public License version 2 as published by the Free Software Foundation.
Pre-requisites
Hardware Requirement
Any Server grade machine with 1GB RAM and 120GB HDD is needed for a normal installation. This may vary according to the number of hosts and services managed by the Nagios server.
Software Requirement
Linux – As an operating system to install Nagios. Better to go for CentOS, which is a free and 100% binary compatible stable release of RedHat Enterprise Linux.
RPM Forge Repo – RPM Forge repo for the yum has to be installed on this. The installation requires the Linux machines to be connected to the direct internet so that the installation will be started directly from the RPM Forge Repository available in the internet.
Nagios packages – Needed the following packages for the complete installation of Nagios.
– nagios – Core nagios package.
– nagios-plugins – Nagios plugins for configuring services of the hosts.
– nagios-plugins-nrpe – Nagios plugin for linux/unix machines.
– nagios-devel – Nagios development packages.
Centreon Packages – Contains the binaries for centreon.
Installation
Installing RPM Forge Repo
After installing the Operating System (CentOS 5.5) , connect the machine directly to the internet. This is needed for installing the packages, as we will do that using YUM package manager.
Execute the following commands to download and install the RPM Forge repository (Repository where the RPMs of all the packages needed for the installation)
# wget http://packages.sw.be/rpmforge-release/rpmforge-release-0.3.6-1.el5.rf.i386.rpm
(This will download this rpm file from the rpmforge website)
[root@yourmachine ~] rpm –ivh rpmforge-release-0.3.6-1.el5.rf.i386.rpm
(Install RPM Forge repo on your machine)
[root@yourmachine ~] yum check-update
( Analyze the output to check whether it is contacting the RPM Forge directory.
[root@yourmachine ~] yum update
(Will update all installed packages on your machine to the latest stable version.)
Nagios Installation
Once the RPM Forge repo is installed, you can run the following command to install Nagios and all other supporting packages.
[root@yourmachine ~] yum install httpd* nagios nagios-plugins nagios-plugins-nrpe nagios-devel
Once the installation is over, this will create all the binaries, users, groups configuration files and supporting files for Nagios.
The installation of Nagios via YUM will install the nagios as a apache module, so you would be able to see a configuration file nagios.conf inside the directory /etc/httpd/conf.d
Then go to the command line and enter the following command for setting up the password for the Nagios Web Interface.
[root@yourmachine ~] htpasswd -c /etc/nagios/htpasswd.users nagiosadmin
Which will show you the following output
New password: type_your_password
Re-type new password: re-type_your_password
Adding password for user nagiosadmin
Check the cgi.cfg file and make sure that the following directives are enabled (Remove the # from start of each line to enable it)
[root@yourmachine ~] cd /etc/nagios
[root@yourmachine nagios] vim cgi.cfg
# AUTHENTICATION USAGE
use_authentication=1
# SYSTEM/PROCESS INFORMATION ACCESS
authorized_for_system_information=nagiosadmin
# CONFIGURATION INFORMATION ACCESS
authorized_for_configuration_information=nagiosadmin
# SYSTEM/PROCESS COMMAND ACCESS
authorized_for_system_commands=nagiosadmin
# GLOBAL HOST/SERVICE VIEW ACCESS
authorized_for_all_services=nagiosadmin
authorized_for_all_hosts=nagiosadmin
# GLOBAL HOST/SERVICE COMMAND ACCESS
authorized_for_all_service_commands=nagiosadmin
authorized_for_all_host_commands=nagiosadmin
To make the apache more secure, run the apache with a less privileged user than root user. So go to the /etc/httpd/conf/httpd.conf file and search for User and Group directives. Put the group and user as nagios and enable that line (Remove the # from the starting of the line) so that it should look like this
User nagios
Group nagios
To reflect the changes you have made, you need to restart the apache service using the following command.
[root@yourmachine ~] service httpd restart
[root@yourmachine ~] service nagios restart
[root@yourmachine ~] chkconfig –level 2345 httpd on (This will enable the service httpd at the boot time)
[root@yourmachine ~] chkconfig –level 2345 nagios on
Access the Nagios Web Interface using the following URL.
You will be prompted for a username and password. Username will be nagiosadmin and password will be the password you set for the nagiosadmin.
Next step is to setup NDOUtils for storing all the nagios related information to the database (MySQL).
NDOUtils Installation
Install NDOUtils package using YUM with the following command. The configuration of NDOUtils will be done only after installing the Centreon.
[root@yourmachine ~] yum -y install mysql-* ndoutils
[root@yourmachine ~] service ndoutils start
[root@yourmachine ~] chkconfig –level 2345 ndoutils on
[root@yourmachine ~] service mysqld start
[root@yourmachine ~] chkconfig –level 2345 mysqld on
After starting the MySQL Server, you need to secure the same using the following command
[root@yourmachine ~] mysql_secure_installation
This will ask you for the following details.
– Set the root password for the root user.
– Remove anonymous users
– Disallow root logins remotely.
– Remove test database
– Reload privileges table
Put “y” for all the questions asked. You can check the password for root user using the following command.
[root@yourmachine ~]mysql -u root -p [Enter]
Enter your mysql root password, which will take you to the mysql prompt.
Execute the MySQL query “show databases” to list the databases
mysql> show databases;
+——————–+
| Database |
+——————–+
| information_schema |
+——————–+
1 row in set (0.00 sec)
Centreon Prerequisites
Before starting the installation of the Centreon, we need to install all the pre-requisites needed for the Centreon.
Run the following commands to install the pre-requisites.
[root@yourmachine ~] yum -y install php-mysql php-posix libgd2 libpng gd fontconfig-devel libjpeg-devel libpng-devel gd-devel perl-GD openssl-devel perl-DBD-MySQL php php-mysql php-gd php-ldap php-xml php-mbstring perl-DBI perl-Config-IniFiles rrdtool perl-rrdtool perl-Crypt-DES perl-Digest-SHA1 perl-Digest-HMAC net-snmp-utils perl-Socket6 perl-IO-Socket-INET6 net-snmp net-snmp-libs php-snmp dmidecode lm_sensors perl-Net-SNMP net-snmp-perl fping cpp gcc gcc-c++ libstdc++ glib2-devel php-pear sudo make gcc
This will install the following packages needed for Centreon
– GD Modules
– PHP and Dependencies
– DBI Modules
– PERL modules
– RRDTool modules
– SNMP and Supporting Packages
– PEAR modules
Next step is to install PEAR modules needed for Centreon.
For that, run the following commands.
[root@yourmachine ~] pear channel-update pear.php.net
[root@yourmachine ~] pear upgrade-all
[root@yourmachine ~] pear install -o -f –alldeps DB DB_DataObject DB_DataObject_FormBuilder MDB2 Date Numbers_Roman Numbers_Words HTML_Common HTML_QuickForm HTML_QuickForm_advmultiselect HTML_Table Auth_SASL HTTP Image_Canvas Image_Color Image_Graph Image_GraphViz Mail Mail_Mime Net_SMTP Net_Socket Net_Traceroute Net_Ping Validate SOAP
[root@yourmachine ~] pear install Auth_SASL Date DB DB_DataObject DB_DataObject_FormBuilder HTML_Common HTML_QuickForm HTML_QuickForm_advmultiselect HTML_Table Image_Canvas Image_Canvas Image_Graph Image_GraphViz Mail_Mime MDB2 Net_Ping Net_Traceroute Numbers_Roman Numbers_Words PEAR Validate XML_RPC
This will install the following PEAR packages needed for the centreon.
– Auth_SASL
– Date
– DB
– DB_DataObject
– DB_DataObject_FormBuilder
– HTML_Common
– HTML_QuickForm
– HTML_QuickForm_advmultiselect
– HTML_Table
– Image_Canvas
– Image_Color
– Image_Graph
– Image_GraphViz
– Mail_Mime
– MDB2
– Net_Ping
– Net_Traceroute
– Numbers_Roman
– Numbers_Words
– PEAR
– Validate
– XML_RPC
Sometimes, during the installation of these PEAR packages you may encounter the following error.
pear/Some_Pear_Package requires PEAR Installer (version >= 1.9.1), installed version is 1.4.9
In this case, you need to upgrade the PEAR Installer to the latest version by the following command and try installing those failed PEAR packages again.
[root@yourmachine ~] pear upgrade –force PEAR
After this installation, you need to restart httpd, mysqld and nagios services.
[root@yourmachine ~] service httpd restart
[root@yourmachine ~] service mysqld restart
[root@yourmachine ~] service nagios restart
Centreon Installation
Now we are ready for the installation of Centreon.
First, download the tar file from the following URL.
[root@yourmachine ~] wget http://download.centreon.com/centreon/centreon-2.1.9.tar.gz
[root@yourmachine ~] tar -xvf centreon-2.1.9.tar.gz
[root@yourmachine ~] cd centreon-2.1.9
Now the installation script is called. In this script you will be asked a number of questions pertaining to the installation, different dependencies etc… In between you will find some comments on questions which are asked during the script.
[root@yourmachine centreon-2.1.9 ] ./install.sh –i (Output of the script is show below. Questions and answers asked during the installation are highlighted in red.)
First step: checking prerequisites
————————————————————————
Checking all needed binaries
————————————————————————
Now the Centreon license (GPL2) is shown. If you don’t accept it the setup will terminate. This General Public License does not permit incorporating your program into proprietary programs. If your program is a subroutine library, you may consider it more useful to permit linking proprietary applications with the library. If this is what you want to do, use the GNU Library General Public License instead of this License.
Do you accept GPL license ?
[y/n], default to [n]:
> y
Now some questions regarding the modules to be installed: Centreon web interface, centcore (distributing module), Centreon plugins and Centreon Trap-Handler.
————————————————————————
Please choose what do you want to install
————————————————————————
Do you want to install Centreon Web Front
[y/n], default to [n]:
> y
Do you want to install Centreon CentCore
[y/n], default to [n]:
> y
Do you want to install Centreon Nagios Plugins
[y/n], default to [n]:
> y
Do you want to install Centreon Snmp Traps process
[y/n], default to [n]:
> y
Now the installation of the different modules begins, starting with Centreon Web, the centreon interface.
————————————————————————
Start CentWeb Installation
————————————————————————
Where is your Centreon directory?
default to [/usr/local/centreon]
>[Press Enter]
Where should centreon be installed? <Enter> accepts the shown default value. You can specify another path. If the directory doesn’t exist you are asked if it should be created:
Do you want me to create this directory ? [/usr/local/centreon]
[y/n], default to [n]:
> y
Path /usr/local/centreon OK
Here you should specify where to put the centreon journals/logs.
Where is your Centreon log directory
default to [/usr/local/centreon/log/]
>[Press Enter]
Do you want me to create this directory ? [/usr/local/centreon/log/]
[y/n], default to [n]:
> y
Path /usr/local/centreon/log/ OK
Very important : the location of centreon config file.\ ATTENTION: changing the path may result in problems…
Where is your Centreon etc directory
default to [/etc/centreon]
[Press Enter]
Do you want me to create this directory ? [/etc/centreon]
[y/n], default to [n]:
> y
Path /etc/centreon OK
Where is your Centreon generation_files directory?
default to [/usr/local/centreon/]
> [Press Enter]
Path /usr/local/centreon/ OK
Where is your Centreon variable library directory?
default to [/var/lib/centreon]
> [Press Enter]
Do you want me to create this directory ? [/var/lib/centreon]
[y/n], default to [n]:
> y
Path /var/lib/centreon
Where is your CentPlugins Traps binary
default to [/usr/local/centreon/bin]
>[Press Enter]
Do you want me to create this directory ? [/usr/local/centreon/bin]
[y/n], default to [n]:
> y
Path /usr/local/centreon/bin OK
Before the next step, run the following commands in another shell.
[root@localhost perl5]# yum install php-rrdtool
[root@yourmachine ~] updatedb
[root@yourmachine ~] locate RRDs.pm (This will show you the correct path to RRDs.pm file)
This will output the location of RRDs.pm file. For eg. /usr/lib/perl5/vendor_perl/5.8.8/i386-linux-thread-multi/RRDs.pm
Create a sybmbolic link to /usr/lib/perl5/RRDs.pm with the following command.
[root@yourmachine ~] ln -s /usr/lib/perl5/vendor_perl/5.8.8/i386-linux-thread-multi/RRDs.pm /usr/lib/perl5/RRDs.pm
Go back to the shell where you are running the Centreon Installation script.
Where is the RRD perl module installed [RRDs.pm]
default to [/usr/lib/perl5/RRDs.pm]
>[Press Enter]
Path /usr/lib/perl5 OK
/usr/bin/rrdtool OK
/usr/bin/mail OK
Where is PEAR [PEAR.php]
default to [/usr/share/php/PEAR.php]
>/usr/share/pear/PEAR.php (Enter this path to PEAR.php file)
Path /usr/share/pear OK
Where is installed Nagios ?
default to [/usr/local/nagios]
>/usr/share/nagios
Path/usr/share/nagios OK
Where is your nagios config directory
default to [/usr/local/nagios/etc]
>/etc/nagios
Path /etc OK
Where is your Nagios var directory ?
default to [/usr/local/nagios/var]
>/var/log/nagios
Path /var/log OK
Where is your Nagios plugins (libexec) directory ?
default to [/usr/local/nagios/libexec]
>/usr/lib/nagios/plugins
Path /usr/lib/nagios/plugins OK
/usr/local/nagios/bin//nagios OK
Where is your Nagios image directory ?
default to [/usr/local/nagios/share/images/logos]
>/usr/share/nagios/images/logos
Path /usr/share/nagios/images/logos OK
/usr/bin/nagiostats OK
p1_file : /usr/bin/p1.pl OK
/usr/bin/php OK
/usr/bin/perl OK
Finding Apache group : nagios
Finding Apache user : nagios
Finding Nagios user : nagios
Finding Nagios group : nagios
Where is your NDO ndomod binary ?
default to [/usr/sbin/ndomod.o]
> /usr/libexec/ndomod-3x.o
/usr/libexec/ndomod-3x.o OK
————————————————————————
Configure Sudo
————————————————————————
Where is sudo configuration file default to [/etc/sudoers]
>[Press Enter]
/etc/sudoers OK
Nagios init script OK
Your sudo is not configured
Do you want me to configure your sudo? (WARNING)
[y/n], default to [n]:
> y
Configuring Sudo OK
Setting up the centreon Aliases etc
————————————————————————
Configure Apache server
————————————————————————
Do you want to add Centreon Apache sub configuration file ?
[y/n], default to [n]:
> y
Create ‘/etc/apache2/conf.d/centreon.conf’ OK
Configuring Apache OK
Do you want to reload your Apache ?
[y/n], default to [n]:
> y
Finding Apache Centreon configuration file
‘/etc/httpd/conf.d/centreon.conf’ : OK
Do you want to update Centreon Apache sub configuration file ?
[y/n], default to [n]:
> n
Create ‘/etc/httpd/conf.d/centreon.conf’ OK
Configuring Apache OK
Do you want to reload your Apache ?
[y/n], default to [n]:
> y
Reloading Apache service OK
Preparing Centreon temporary files
Change right on /usr/local/centreon/log OK
Change right on /etc/centreon OK
Change right on /usr/share/nagios/images/logos OK
Install nagios documentation OK
Change macros for insertBaseConf.sql OK
Change macros for php files
Change macros for php files OK
Change right on /etc/nagios OK
Copy CentWeb in system directory
Install CentWeb (web front of centreon) OK
Install libraries OK
Copying libinstall OK
Change macros for centreon.cron OK
Install Centreon cron.d file OK
Change macros for archiveDayLog OK
Change macros for centAcl.php OK
Install cron directory OK
PEAR libraries: a set of libraries is still missing but they will be installed or updated as nessecary (if you have a connection to the internet). Otherwise you have to install them manually
————————————————————————
Pear Modules
————————————————————————
Check PEAR modules
PEAR 1.4.9 1.6.1 OK
After displaying the current versions you may get the request to update some libraries.
Do you want me to install/upgrade your PEAR modules
[y/n], default to [y]: [Press Enter]
Upgrading PEAR modules
Installing PEAR modules
All PEAR modules OK
The script will continue.
————————————————————————
Centreon Post Install
————————————————————————
Create /usr/local/centreon/www/install/install.conf.php OK
Create /etc/centreon/instCentWeb.conf OK
Now CentStorage will be installed, also called ODS (Oreon Data Storage). At the moment this module permits archiving on the basis of RRD and MySQL. Additionally CentStorage enables you to create graphs for monitoring the different metrics.
————————————————————————
Start CentStorage Installation
————————————————————————
Where is your Centreon Run Dir directory?
default to [/var/run/centreon]
>[Press Enter]
Do you want me to create this directory ? [/var/run/centreon]
[y/n], default to [n]:
> y
Path /var/run/centreon OK
Where is your CentStorage binary directory
default to [/usr/local/centreon/bin]
>[Press Enter]
Path /usr/local/centreon/bin OK
Where is your CentStorage RRD directory
default to [/var/lib/centreon]
>[Press Enter]
Path /var/lib/centreon OK
Attention: the centreon lib directory should be placed on a continuously available partition to avoid problems. The directory contains the RRDTools. Consider to place the MySQl data on large partition. The logs and performance data also need a lot of space.
Path /var/lib/centreon OK
Finding Nagios group : nagios
Finding Nagios user : nagios
Preparing Centreon temporary files
/tmp/centreon-setup exists, it will be moved…
install www/install/createTablesCentstorage.sql OK
Creating Centreon Directory ‘/var/lib/centreon/status’ OK
Creating Centreon Directory ‘/var/lib/centreon/metrics’ OK
Change macros for centstorage binary OK
Install CentStorage binary OK
Install library for centstorage OK
Change right : /var/run/centreon OK
Change macros for centstorage init script OK
Do you want me to install CentStorage init script ?
[y/n], default to [n]:
> y
CentStorage init script installed OK
Do you want me to install CentStorage run level ?
[y/n], default to [n]:
> y
Adding system startup for /etc/init.d/centstorage …
/etc/rc0.d/K30centstorage -> ../init.d/centstorage
/etc/rc1.d/K30centstorage -> ../init.d/centstorage
/etc/rc6.d/K30centstorage -> ../init.d/centstorage
/etc/rc2.d/S40centstorage -> ../init.d/centstorage
/etc/rc3.d/S40centstorage -> ../init.d/centstorage
/etc/rc4.d/S40centstorage -> ../init.d/centstorage
/etc/rc5.d/S40centstorage -> ../init.d/centstorage
Change macros for logAnalyser OK
Install logAnalyser OK
Change macros for nagiosPerfTrace OK
Install nagiosPerfTrace OK
Change macros for purgeLogs OK
Install purgeLogs OK
Change macros for purgeCentstorage OK
Install purgeCentstorage OK
Change macros for centreonPurge.sh OK
Install centreonPurge.sh OK
Change macros for centstorage.cron OK
Install CentStorage cron OK
Create /etc/centreon/instCentStorage.conf OK
CentStorage is installed now.
————————————————————————
Start CentCore Installation
————————————————————————
Where is your CentCore binary directory
default to [/usr/local/centreon/bin]
>[Press Enter]
Path /usr/local/centreon/bin OK
/usr/bin/ssh OK
/usr/bin/scp OK
Finding Nagios group : nagios
Finding Nagios user : nagios
Preparing Centreon temporary files
/tmp/centreon-setup exists, it will be moved…
Change CentCore Macro OK
Copy CentCore in binary directory OK
Change right : /var/run/centreon OK
Change right : /var/lib/centreon OK
Replace CentCore init script Macro OK
Do you want me to install CentCore init script ?
[y/n], default to [n]:
> y
CentCore init script installed OK
Do you want me to install CentCore run level ?
[y/n], default to [n]:
> y
Adding system startup for /etc/init.d/centcore …
/etc/rc0.d/K30centcore -> ../init.d/centcore
/etc/rc1.d/K30centcore -> ../init.d/centcore
/etc/rc6.d/K30centcore -> ../init.d/centcore
/etc/rc2.d/S40centcore -> ../init.d/centcore
/etc/rc3.d/S40centcore -> ../init.d/centcore
/etc/rc4.d/S40centcore -> ../init.d/centcore
/etc/rc5.d/S40centcore -> ../init.d/centcore
Create /etc/centreon/instCentCore.conf OK
Please answer some questions regarding the installation of the centreon plugins.
————————————————————————
Start CentPlugins Installation
————————————————————————
Where is your CentPlugins lib directory
default to [/var/lib/centreon/centplugins]
>[Press Enter]
Do you want me to create this directory ? [/var/lib/centreon/centplugins]
[y/n], default to [n]:
> y
Path /var/lib/centreon/centplugins OK
Finding Nagios user : nagios
Finding Nagios group : nagios
Preparing Centreon temporary files
/tmp/centreon-setup exists, it will be moved…
Change macros for CentPlugins OK
Installing the plugins OK
Change right on centreon.conf OK
CentPlugins is installed
————————————————————————
Start CentPlugins Traps Installation
————————————————————————
Where is your SNMP configuration directory
default to [/etc/snmp]
>[Press Enter]
/etc/snmp OK
Where is your SNMPTT binaries directory
default to [/usr/local/centreon/bin/]
>[Press Enter]
/usr/local/centreon/bin/ OK
Finding Nagios group : nagios
Finding Apache user : nagios
Preparing Centreon temporary files
/tmp/centreon-setup exists, it will be moved…
Change macros for CentPluginsTraps OK
Installing the plugins Trap binaries OK
Backup all your snmp files OK
Change macros for snmptrapd.conf OK
Change macros for snmptt.ini OK
Install : snmptrapd.conf OK
Install : snmp.conf OK
Install : snmptt.ini OK
Install : snmptt OK
Install : snmpttconvertmib OK
Create /etc/centreon/instCentPlugins.conf OK
Reloading Apache configuration on CentOS:
[root@yourmachine ~]service httpd reload
Now the Centreon is installed.
Now go to the URL http://yourserver-ip/centreon
Next step is to start the Web Installation during which it will initialize the database and set the administrator login information.
This URL will redirect you in web setup frontend.