
Core OS & Docker Container Virtualization
CoreOS is an open source lightweight operating system based on the Linux kernel and designed for providing infrastructure to clustered deployments, while focusing on automation, ease of applications deployment, security, reliability and scalability.

CoreOS is a powerful Linux distribution built to make large, scalable deployments on varied infrastructure simple to manage. Based on a build of Chrome OS, CoreOS maintains a lightweight host system and uses Docker containers for all applications. This system provides process isolation and also allows applications to be moved throughout a cluster easily.
To manage these clusters, CoreOS uses a globally distributed key-value store called etcd to pass configuration data between nodes. This component is also the platform for service discovery, allowing applications to be dynamically configured based on the information available through the shared resource. Offering Linux as a service, CoreOS has become the preferred distro for Docker and may go a long way toward making data centers more cloudlike.
In order to schedule and manage applications across the entirety of the cluster, a tool called fleet is used. Fleet serves as a cluster-wide init system that can be used to manage processes across the entire cluster. This makes it easy to configure highly available applications and manage the cluster from a single point. It does this by tying into each individual node’s systemd init system.
CoreOS is a fork of Chrome OS, by the means of using its software development kit (SDK) freely available through Chromium OS as a base while adding new functionality and customizing it to support hardware used in servers.
As of July 2014, CoreOS is actively developed, primarily by Alex Polvi, Brandon Philips and Michael Marineau, with its major features (other than etcd and fleet) available as a stable release.
Docker is an open platform for developers and sysadmins to build, ship, and run distributed applications. Consisting of Docker Engine, a portable, lightweight runtime and packaging tool, and Docker Hub, a cloud service for sharing applications and automating workflows, Docker enables apps to be quickly assembled from components and eliminates the friction between development, QA, and production environments. As a result, IT can ship faster and run the same app, unchanged, on laptops, data center VMs, and any cloud. Docker makes virtualization light, easy, and portable.

Docker is an open source framework that provides a lighter-weight type of virtualization, using Linux containers rather than virtual machines. Built on traditional Linux distributions such as Red Hat Enterprise Linux and Ubuntu, Docker lets you package applications and services as images that run in their own portable containers and can move between physical, virtual, and cloud foundations without requiring any modification. If you build a Docker image on an Ubuntu laptop or physical server, you can run it on any compatible Linux, anywhere.
In this way, Docker allows for a very high degree of application portability and agility, and it lends itself to highly scalable applications. However, the nature of Docker also leans toward running a single service or application per container, rather than a collection of processes, such as a LAMP stack. That is possible, but we will detail here the most common use, which is for a single process or service.
CoreOS allows you to set up your infrastructure in Docker containers, which may mean that you need to rethink the way your applications are built out. Basically, you would want to set up each “service”, like an app server or a database server, in its own Docker container. These Docker containers can be forwarded traffic from their host system if desired.
Docker has its own recommendations for how to handle things like databases inside containers and connecting applications to storage. What CoreOS allows you to do is manage your Docker-ized infrastructure in a reliable, scalable manner. So once you have containers configured to communicate with each other, you can tell CoreOS to deploy a certain number of them in a specific configuration across your cluster using fleet. The cluster can monitor downtime and automatically move over services when there are machine failures. If you have configured your containers to monitor etcd values and update their own configurations when a change is detected, you can get automatic service discovery.
Basically, CoreOS is an incredibly flexible platform that can be used to build up very scalable solutions. You may have to rearchitecture some of your application designs, but the benefits are usually worth the effort.
fleet is a cluster manager that controls systemd at the cluster level. To run your services in the cluster, you must submit regular systemd units combined with a few fleet-specific properties.
Features >>
> Deploy docker containers on arbitrary hosts in a cluster
> Distribute services across a cluster using machine-level anti-affinity
> Maintain N instances of a service, re-scheduling on machine failure
> Discover machines running in the cluster
> Automatically SSH into the machine running a job
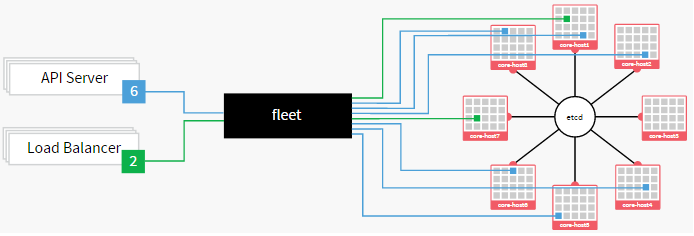
With fleet, you can treat your CoreOS cluster as if it shared a single init system. It encourages users to write applications as small, ephemeral units that can easily migrate around a cluster of self-updating CoreOS machines.
By utilizing fleet, a devops team can focus on running containers that make up a service, without having to worry about the individual machines each container is running on. If your application consists of 5 containers, fleet will guarantee that they stay running somewhere on the cluster. If a machine fails or needs to be updated, containers running on that machine will be moved to other qualified machines in the cluster.
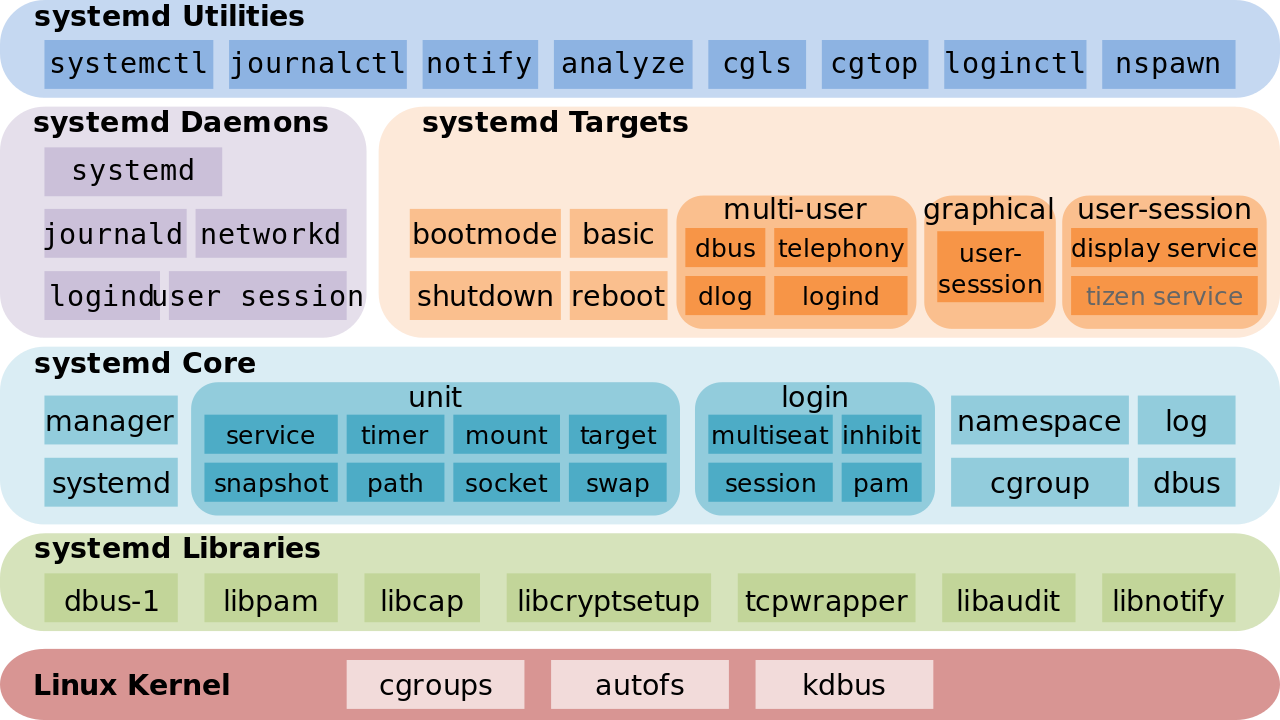
What is systemd ?
systemd is a suite of system management daemons, libraries, and utilities designed for Linux and programmed exclusively for the Linux API.
Systemd authors characterize the software suite as a “basic building block” for an Operating System.
The daemon systemd is the first process that is executed in user space during the Linux startup process.
systemd serves as the root of the user space’s process tree.
The name systemd adheres to the Unix convention of making daemons easier to distinguish by having the letter d as the last letter of the filename.
OpenSource Software
Centralized Identity Management Solutions
OpenSource Directory Servers
* OpenLDAP – http://openldap.org
* 389-DS – http://directory.fedoraproject.org
* Apache-DS – http://directory.apache.org
* OpenDS – http://opends.java.net
Single Sign On
* MIT Kerberos – http://web.mit.edu/kerberos/
Domain Name Service
* ISC Bind – https://www.isc.org/software/bind
* PowerDNS – http://www.powerdns.com
DHCP Server
* ISC DHCP – http://www.isc.org/software/dhcp
Version Control System
* Git – http://git-scm.org
* Subversion – http://subversion.apache.org
* Mercurial – http://mercurial.selenic.com
* Bazaar – http://bazaar.canonical.com
Backup Software
* Amanda – http://www.amanda.org
* Bacula – http://www.bacula.org
Central Repository Server
* DebMirror for Debian – https://help.ubuntu.com/community/Debmirror
* Rsync – Usually used for mirroring – http://rsync.samba.org/
Antivirus
* ClamAV – http://clamav.net
Network Imaging Solution
* Clonezilla – http://clonezilla.org
* fog – http://www.fogproject.org
* G4L – http://g4l.sourceforge.net
Software and Hardware Inventory
* OpenAudit – http://www.open-audit.org
* OCSInventory – http://www.ocsinventory-ng.org
* FusionInventory – http://www.fusioninventory.org
* GLPI – http://www.glpi-project.org
* Tracmor – http://www.tracmor.com
Content Management System
* Alfresco – http://www.alfresco.com
* Joomla – http://www.joomla.org
* Drupal – http://www.drupal.org
* Typo3 – http://typo3.org
* Concrete5 – http://www.concrete5.org
* Plone – http://plone.org
* OpenCMS – http://www.opencms.org
* Locomotive – http://locomotivecms.com
Network Monitoring and Dashboard
* Nagios – http://nagios.org
* Centreon – http://www.centreon.com
* Icinga – http://www.icinga.org
* Ninja – http://www.op5.org/community/plugin-inventory/op5-projects/ninja
* OpenNMS – http://opennms.org
* Zenoss – http://community.zenoss.org/index.jspa
* Zabbix – http://www.zabbix.org
Mail Servers
* Zimbra ZCS – http://www.zimbra.com/downloads/os-downloads.html
* iRedOS – http://www.iredmail.org/
* DeepRootLinux – http://www.deeproot.in
Reverse Proxy Servers and Web Servers
* Apache Httpd – http://httpd.apache.org
* Nginx – http://nginx.org/en
* Lighttpd – http://www.lighttpd.net
* Varnish (proxy only) – http://www.varnish-cache.org
Web Proxy Server
* Squid Proxy Server – http://www.squid-cache.org
Network Access Control
* Packetfence – http://packetfence.org
Management Tools
* Ovirt – http://ovirt.org
* Karesansui – http://karesansui-project.info/
* Archiphel – http://archipelproject.org/
* Ganeti – http://code.google.com/p/ganeti/
Cloud Software
Iaas
* Openstack – http://www.openstack.org
* Cloudstack – http://www.cloudstack.org
* Eucalyptus – http://www.eucalyptus.org
PaaS
* OpenShift Origin – https://openshift.redhat.com/community/open-source
* WSO2 Stratos – http://wso2.com/cloud/stratos
* CloudFoundry – http://www.cloudfoundry.org
Virtual Private Network
* OpenVPN – http://openvpn.net
VOIP
* Asterisk – http://www.asterisk.org
* FreeSwitch – http://www.freeswitch.org
Chat Server
* Ejabberd – http://ejabberd.org
* Openfire – www.igniterealtime.org/projects/openfire/
Team Collaboration Tools
* OpenAtrium – http://www.openatrium.org
* Redmine – http://redmine.org
* Teambox – http://teambox.com
Security Tools
* OpenVAS – http://www.openvas.org
* Snort – http://www.snort.org
Configuration Management Tools
* Puppet – http://puppetlabs.com
* Chef – http://opscode.com/chef
* Cfengine – http://cfengine.com
* Salt – http://saltstack.org
DHCP Server Configuration in CentOS
How to install DHCP Server
[root@dhcpserver ~]# yum install dhcp
DHCP Server Configuration
1. Install the Package ‘dhcp’
#yum install dhcp
2. To check whether the package is installed use:
* rpm -qa | grep dhcp
3. To list the files installed from the package ‘dhcp’
* rpm -ql dhcp
4. Master Configuration files are
* /etc/dhcp/dhcpd.conf (ipv4)
* /etc/dhcp/dhcpd6.conf (ipv6)
5. The Master Configuration file will be empty and will point you to a sample file in /usr/share/doc/dhcp-<ver>/dhcpd.conf.sample
6. Copy the sample configuration (/usr/share/doc/dhcp-<ver>/dhcpd.conf.sample) to /etc/dhcp/dhcpd.conf
7. Basic Set of Parameters :
- domain name
- domain name servers
- default-lease-time
- max lease time
- subnet
Install and configure Centreon on CentOS
Nagios is a popular open source computer system and network monitoring software application. It watches hosts and services, alerting users when things go wrong and again when they get better, if required.
Nagios, originally created under the name NetSaint, was written and is currently maintained by Ethan Galstad, along with a group of developers actively maintaining both official and unofficial plugins. N.A.G.I.O.S. is a recursive acronym: “Nagios Ain’t Gonna Insist On Sainthood”, “Sainthood” being a reference to the original name of the software, which was changed in response to a legal challenge by owners of a similar trademark. “Agios” is also Greek for ‘saint’.
Nagios was originally designed to run under GNU/Linux, but also runs well on other Unix variants. It is free software, licensed under the terms of the GNU General Public License version 2 as published by the Free Software Foundation.
Pre-requisites
Hardware Requirement
Any Server grade machine with 1GB RAM and 120GB HDD is needed for a normal installation. This may vary according to the number of hosts and services managed by the Nagios server.
Software Requirement
Linux – As an operating system to install Nagios. Better to go for CentOS, which is a free and 100% binary compatible stable release of RedHat Enterprise Linux.
RPM Forge Repo – RPM Forge repo for the yum has to be installed on this. The installation requires the Linux machines to be connected to the direct internet so that the installation will be started directly from the RPM Forge Repository available in the internet.
Nagios packages – Needed the following packages for the complete installation of Nagios.
– nagios – Core nagios package.
– nagios-plugins – Nagios plugins for configuring services of the hosts.
– nagios-plugins-nrpe – Nagios plugin for linux/unix machines.
– nagios-devel – Nagios development packages.
Centreon Packages – Contains the binaries for centreon.
Installation
Installing RPM Forge Repo
After installing the Operating System (CentOS 5.5) , connect the machine directly to the internet. This is needed for installing the packages, as we will do that using YUM package manager.
Execute the following commands to download and install the RPM Forge repository (Repository where the RPMs of all the packages needed for the installation)
# wget http://packages.sw.be/rpmforge-release/rpmforge-release-0.3.6-1.el5.rf.i386.rpm
(This will download this rpm file from the rpmforge website)
[root@yourmachine ~] rpm –ivh rpmforge-release-0.3.6-1.el5.rf.i386.rpm
(Install RPM Forge repo on your machine)
[root@yourmachine ~] yum check-update
( Analyze the output to check whether it is contacting the RPM Forge directory.
[root@yourmachine ~] yum update
(Will update all installed packages on your machine to the latest stable version.)
Nagios Installation
Once the RPM Forge repo is installed, you can run the following command to install Nagios and all other supporting packages.
[root@yourmachine ~] yum install httpd* nagios nagios-plugins nagios-plugins-nrpe nagios-devel
Once the installation is over, this will create all the binaries, users, groups configuration files and supporting files for Nagios.
The installation of Nagios via YUM will install the nagios as a apache module, so you would be able to see a configuration file nagios.conf inside the directory /etc/httpd/conf.d
Then go to the command line and enter the following command for setting up the password for the Nagios Web Interface.
[root@yourmachine ~] htpasswd -c /etc/nagios/htpasswd.users nagiosadmin
Which will show you the following output
New password: type_your_password
Re-type new password: re-type_your_password
Adding password for user nagiosadmin
Check the cgi.cfg file and make sure that the following directives are enabled (Remove the # from start of each line to enable it)
[root@yourmachine ~] cd /etc/nagios
[root@yourmachine nagios] vim cgi.cfg
# AUTHENTICATION USAGE
use_authentication=1
# SYSTEM/PROCESS INFORMATION ACCESS
authorized_for_system_information=nagiosadmin
# CONFIGURATION INFORMATION ACCESS
authorized_for_configuration_information=nagiosadmin
# SYSTEM/PROCESS COMMAND ACCESS
authorized_for_system_commands=nagiosadmin
# GLOBAL HOST/SERVICE VIEW ACCESS
authorized_for_all_services=nagiosadmin
authorized_for_all_hosts=nagiosadmin
# GLOBAL HOST/SERVICE COMMAND ACCESS
authorized_for_all_service_commands=nagiosadmin
authorized_for_all_host_commands=nagiosadmin
To make the apache more secure, run the apache with a less privileged user than root user. So go to the /etc/httpd/conf/httpd.conf file and search for User and Group directives. Put the group and user as nagios and enable that line (Remove the # from the starting of the line) so that it should look like this
User nagios
Group nagios
To reflect the changes you have made, you need to restart the apache service using the following command.
[root@yourmachine ~] service httpd restart
[root@yourmachine ~] service nagios restart
[root@yourmachine ~] chkconfig –level 2345 httpd on (This will enable the service httpd at the boot time)
[root@yourmachine ~] chkconfig –level 2345 nagios on
Access the Nagios Web Interface using the following URL.
You will be prompted for a username and password. Username will be nagiosadmin and password will be the password you set for the nagiosadmin.
Next step is to setup NDOUtils for storing all the nagios related information to the database (MySQL).
NDOUtils Installation
Install NDOUtils package using YUM with the following command. The configuration of NDOUtils will be done only after installing the Centreon.
[root@yourmachine ~] yum -y install mysql-* ndoutils
[root@yourmachine ~] service ndoutils start
[root@yourmachine ~] chkconfig –level 2345 ndoutils on
[root@yourmachine ~] service mysqld start
[root@yourmachine ~] chkconfig –level 2345 mysqld on
After starting the MySQL Server, you need to secure the same using the following command
[root@yourmachine ~] mysql_secure_installation
This will ask you for the following details.
– Set the root password for the root user.
– Remove anonymous users
– Disallow root logins remotely.
– Remove test database
– Reload privileges table
Put “y” for all the questions asked. You can check the password for root user using the following command.
[root@yourmachine ~]mysql -u root -p [Enter]
Enter your mysql root password, which will take you to the mysql prompt.
Execute the MySQL query “show databases” to list the databases
mysql> show databases;
+——————–+
| Database |
+——————–+
| information_schema |
+——————–+
1 row in set (0.00 sec)
Centreon Prerequisites
Before starting the installation of the Centreon, we need to install all the pre-requisites needed for the Centreon.
Run the following commands to install the pre-requisites.
[root@yourmachine ~] yum -y install php-mysql php-posix libgd2 libpng gd fontconfig-devel libjpeg-devel libpng-devel gd-devel perl-GD openssl-devel perl-DBD-MySQL php php-mysql php-gd php-ldap php-xml php-mbstring perl-DBI perl-Config-IniFiles rrdtool perl-rrdtool perl-Crypt-DES perl-Digest-SHA1 perl-Digest-HMAC net-snmp-utils perl-Socket6 perl-IO-Socket-INET6 net-snmp net-snmp-libs php-snmp dmidecode lm_sensors perl-Net-SNMP net-snmp-perl fping cpp gcc gcc-c++ libstdc++ glib2-devel php-pear sudo make gcc
This will install the following packages needed for Centreon
– GD Modules
– PHP and Dependencies
– DBI Modules
– PERL modules
– RRDTool modules
– SNMP and Supporting Packages
– PEAR modules
Next step is to install PEAR modules needed for Centreon.
For that, run the following commands.
[root@yourmachine ~] pear channel-update pear.php.net
[root@yourmachine ~] pear upgrade-all
[root@yourmachine ~] pear install -o -f –alldeps DB DB_DataObject DB_DataObject_FormBuilder MDB2 Date Numbers_Roman Numbers_Words HTML_Common HTML_QuickForm HTML_QuickForm_advmultiselect HTML_Table Auth_SASL HTTP Image_Canvas Image_Color Image_Graph Image_GraphViz Mail Mail_Mime Net_SMTP Net_Socket Net_Traceroute Net_Ping Validate SOAP
[root@yourmachine ~] pear install Auth_SASL Date DB DB_DataObject DB_DataObject_FormBuilder HTML_Common HTML_QuickForm HTML_QuickForm_advmultiselect HTML_Table Image_Canvas Image_Canvas Image_Graph Image_GraphViz Mail_Mime MDB2 Net_Ping Net_Traceroute Numbers_Roman Numbers_Words PEAR Validate XML_RPC
This will install the following PEAR packages needed for the centreon.
– Auth_SASL
– Date
– DB
– DB_DataObject
– DB_DataObject_FormBuilder
– HTML_Common
– HTML_QuickForm
– HTML_QuickForm_advmultiselect
– HTML_Table
– Image_Canvas
– Image_Color
– Image_Graph
– Image_GraphViz
– Mail_Mime
– MDB2
– Net_Ping
– Net_Traceroute
– Numbers_Roman
– Numbers_Words
– PEAR
– Validate
– XML_RPC
Sometimes, during the installation of these PEAR packages you may encounter the following error.
pear/Some_Pear_Package requires PEAR Installer (version >= 1.9.1), installed version is 1.4.9
In this case, you need to upgrade the PEAR Installer to the latest version by the following command and try installing those failed PEAR packages again.
[root@yourmachine ~] pear upgrade –force PEAR
After this installation, you need to restart httpd, mysqld and nagios services.
[root@yourmachine ~] service httpd restart
[root@yourmachine ~] service mysqld restart
[root@yourmachine ~] service nagios restart
Centreon Installation
Now we are ready for the installation of Centreon.
First, download the tar file from the following URL.
[root@yourmachine ~] wget http://download.centreon.com/centreon/centreon-2.1.9.tar.gz
[root@yourmachine ~] tar -xvf centreon-2.1.9.tar.gz
[root@yourmachine ~] cd centreon-2.1.9
Now the installation script is called. In this script you will be asked a number of questions pertaining to the installation, different dependencies etc… In between you will find some comments on questions which are asked during the script.
[root@yourmachine centreon-2.1.9 ] ./install.sh –i (Output of the script is show below. Questions and answers asked during the installation are highlighted in red.)
First step: checking prerequisites
————————————————————————
Checking all needed binaries
————————————————————————
Now the Centreon license (GPL2) is shown. If you don’t accept it the setup will terminate. This General Public License does not permit incorporating your program into proprietary programs. If your program is a subroutine library, you may consider it more useful to permit linking proprietary applications with the library. If this is what you want to do, use the GNU Library General Public License instead of this License.
Do you accept GPL license ?
[y/n], default to [n]:
> y
Now some questions regarding the modules to be installed: Centreon web interface, centcore (distributing module), Centreon plugins and Centreon Trap-Handler.
————————————————————————
Please choose what do you want to install
————————————————————————
Do you want to install Centreon Web Front
[y/n], default to [n]:
> y
Do you want to install Centreon CentCore
[y/n], default to [n]:
> y
Do you want to install Centreon Nagios Plugins
[y/n], default to [n]:
> y
Do you want to install Centreon Snmp Traps process
[y/n], default to [n]:
> y
Now the installation of the different modules begins, starting with Centreon Web, the centreon interface.
————————————————————————
Start CentWeb Installation
————————————————————————
Where is your Centreon directory?
default to [/usr/local/centreon]
>[Press Enter]
Where should centreon be installed? <Enter> accepts the shown default value. You can specify another path. If the directory doesn’t exist you are asked if it should be created:
Do you want me to create this directory ? [/usr/local/centreon]
[y/n], default to [n]:
> y
Path /usr/local/centreon OK
Here you should specify where to put the centreon journals/logs.
Where is your Centreon log directory
default to [/usr/local/centreon/log/]
>[Press Enter]
Do you want me to create this directory ? [/usr/local/centreon/log/]
[y/n], default to [n]:
> y
Path /usr/local/centreon/log/ OK
Very important : the location of centreon config file.\ ATTENTION: changing the path may result in problems…
Where is your Centreon etc directory
default to [/etc/centreon]
[Press Enter]
Do you want me to create this directory ? [/etc/centreon]
[y/n], default to [n]:
> y
Path /etc/centreon OK
Where is your Centreon generation_files directory?
default to [/usr/local/centreon/]
> [Press Enter]
Path /usr/local/centreon/ OK
Where is your Centreon variable library directory?
default to [/var/lib/centreon]
> [Press Enter]
Do you want me to create this directory ? [/var/lib/centreon]
[y/n], default to [n]:
> y
Path /var/lib/centreon
Where is your CentPlugins Traps binary
default to [/usr/local/centreon/bin]
>[Press Enter]
Do you want me to create this directory ? [/usr/local/centreon/bin]
[y/n], default to [n]:
> y
Path /usr/local/centreon/bin OK
Before the next step, run the following commands in another shell.
[root@localhost perl5]# yum install php-rrdtool
[root@yourmachine ~] updatedb
[root@yourmachine ~] locate RRDs.pm (This will show you the correct path to RRDs.pm file)
This will output the location of RRDs.pm file. For eg. /usr/lib/perl5/vendor_perl/5.8.8/i386-linux-thread-multi/RRDs.pm
Create a sybmbolic link to /usr/lib/perl5/RRDs.pm with the following command.
[root@yourmachine ~] ln -s /usr/lib/perl5/vendor_perl/5.8.8/i386-linux-thread-multi/RRDs.pm /usr/lib/perl5/RRDs.pm
Go back to the shell where you are running the Centreon Installation script.
Where is the RRD perl module installed [RRDs.pm]
default to [/usr/lib/perl5/RRDs.pm]
>[Press Enter]
Path /usr/lib/perl5 OK
/usr/bin/rrdtool OK
/usr/bin/mail OK
Where is PEAR [PEAR.php]
default to [/usr/share/php/PEAR.php]
>/usr/share/pear/PEAR.php (Enter this path to PEAR.php file)
Path /usr/share/pear OK
Where is installed Nagios ?
default to [/usr/local/nagios]
>/usr/share/nagios
Path/usr/share/nagios OK
Where is your nagios config directory
default to [/usr/local/nagios/etc]
>/etc/nagios
Path /etc OK
Where is your Nagios var directory ?
default to [/usr/local/nagios/var]
>/var/log/nagios
Path /var/log OK
Where is your Nagios plugins (libexec) directory ?
default to [/usr/local/nagios/libexec]
>/usr/lib/nagios/plugins
Path /usr/lib/nagios/plugins OK
/usr/local/nagios/bin//nagios OK
Where is your Nagios image directory ?
default to [/usr/local/nagios/share/images/logos]
>/usr/share/nagios/images/logos
Path /usr/share/nagios/images/logos OK
/usr/bin/nagiostats OK
p1_file : /usr/bin/p1.pl OK
/usr/bin/php OK
/usr/bin/perl OK
Finding Apache group : nagios
Finding Apache user : nagios
Finding Nagios user : nagios
Finding Nagios group : nagios
Where is your NDO ndomod binary ?
default to [/usr/sbin/ndomod.o]
> /usr/libexec/ndomod-3x.o
/usr/libexec/ndomod-3x.o OK
————————————————————————
Configure Sudo
————————————————————————
Where is sudo configuration file default to [/etc/sudoers]
>[Press Enter]
/etc/sudoers OK
Nagios init script OK
Your sudo is not configured
Do you want me to configure your sudo? (WARNING)
[y/n], default to [n]:
> y
Configuring Sudo OK
Setting up the centreon Aliases etc
————————————————————————
Configure Apache server
————————————————————————
Do you want to add Centreon Apache sub configuration file ?
[y/n], default to [n]:
> y
Create ‘/etc/apache2/conf.d/centreon.conf’ OK
Configuring Apache OK
Do you want to reload your Apache ?
[y/n], default to [n]:
> y
Finding Apache Centreon configuration file
‘/etc/httpd/conf.d/centreon.conf’ : OK
Do you want to update Centreon Apache sub configuration file ?
[y/n], default to [n]:
> n
Create ‘/etc/httpd/conf.d/centreon.conf’ OK
Configuring Apache OK
Do you want to reload your Apache ?
[y/n], default to [n]:
> y
Reloading Apache service OK
Preparing Centreon temporary files
Change right on /usr/local/centreon/log OK
Change right on /etc/centreon OK
Change right on /usr/share/nagios/images/logos OK
Install nagios documentation OK
Change macros for insertBaseConf.sql OK
Change macros for php files
Change macros for php files OK
Change right on /etc/nagios OK
Copy CentWeb in system directory
Install CentWeb (web front of centreon) OK
Install libraries OK
Copying libinstall OK
Change macros for centreon.cron OK
Install Centreon cron.d file OK
Change macros for archiveDayLog OK
Change macros for centAcl.php OK
Install cron directory OK
PEAR libraries: a set of libraries is still missing but they will be installed or updated as nessecary (if you have a connection to the internet). Otherwise you have to install them manually
————————————————————————
Pear Modules
————————————————————————
Check PEAR modules
PEAR 1.4.9 1.6.1 OK
After displaying the current versions you may get the request to update some libraries.
Do you want me to install/upgrade your PEAR modules
[y/n], default to [y]: [Press Enter]
Upgrading PEAR modules
Installing PEAR modules
All PEAR modules OK
The script will continue.
————————————————————————
Centreon Post Install
————————————————————————
Create /usr/local/centreon/www/install/install.conf.php OK
Create /etc/centreon/instCentWeb.conf OK
Now CentStorage will be installed, also called ODS (Oreon Data Storage). At the moment this module permits archiving on the basis of RRD and MySQL. Additionally CentStorage enables you to create graphs for monitoring the different metrics.
————————————————————————
Start CentStorage Installation
————————————————————————
Where is your Centreon Run Dir directory?
default to [/var/run/centreon]
>[Press Enter]
Do you want me to create this directory ? [/var/run/centreon]
[y/n], default to [n]:
> y
Path /var/run/centreon OK
Where is your CentStorage binary directory
default to [/usr/local/centreon/bin]
>[Press Enter]
Path /usr/local/centreon/bin OK
Where is your CentStorage RRD directory
default to [/var/lib/centreon]
>[Press Enter]
Path /var/lib/centreon OK
Attention: the centreon lib directory should be placed on a continuously available partition to avoid problems. The directory contains the RRDTools. Consider to place the MySQl data on large partition. The logs and performance data also need a lot of space.
Path /var/lib/centreon OK
Finding Nagios group : nagios
Finding Nagios user : nagios
Preparing Centreon temporary files
/tmp/centreon-setup exists, it will be moved…
install www/install/createTablesCentstorage.sql OK
Creating Centreon Directory ‘/var/lib/centreon/status’ OK
Creating Centreon Directory ‘/var/lib/centreon/metrics’ OK
Change macros for centstorage binary OK
Install CentStorage binary OK
Install library for centstorage OK
Change right : /var/run/centreon OK
Change macros for centstorage init script OK
Do you want me to install CentStorage init script ?
[y/n], default to [n]:
> y
CentStorage init script installed OK
Do you want me to install CentStorage run level ?
[y/n], default to [n]:
> y
Adding system startup for /etc/init.d/centstorage …
/etc/rc0.d/K30centstorage -> ../init.d/centstorage
/etc/rc1.d/K30centstorage -> ../init.d/centstorage
/etc/rc6.d/K30centstorage -> ../init.d/centstorage
/etc/rc2.d/S40centstorage -> ../init.d/centstorage
/etc/rc3.d/S40centstorage -> ../init.d/centstorage
/etc/rc4.d/S40centstorage -> ../init.d/centstorage
/etc/rc5.d/S40centstorage -> ../init.d/centstorage
Change macros for logAnalyser OK
Install logAnalyser OK
Change macros for nagiosPerfTrace OK
Install nagiosPerfTrace OK
Change macros for purgeLogs OK
Install purgeLogs OK
Change macros for purgeCentstorage OK
Install purgeCentstorage OK
Change macros for centreonPurge.sh OK
Install centreonPurge.sh OK
Change macros for centstorage.cron OK
Install CentStorage cron OK
Create /etc/centreon/instCentStorage.conf OK
CentStorage is installed now.
————————————————————————
Start CentCore Installation
————————————————————————
Where is your CentCore binary directory
default to [/usr/local/centreon/bin]
>[Press Enter]
Path /usr/local/centreon/bin OK
/usr/bin/ssh OK
/usr/bin/scp OK
Finding Nagios group : nagios
Finding Nagios user : nagios
Preparing Centreon temporary files
/tmp/centreon-setup exists, it will be moved…
Change CentCore Macro OK
Copy CentCore in binary directory OK
Change right : /var/run/centreon OK
Change right : /var/lib/centreon OK
Replace CentCore init script Macro OK
Do you want me to install CentCore init script ?
[y/n], default to [n]:
> y
CentCore init script installed OK
Do you want me to install CentCore run level ?
[y/n], default to [n]:
> y
Adding system startup for /etc/init.d/centcore …
/etc/rc0.d/K30centcore -> ../init.d/centcore
/etc/rc1.d/K30centcore -> ../init.d/centcore
/etc/rc6.d/K30centcore -> ../init.d/centcore
/etc/rc2.d/S40centcore -> ../init.d/centcore
/etc/rc3.d/S40centcore -> ../init.d/centcore
/etc/rc4.d/S40centcore -> ../init.d/centcore
/etc/rc5.d/S40centcore -> ../init.d/centcore
Create /etc/centreon/instCentCore.conf OK
Please answer some questions regarding the installation of the centreon plugins.
————————————————————————
Start CentPlugins Installation
————————————————————————
Where is your CentPlugins lib directory
default to [/var/lib/centreon/centplugins]
>[Press Enter]
Do you want me to create this directory ? [/var/lib/centreon/centplugins]
[y/n], default to [n]:
> y
Path /var/lib/centreon/centplugins OK
Finding Nagios user : nagios
Finding Nagios group : nagios
Preparing Centreon temporary files
/tmp/centreon-setup exists, it will be moved…
Change macros for CentPlugins OK
Installing the plugins OK
Change right on centreon.conf OK
CentPlugins is installed
————————————————————————
Start CentPlugins Traps Installation
————————————————————————
Where is your SNMP configuration directory
default to [/etc/snmp]
>[Press Enter]
/etc/snmp OK
Where is your SNMPTT binaries directory
default to [/usr/local/centreon/bin/]
>[Press Enter]
/usr/local/centreon/bin/ OK
Finding Nagios group : nagios
Finding Apache user : nagios
Preparing Centreon temporary files
/tmp/centreon-setup exists, it will be moved…
Change macros for CentPluginsTraps OK
Installing the plugins Trap binaries OK
Backup all your snmp files OK
Change macros for snmptrapd.conf OK
Change macros for snmptt.ini OK
Install : snmptrapd.conf OK
Install : snmp.conf OK
Install : snmptt.ini OK
Install : snmptt OK
Install : snmpttconvertmib OK
Create /etc/centreon/instCentPlugins.conf OK
Reloading Apache configuration on CentOS:
[root@yourmachine ~]service httpd reload
Now the Centreon is installed.
Now go to the URL http://yourserver-ip/centreon
Next step is to start the Web Installation during which it will initialize the database and set the administrator login information.
This URL will redirect you in web setup frontend.