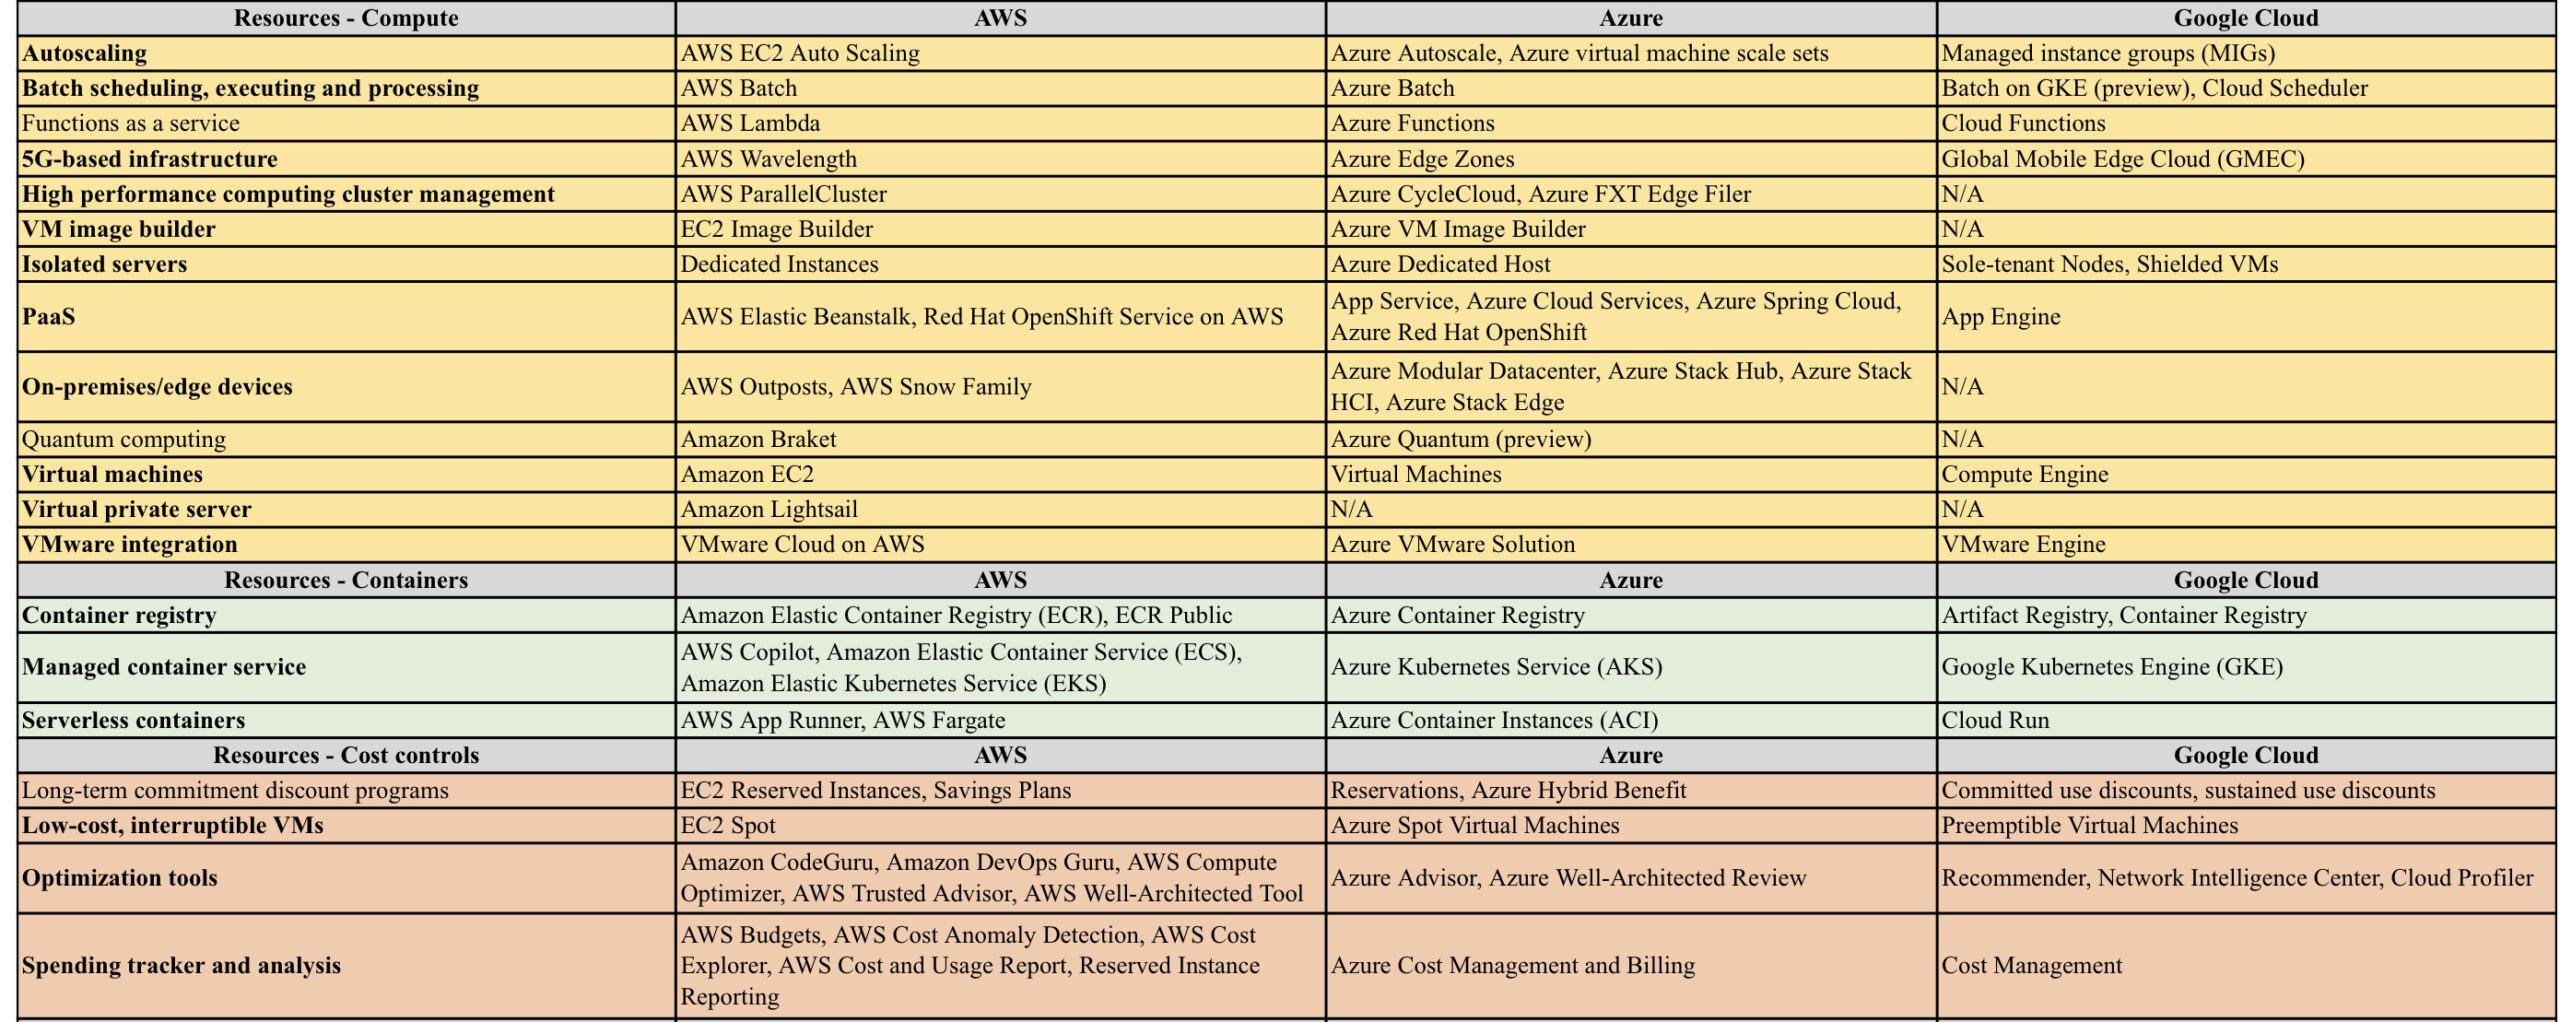
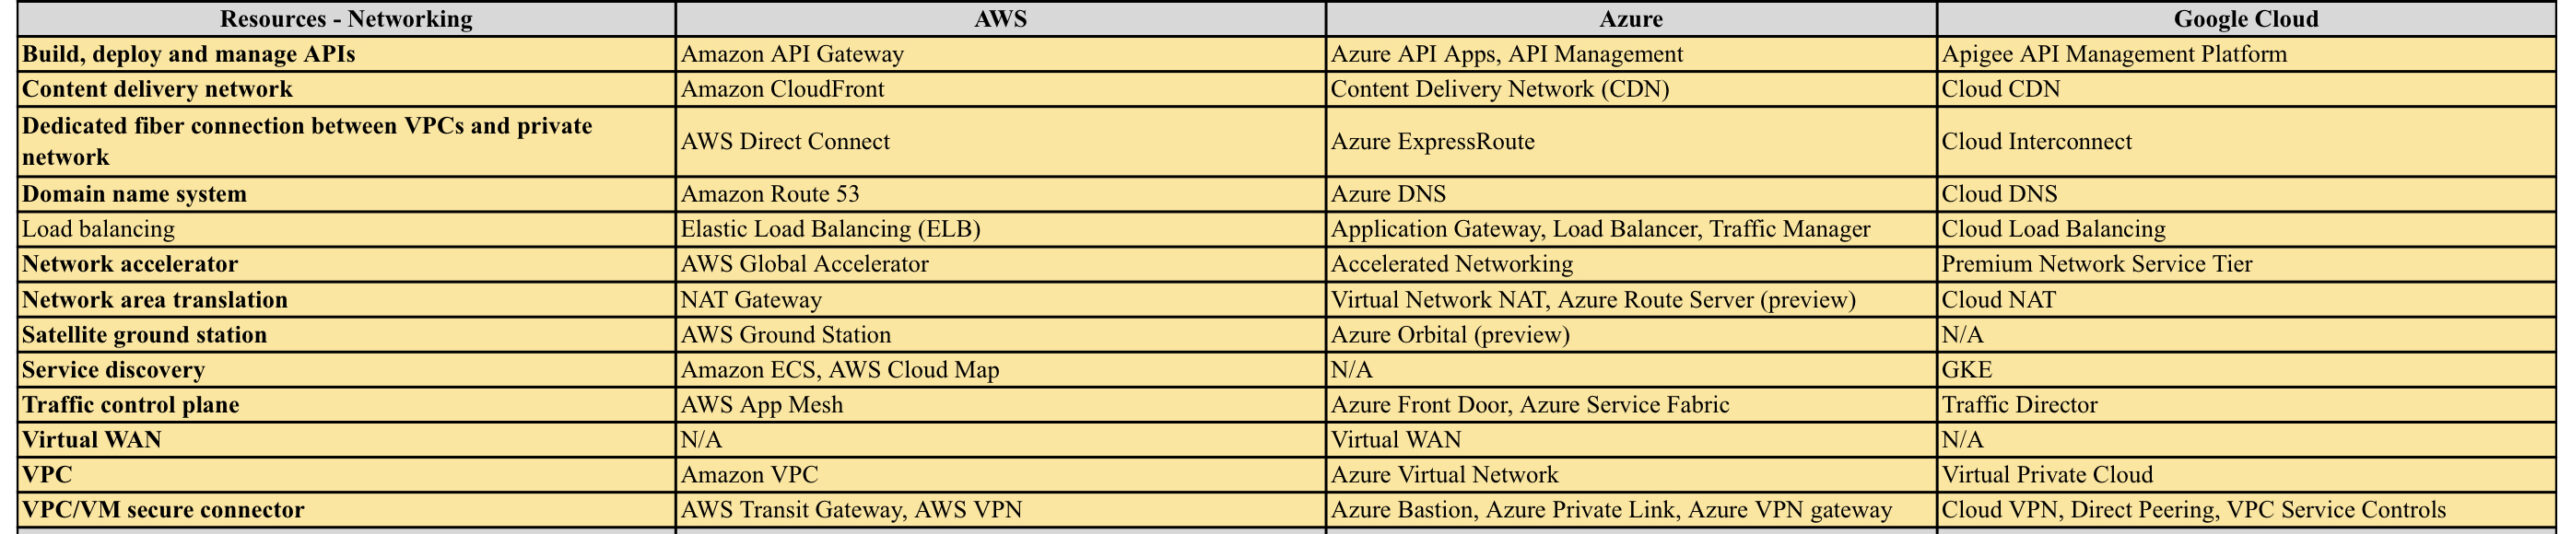
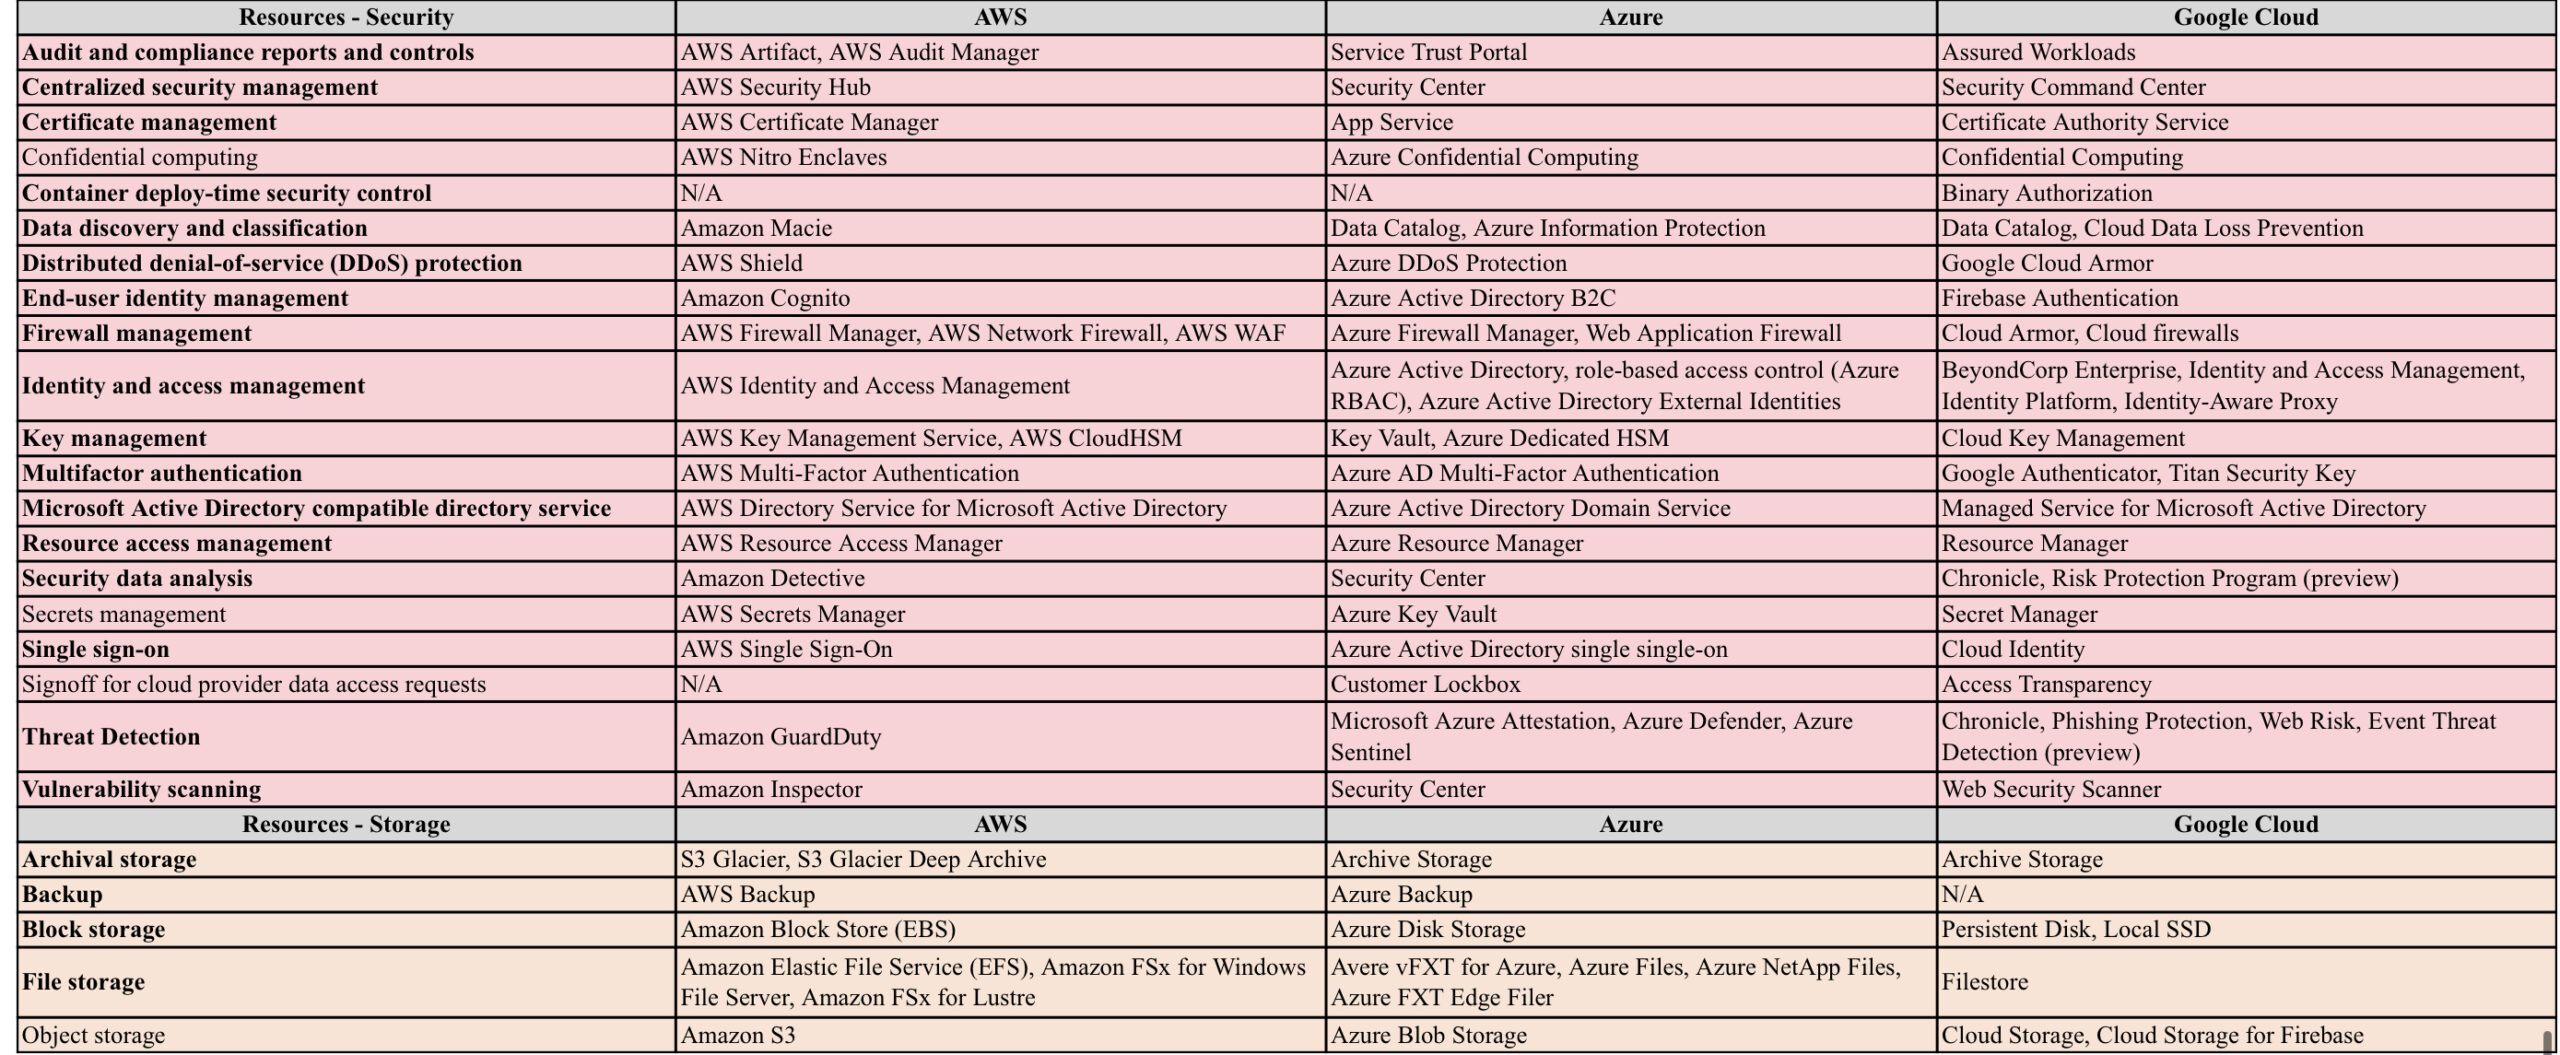
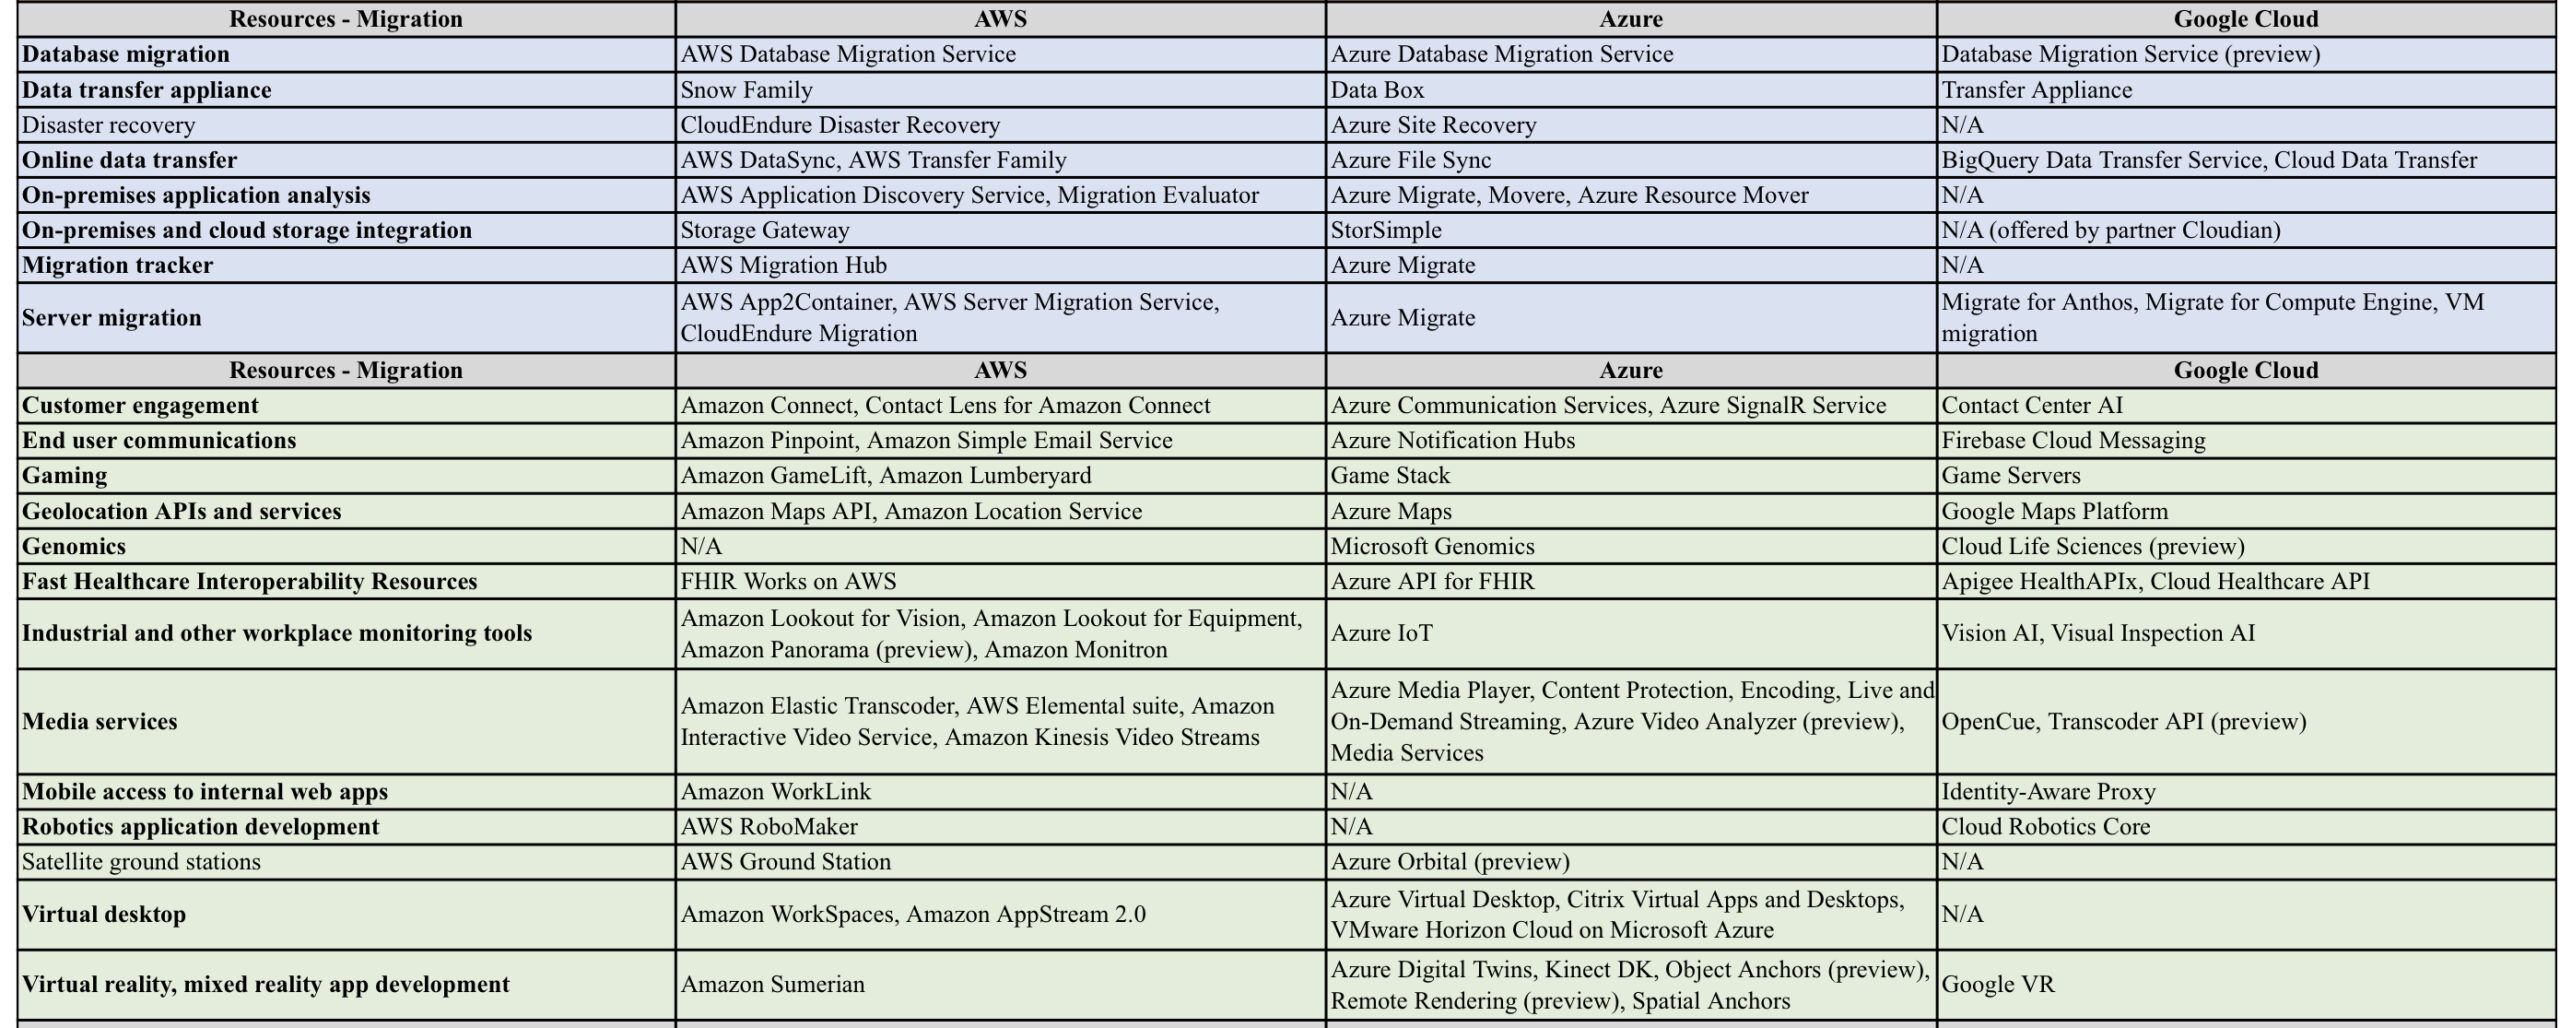
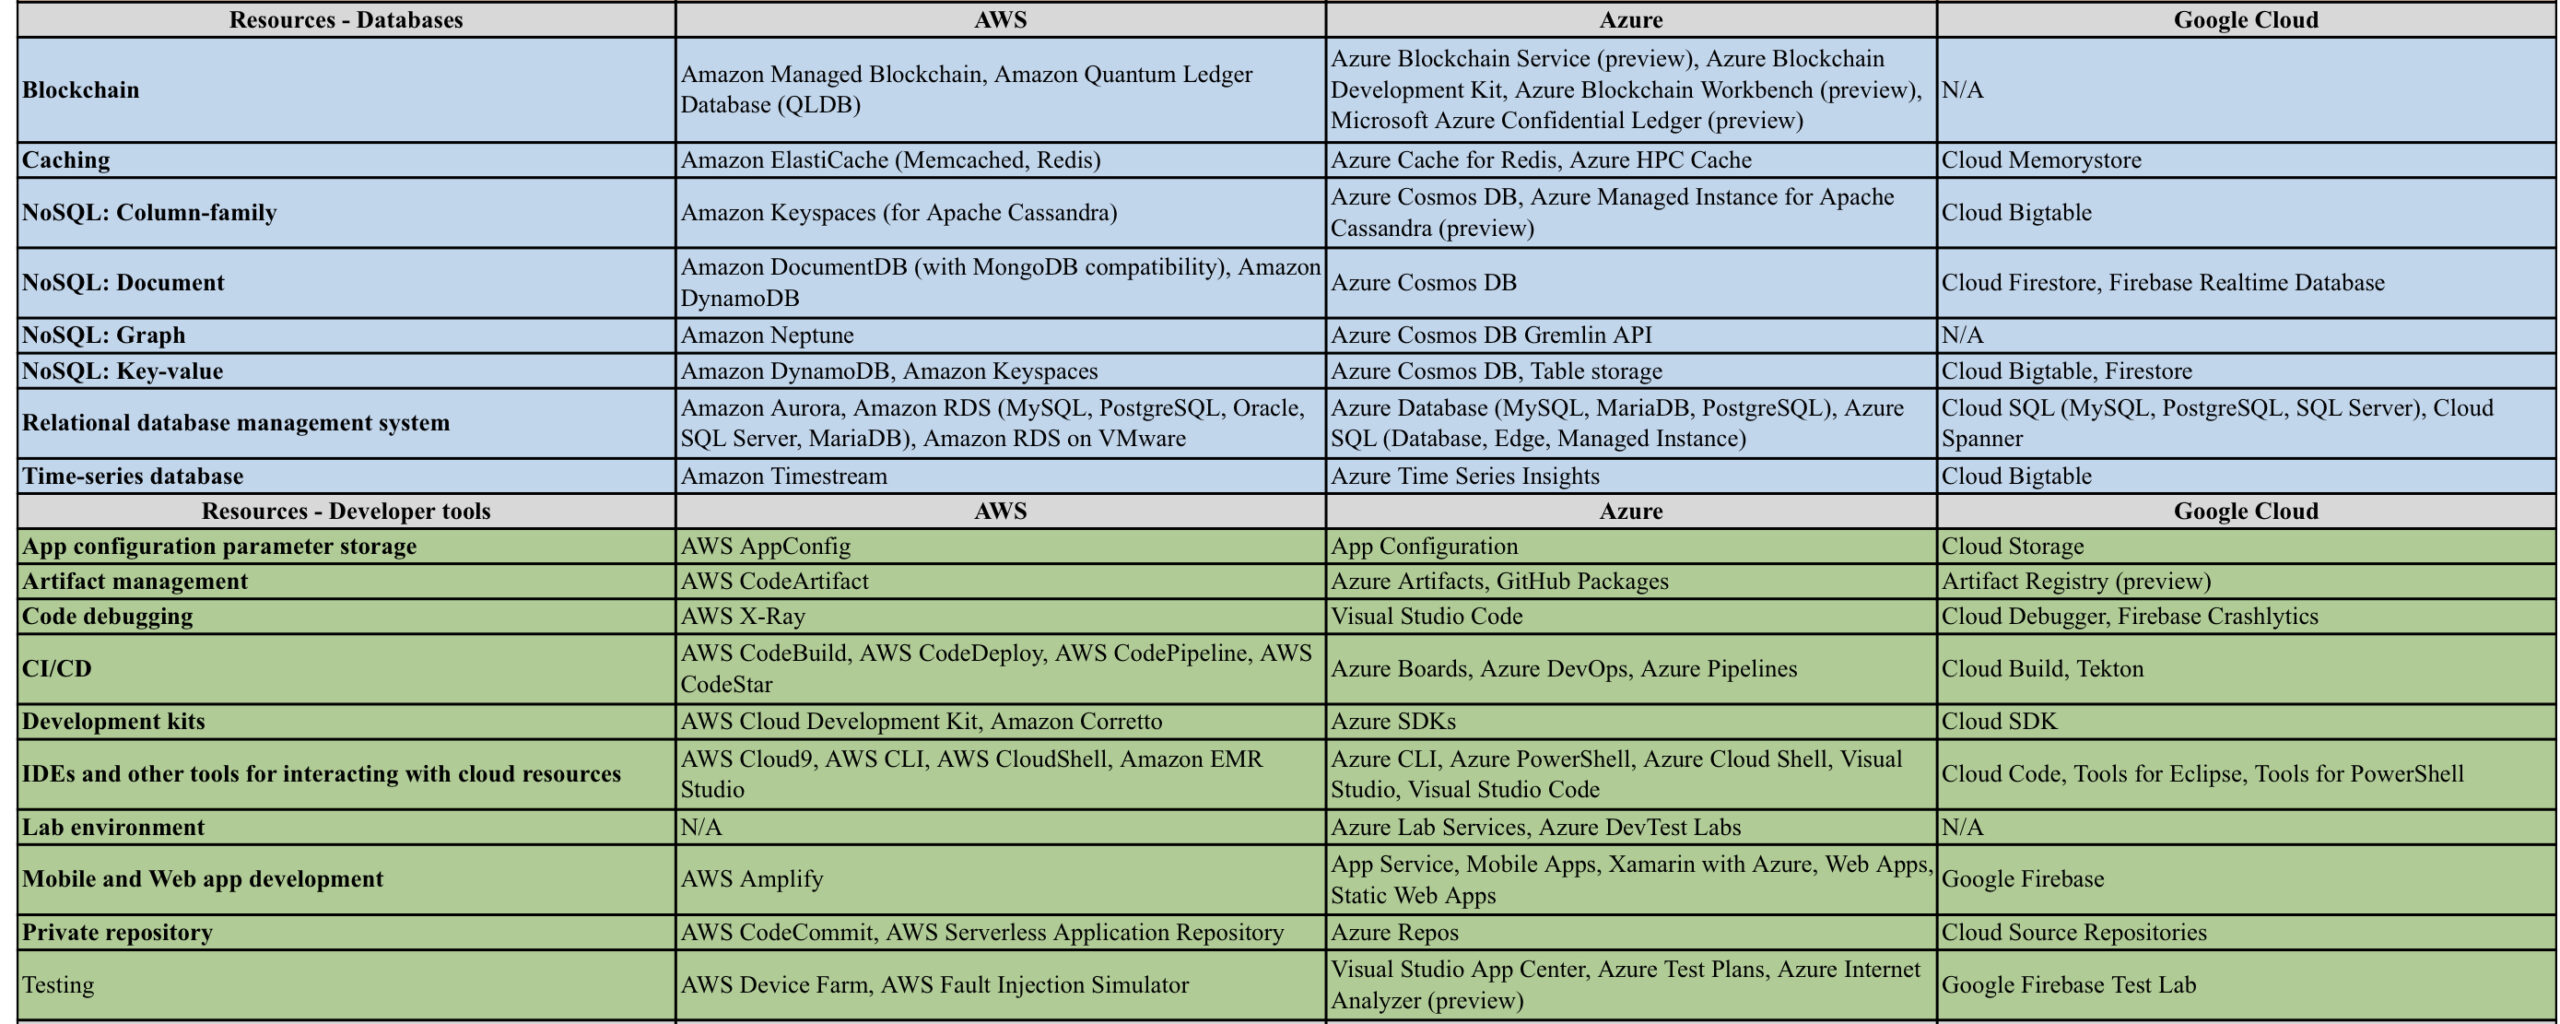
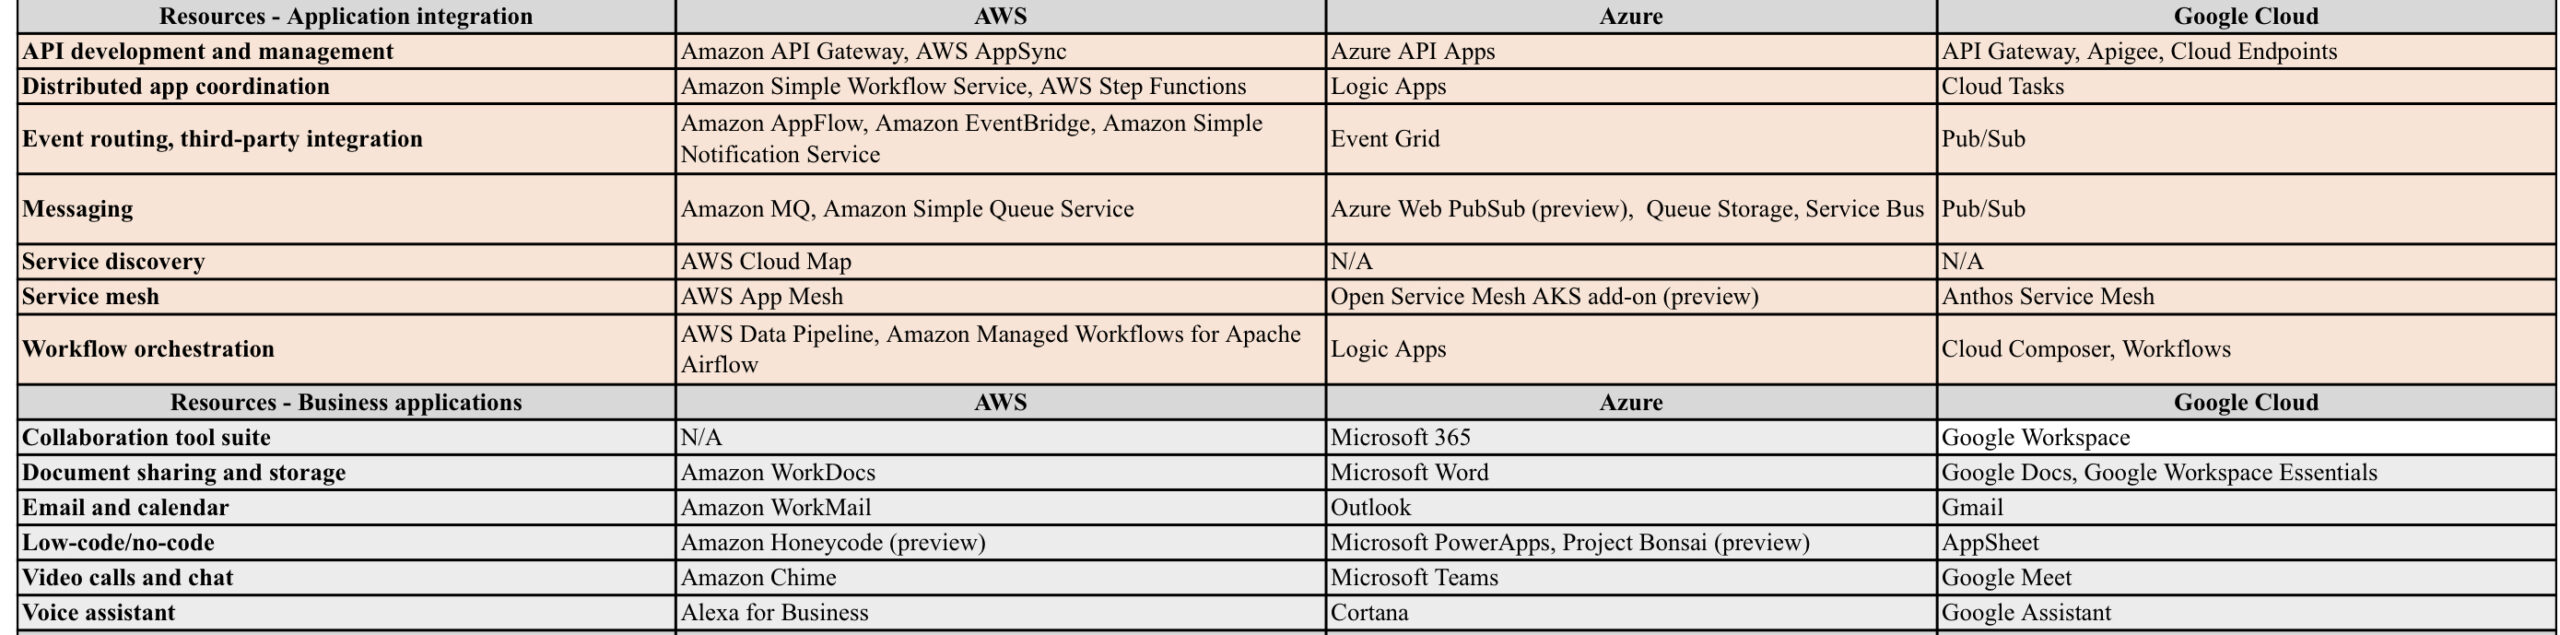
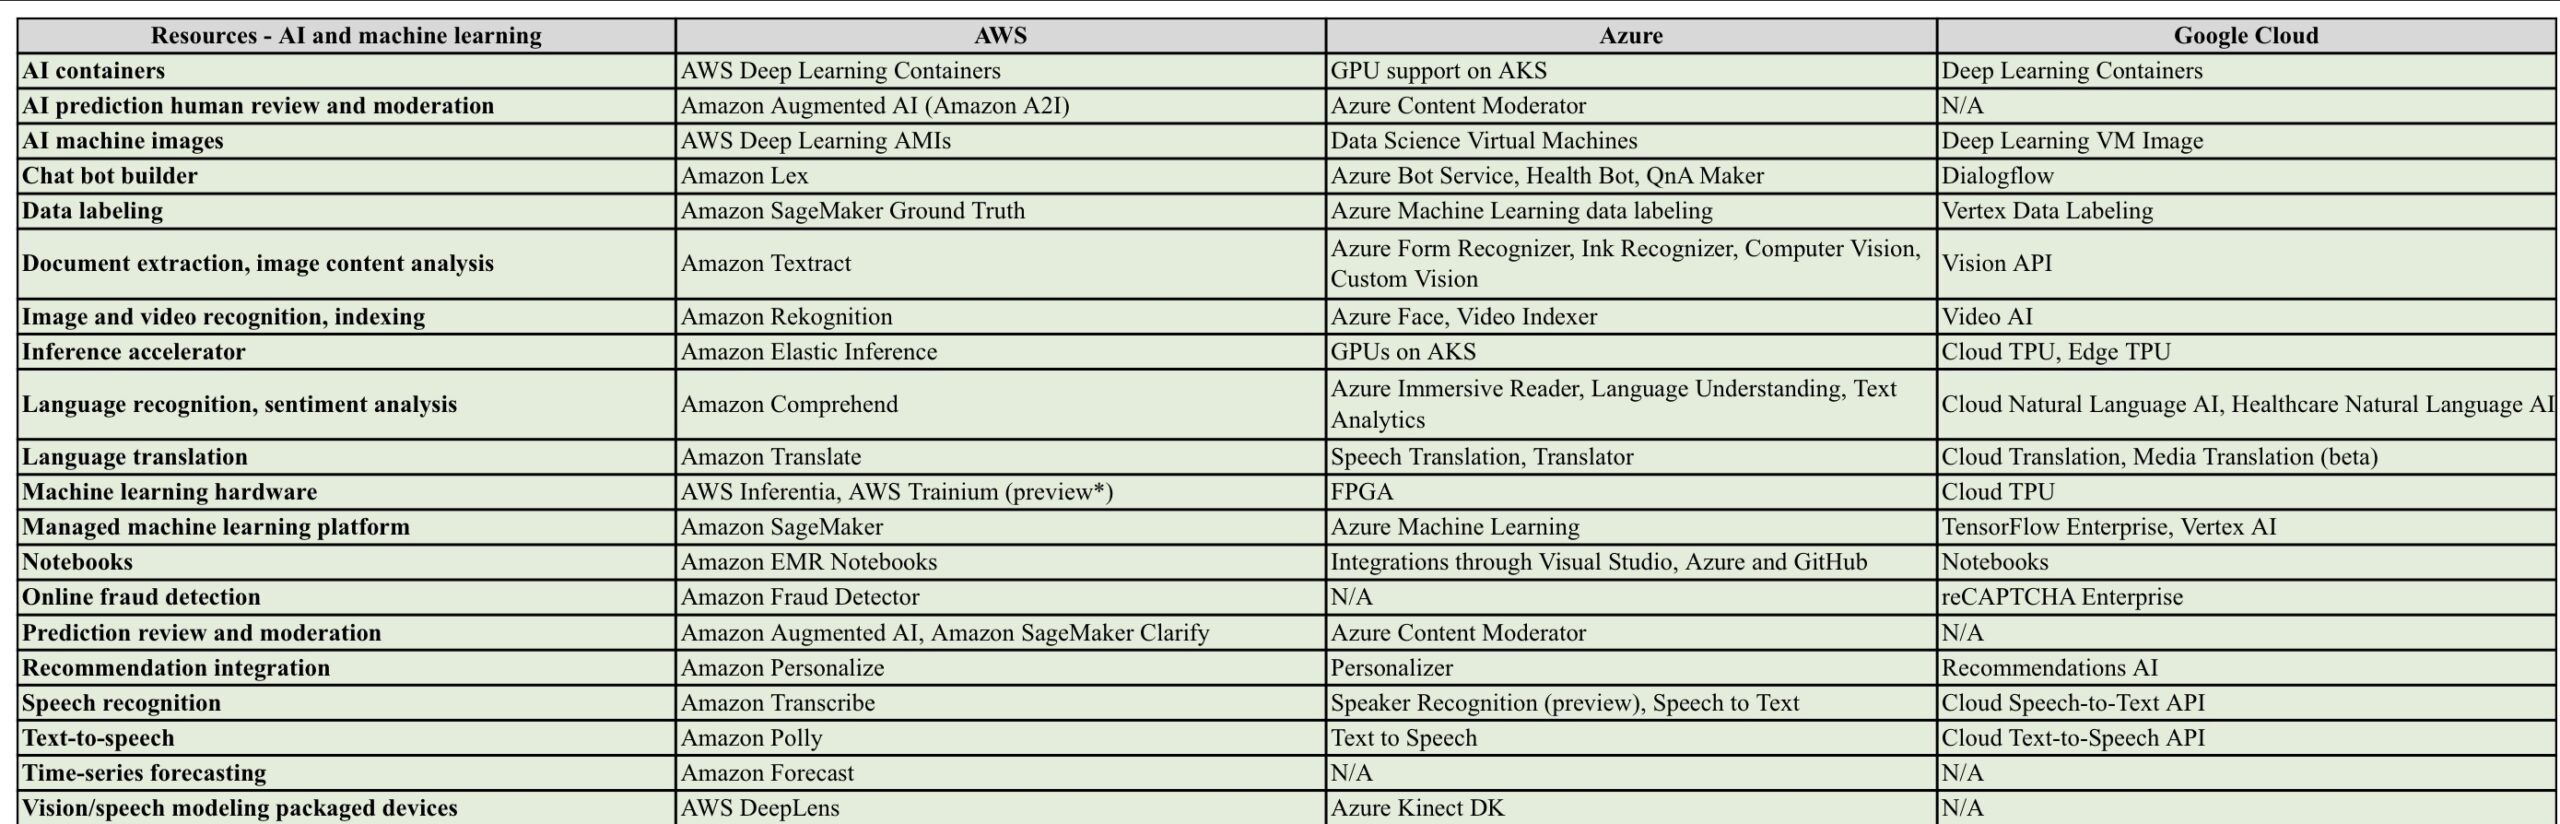
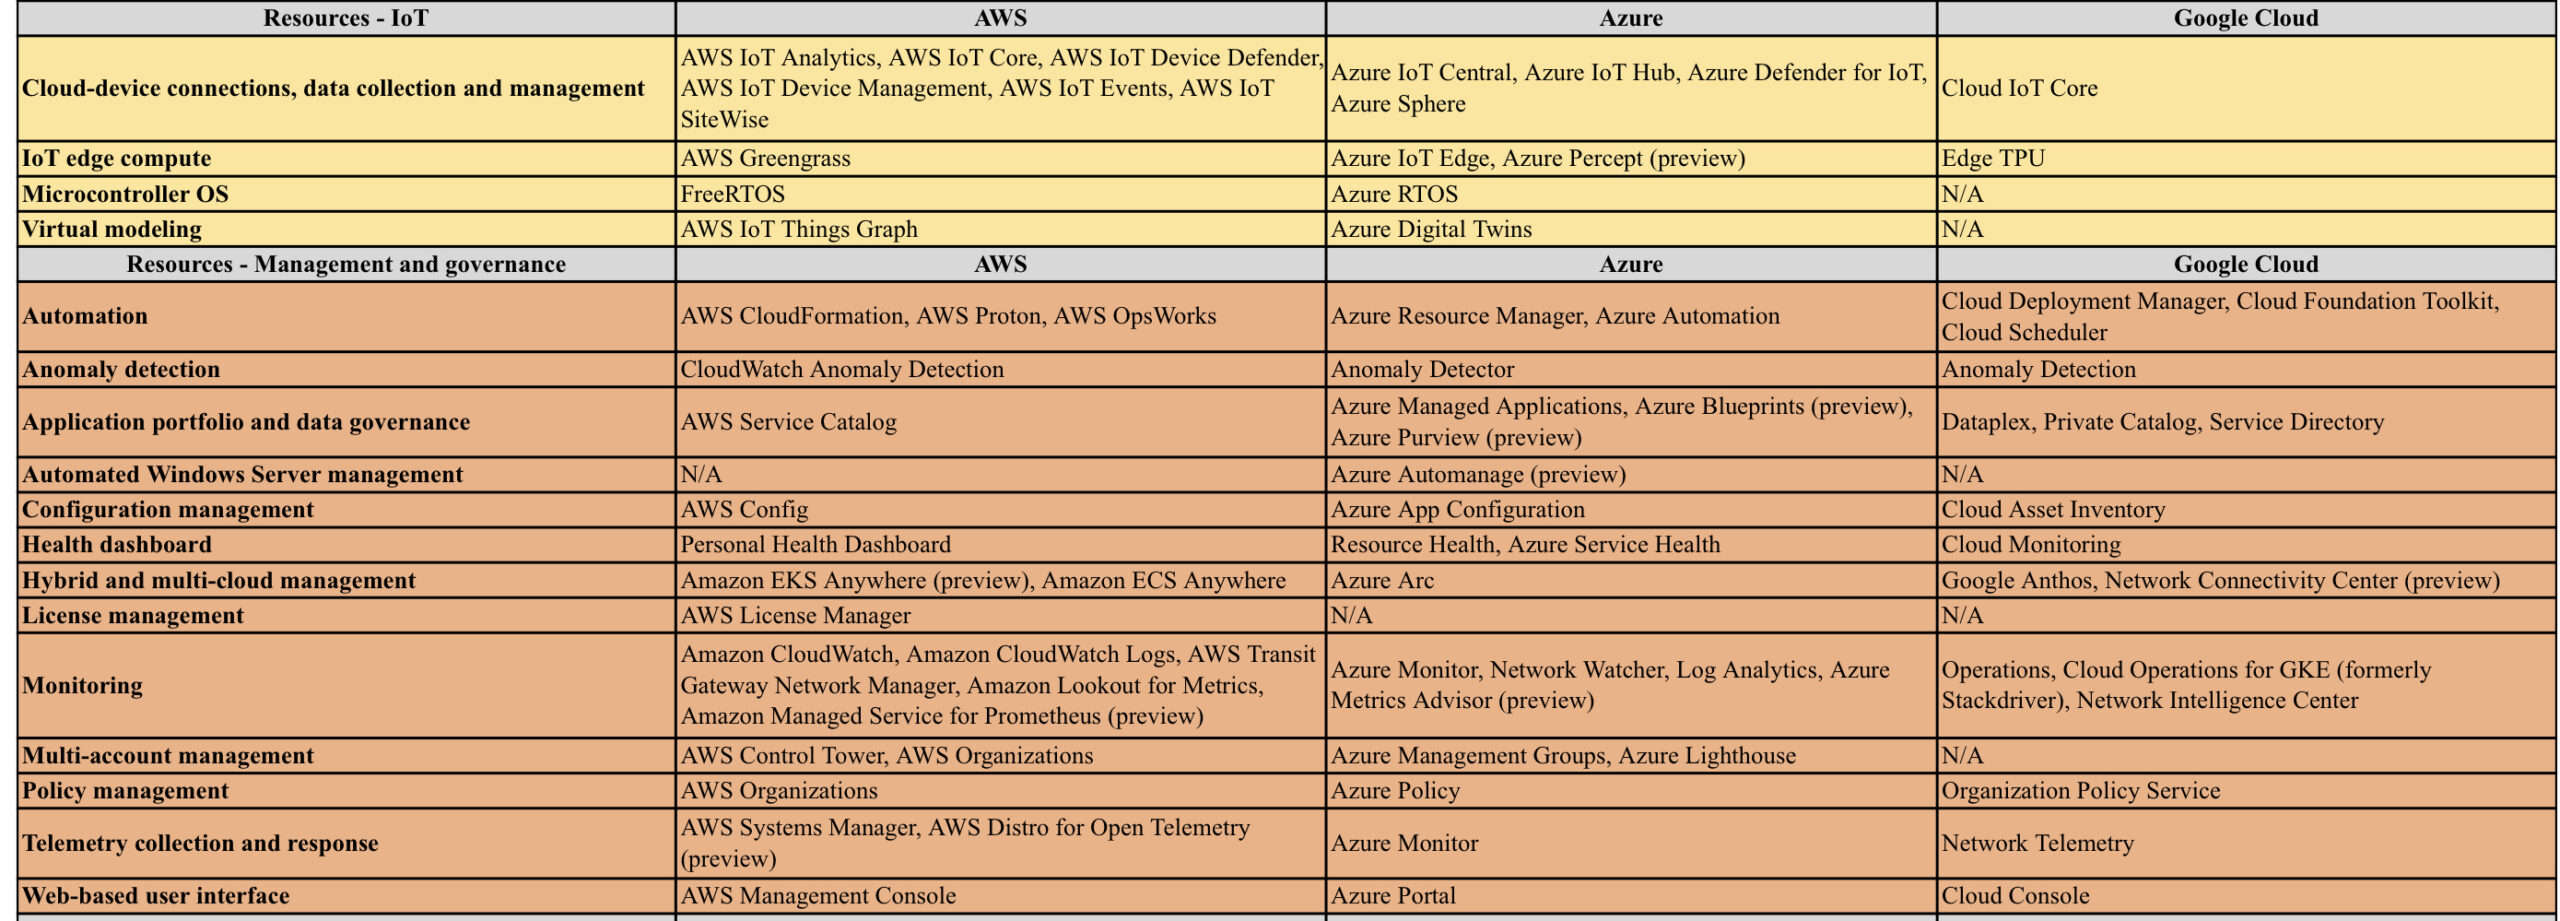
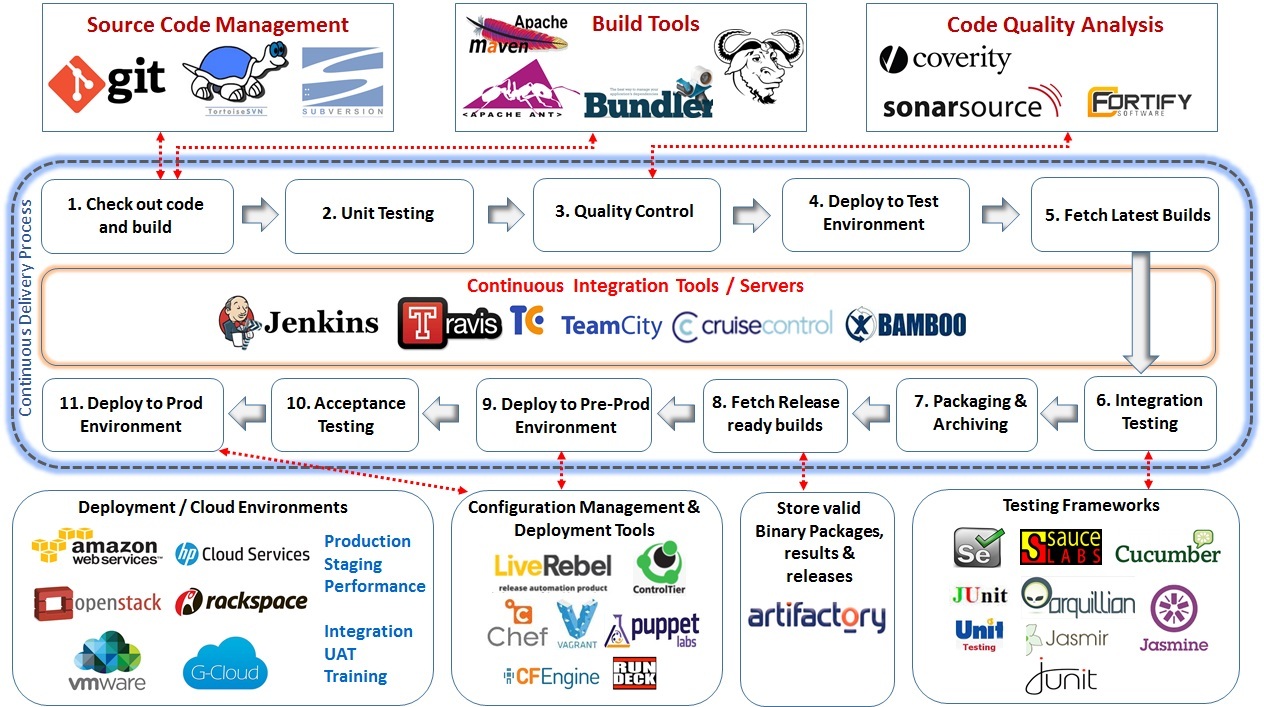
AWS vs Azure vs GCP
AWS/Azure/GCP provides a set of flexible services designed to enable companies to more rapidly and reliably build and deliver products using Cloud and DevOps practices. These services simplify provisioning and managing infrastructure, deploying application code, automating software release processes, and monitoring your application and infrastructure performance.
DevOps is the combination of cultural philosophies, practices, and tools that increases an organisations ability to deliver applications and services at high velocity, evolving and improving products at a faster pace than organisations using traditional software development and infrastructure management processes.

Microsoft Exchange to Office 365 Migration
Microsoft Exchange – Traditional Infrastructure with a standard layout
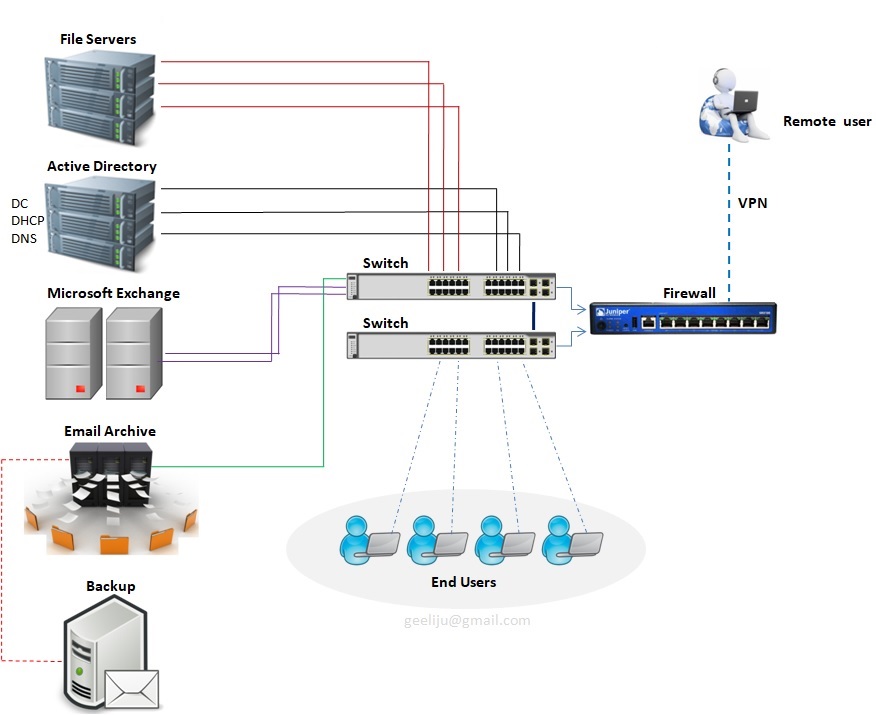
Please refer the above diagram. Starting at the top with File Servers which will serve multiple roles with in your environment. You will have User Home Drives, you will also have Shared Storage they can be utilized across your environment. Second you have Active Directory. This controls all your users and authentication both internally and your remote users utilizing VPN to connect in. You have your Exchange Server which is your email Server, that used to communicate both internally and across your environment as well as clients and your External users. Going along with Exchange you will also need a Email Archive to store all of your old email based on what ever retention policy you have set. And with that you need some sort of backup attached to that whether with Tape or Backup to Disks. Then you have all your End users utilizing all of your infrastructure internally.
Standard Challenges :
In the above example (diagram) we have 10 Physical Servers, which is a lot of maintenance for an individual with a setup of this size. Second thing to consider is your Server Migrations or Upgrade and that goes for Operating Systems or any kind of Software that are utilized within your environment. The third thing that you need to take into account is, all of these is required by the end users which means you have to have some sort of backup, Disaster Recovery or some sort of offsite usage capability. And the Final component that becomes a major challenge is Resources, where you have power cooling and network which is utilized by everyone of these devises.
Now that you have decided to MIGRATE, Whats NEXT ?
Evaluation >>
The first thing that you must do is to take a look at your environments to make sure that it supports the Cloud Based solution that you are investigating. So what you and team should be evaluating ?? Well, you need to start with –
1. Network Traffic Capabilities
2. The Internet Speed
3. Versions of Software both Server and User based
4. User Count
5. Data Size
6. The user roles and the needs of each one of those users
7. WHO and WHAT will be affected by this migration ?
8. When it comes to WHO, you should break things down by Departments, User Type, Location and Primary Work Location.
9. When it comes to WHAT, you should make a list of what would change and how it would change. Not just for your user but also for you as the Administrator.
Everything will be affected in your network from where your files are stored and how your users authenticate to specific resources, where the Mail Flow comes from, how things are archived and how your remote users interact with your network and the resources use to be inside your network.
Then you need to evaluate licensing needs. Based on the list that you made you should be able to determine the licensing needs of those users. One of the best updates made to O365 was the ability to mix and match the licensing, which means you are no longer bound to use one type of license to all of your users which can be a huge cost saving benefit to you environment.
Migration Options >>
Different types of migrations that you can utilize in your environment.
1. Remote Move Migration – You use this for 2 reasons.
a > If you are going to do an Exchange Hybrid Deployment with mailboxes both On premise and Cloud based OR
b > If you are going to move mailboxes over a long period of time, this is supported by Exchange 2010 and later or if you have more than 2000 Mail boxes.
2. Stage Migration – Use use this if you are planning to move all of your mail boxes to Exchange Online over a period of time but this option is only supported on Exchange 2003 or 2007.
3. Cut Over Migration – This is a short term migration where users will be migrated in one batch and then cut over in a single swoop. This is used for 2000 or Less mail boxes and the users identity will be managed in O365.
4. IMAP Migration – This is used for other types of messaging systems other than Exchange such as AOL, Lotus, Google mail etc.
So what now that we know, what type of migrations exists, lets looks at how the infrastructure Cloud look like and how the migration data will flow.
Infra migration plan and Data flow >>
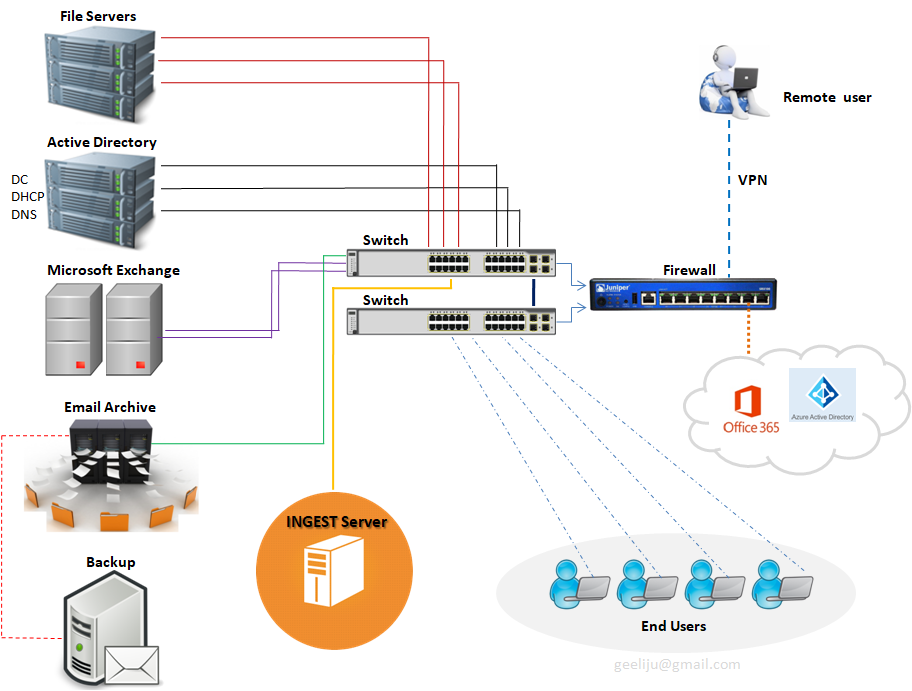
Lets start with one of the components which has actually been added called “INGEST SERVER“. Basically what this Ingest server during your migration is it will take your mail out of exchange, process it and then upload into your Office 365 Tenant. The purpose of this design is however to make sure that during the migration process which normally happens during business hours is not taxing to your servers and doesn’t affect your end users. At what point this suggested infrastructure get moved ?? All of this get taken out once you are ready to do your final cut over to your Cloud based solution.
Now lets take a look at the environment Post Migration >>
This first thing that you will notice is the decreased amount of infrastructure for you to manage, maintain and upgrade. This leads to increased operational efficiency. So how do we do that ? Lets start with our File Server.
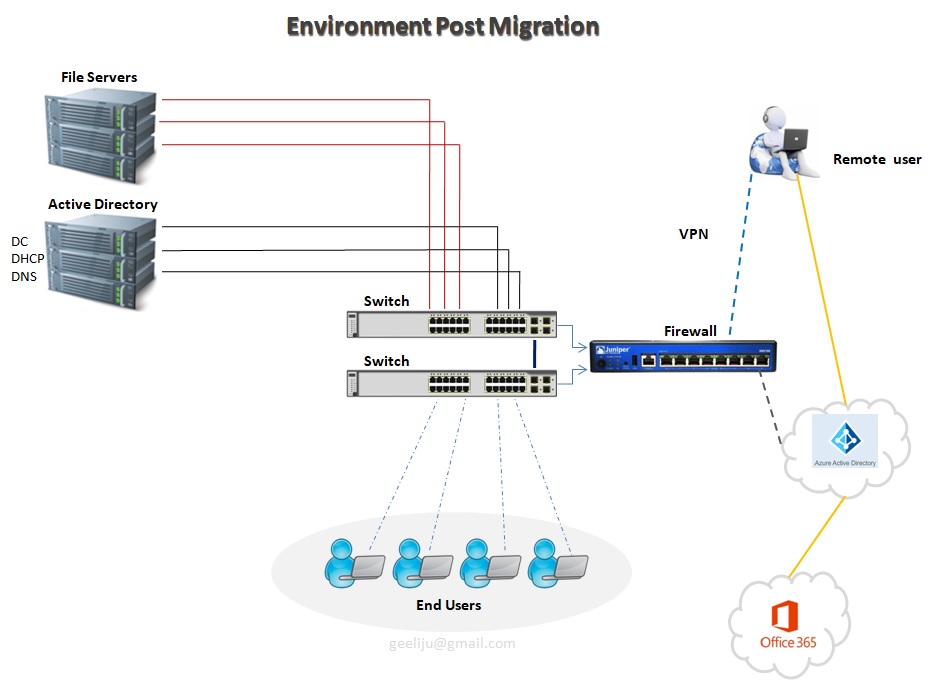
In our example we have only got 3 File servers. Basically, now what we have done is we have now taken all of our shared files and we moved them to Share Point Online and Office365. Then we have taken all of our user’s home drives and we have moved them to OneDrive for Business and Office365.
We have only a single Active Directory Server in this example, but we do have a possibility of Second depending on the amount load and that you need for internal based Applications. But for our purposes, we will only utilized one. All of your Remote users and everyone who is accessing the Cloud Based Services is authenticating to your Azure Active Directory as pause to your internal Active Directory. Those two synchronize together, so every time a user changes his password internally, it automatically updates in Office365. One of the Biggest component that you will notice missing is your Exchange Server and the need for your mail archive. Neither one of those are needed because are resources handled by Office365 as well. Your Remote users are not fully connected to your environment at all times. They are authenticating directly to Azure Active Directory utilizing all of these Cloud based Services that you moved out here (Office365 + Azure AD). As a matter of fact the only reason that these remote users will need to connect to your internal environment is just in case of any internal based Applications to be accessed..
O365 – >>
OpenStack ‘Mitaka’ installation on CentOS 7
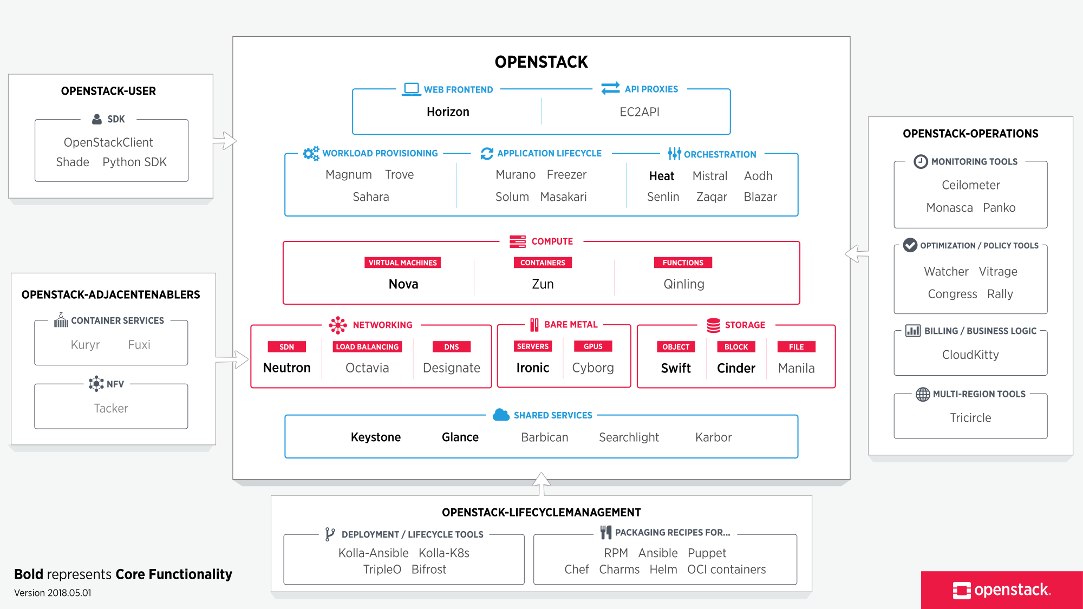
OpenStack is a Cloud Software that manage large pool of compute (hypervisors), storage ( block & swift ) and network resources of a data center.
It provides a Dashboard where admins can create and manage Projects (Tenants ) and give appropriate access to the project members , further on Project members can create VMs (Virtual Machine).
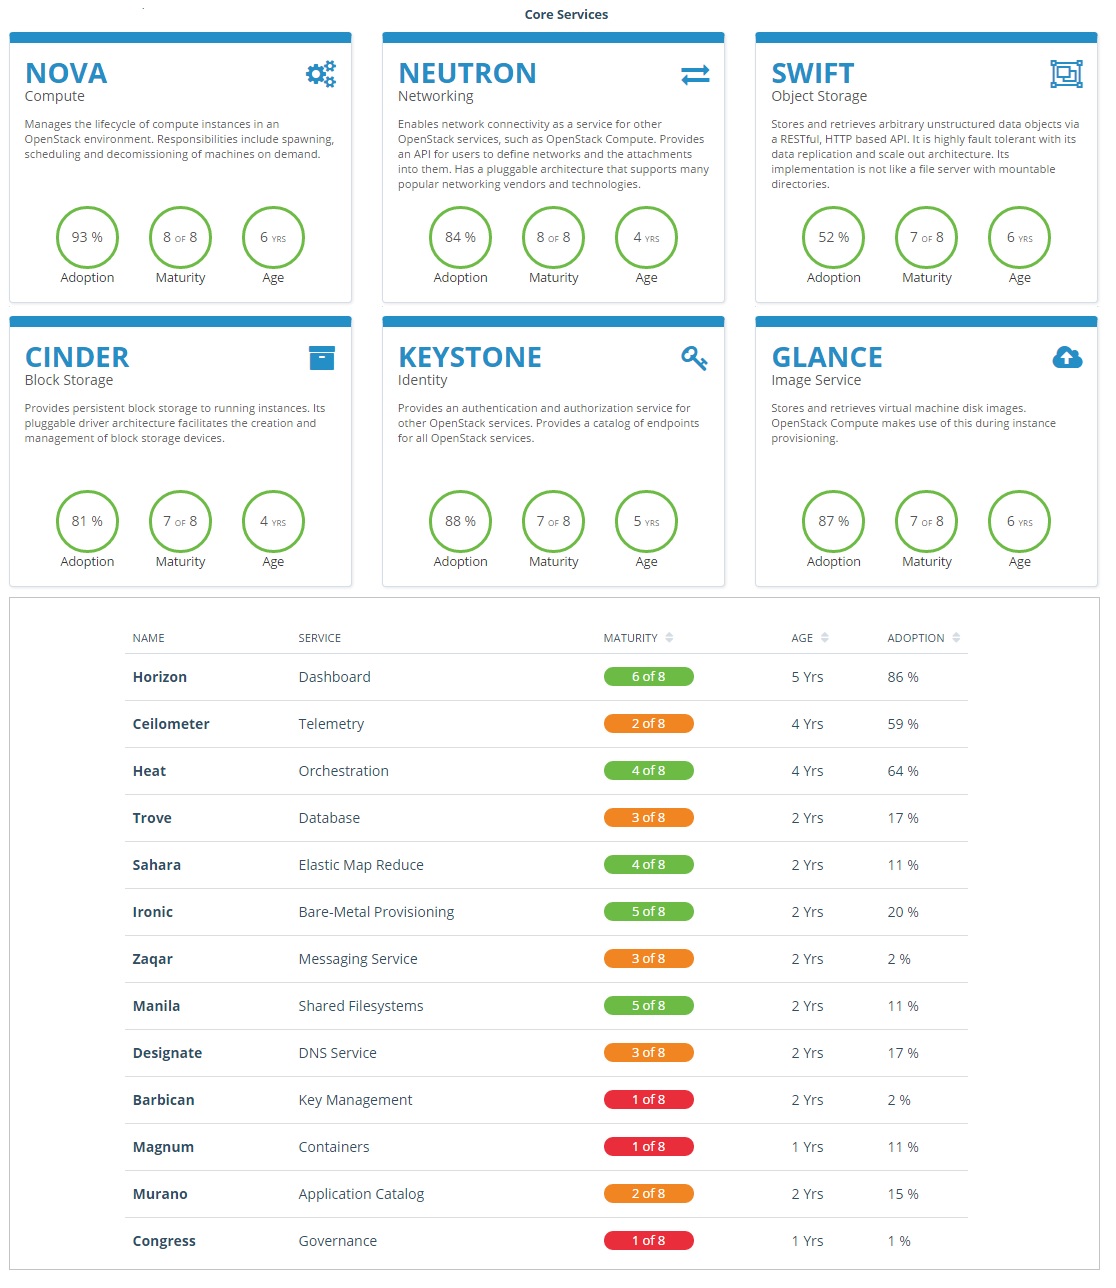
OpenStack consists of several Services/Projects that are separately installed depending on your cloud needs like –
You can install any of these projects separately and configure them ‘stand-alone’ or as connected entities.
The OpenStack project is an open source cloud computing platform that supports all types of cloud environments. The project aims for simple implementation, massive scalability, and a rich set of features. Cloud computing experts from around the world contribute to the project. OpenStack provides an Infrastructure-as-a-Service (IaaS) solution through a variety of services.
Each service offers an Application Programming Interface (API) that facilitates this integration.
After becoming familiar with basic installation, configuration, operation, and troubleshooting of these OpenStack services, you should consider the following steps towards deployment using a Production Architecture:
- Determine and implement the necessary core and optional services to meet performance and redundancy requirements.
- Increase Security using methods such as Firewalls, Encryption, and Service Policies.
- Implement a deployment tool such as Ansible, Chef, Puppet, or Salt to automate deployment and management of the production environment.
Single Node OpenStack ‘ MITAKA ’ installation Steps on CentOS 7 using RDO repositories (Packstack)
Set the following steps:
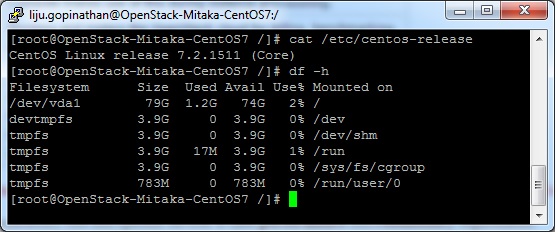
1. Hostname to OpenStack-Mitaka-CentOS7
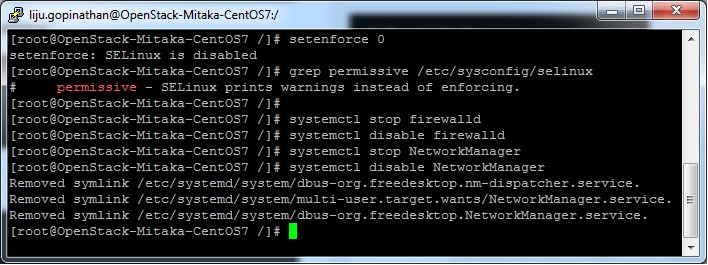
2. Selinux in Permissive Mode >> Edit the selinux config file ( /etc/sysconfig/selinux ) and set “SELINUX=permissive”
3. Disable firewalld & NetworkManager Service
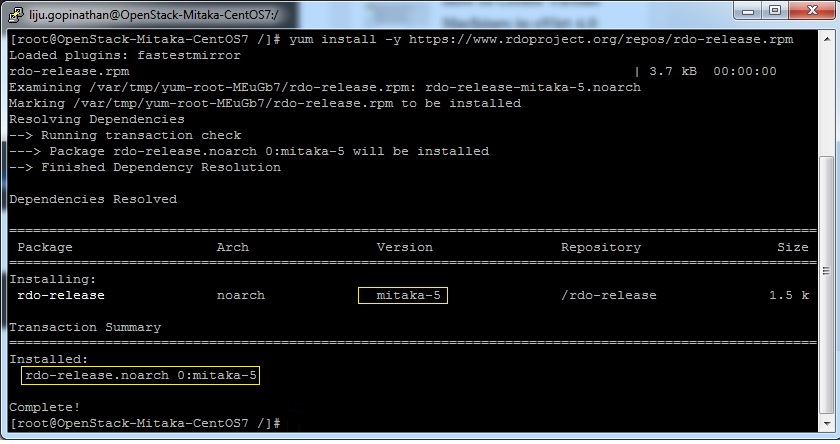
4. Update the system and enable RDO Repository for MITAKA packages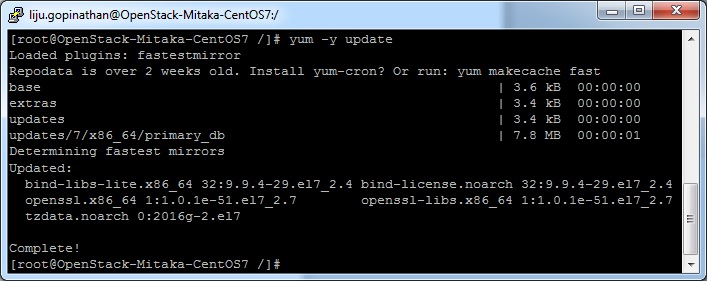
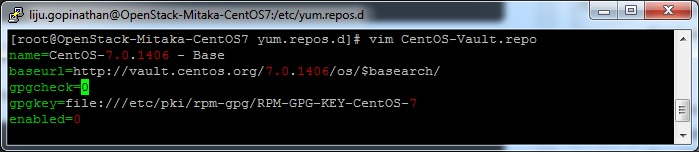
5. Check the yum repolist to varify the repo details and then install OpenStack PackStack Package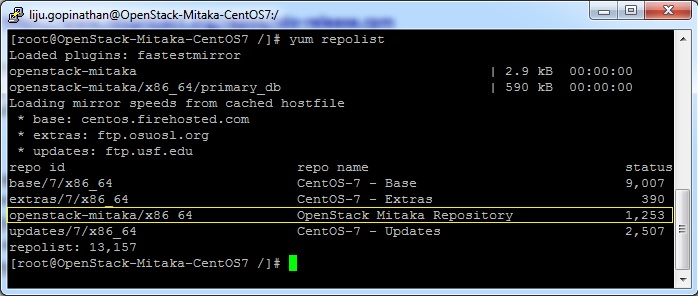
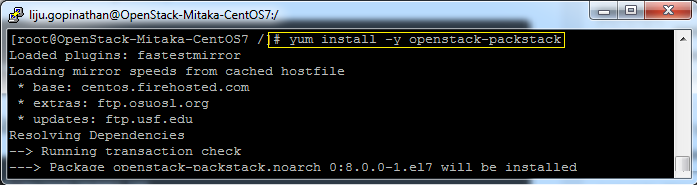
Once the Packstack installation is done we will deploy OpenStack. Packstack can be installed in 3 ways :
a. packstack
b. packstack –allinone
c. packstack –gen answer-file=/path ( The easiest way to install Packstack )**
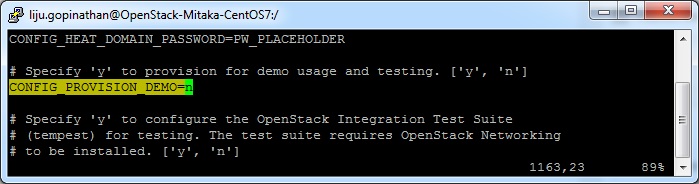
Generate the answer file using the command #packstack –gen-answer-file=/root/answer.txt and the edit the answer file “/root/answer.txt”.
Change the following parameters and ignore the rest.
CONFIG_PROVISION_DEMO=n
CONFIG_KEYSTONE_ADMIN_PW=letslearntogether
CONFIG_HORIZON_SSL=n
CONFIG_NAGIOS_INSTALL=n
6. OpenStack installation using answer file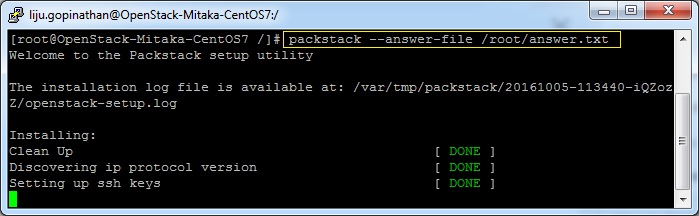
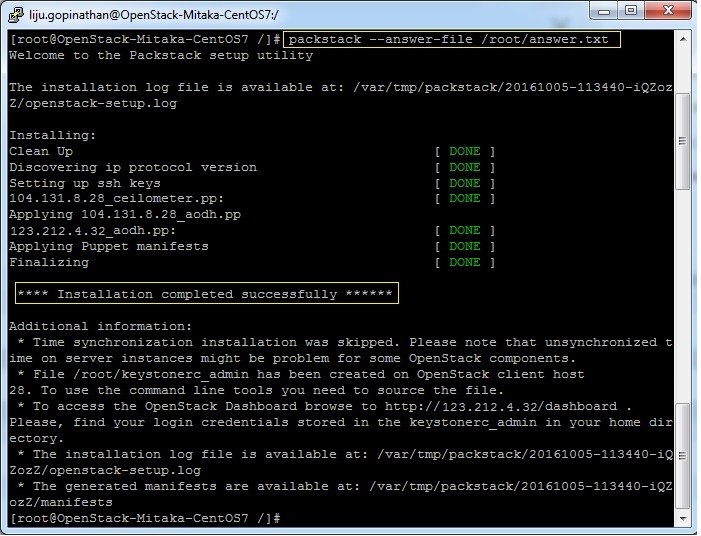
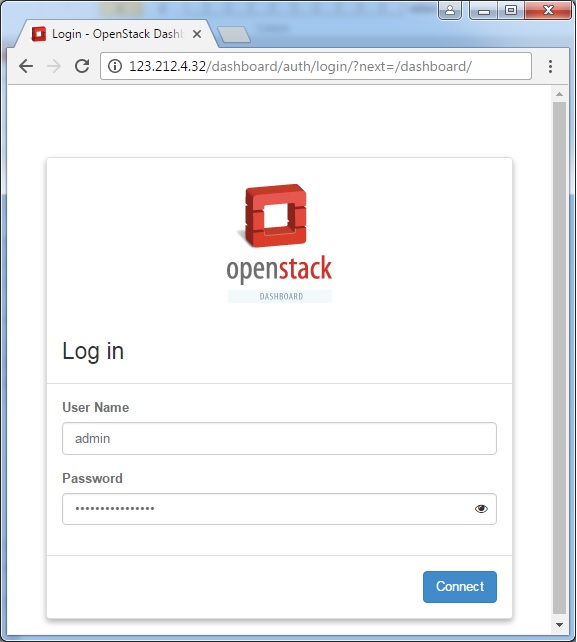
This completes the OpenStack installation. A new interface called “br-ex” will be created and assign the IP addess of eth0 or enp0s3 to br-ex.
You can now access OpenStack Dashboard using https://123.212.4.32/dashboard
Happy Learning !!
Splunk on CentOS 7
Pre-requisites for the installations – Recommend a proper hostname, firewall and network configuration for the server prior to the installations.
Splunk supports only 64 bit Server Architecture.
Create a Splunk User
It is always recommended to run this application as its dedicated user rather than as root.
Create a user to run this application and create an application folder for the installation.
login as: root
root@ Splunk-Test-Server’s password:****
Last login: Tue Sep 6 09:02:20 2016 from host-78-151-0-55.as13285.net
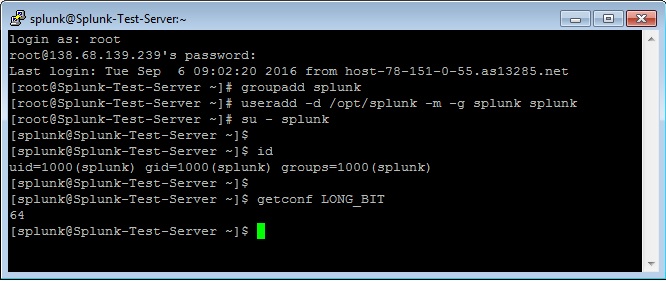
[root@Splunk-Test-Server ~]# groupadd splunk
[root@Splunk-Test-Server ~]# useradd -d /opt/splunk -m -g splunk splunk
[root@Splunk-Test-Server ~]# su – splunk
[splunk@Splunk-Test-Server ~]$
[splunk@Splunk-Test-Server ~]$ id
uid=1000(splunk) gid=1000(splunk) groups=1000(splunk)
[splunk@Splunk-Test-Server ~]$
To Confirm the Server Architecture
[splunk@Splunk-Test-Server ~]$ getconf LONG_BIT
64
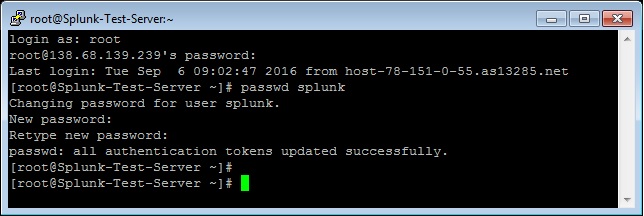
[root@Splunk-Test-Server ~]# passwd splunk
Changing password for user splunk.
New password: ****
Retype new password: ****
passwd: all authentication tokens updated successfully.
[root@Splunk-Test-Server ~]#
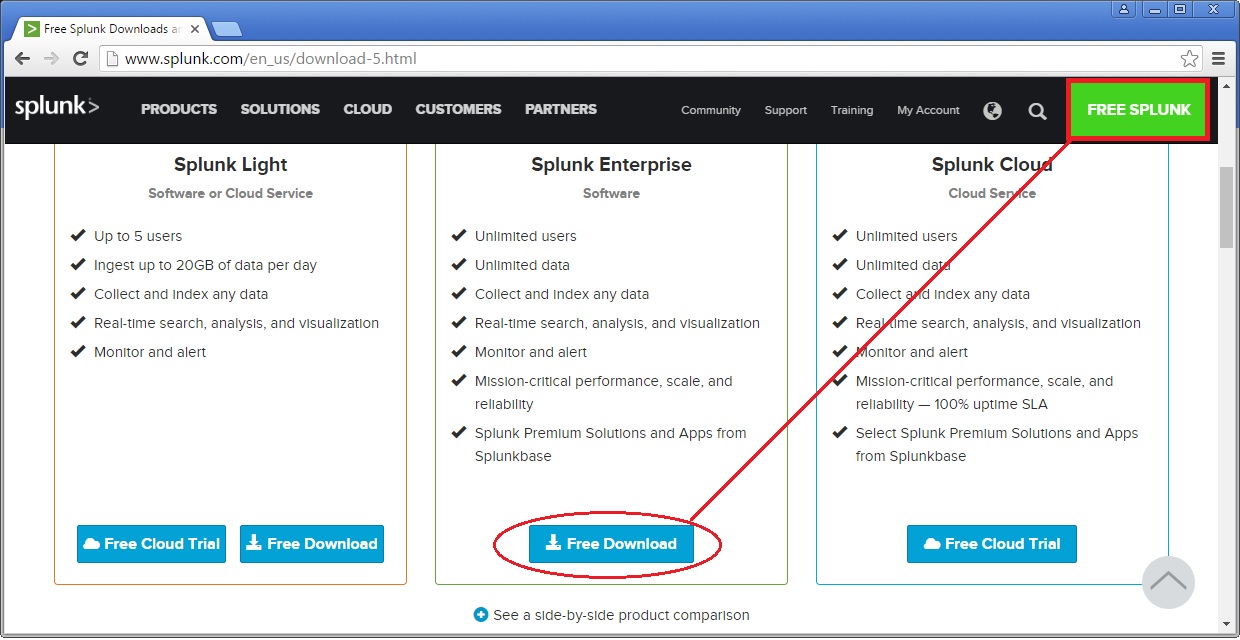
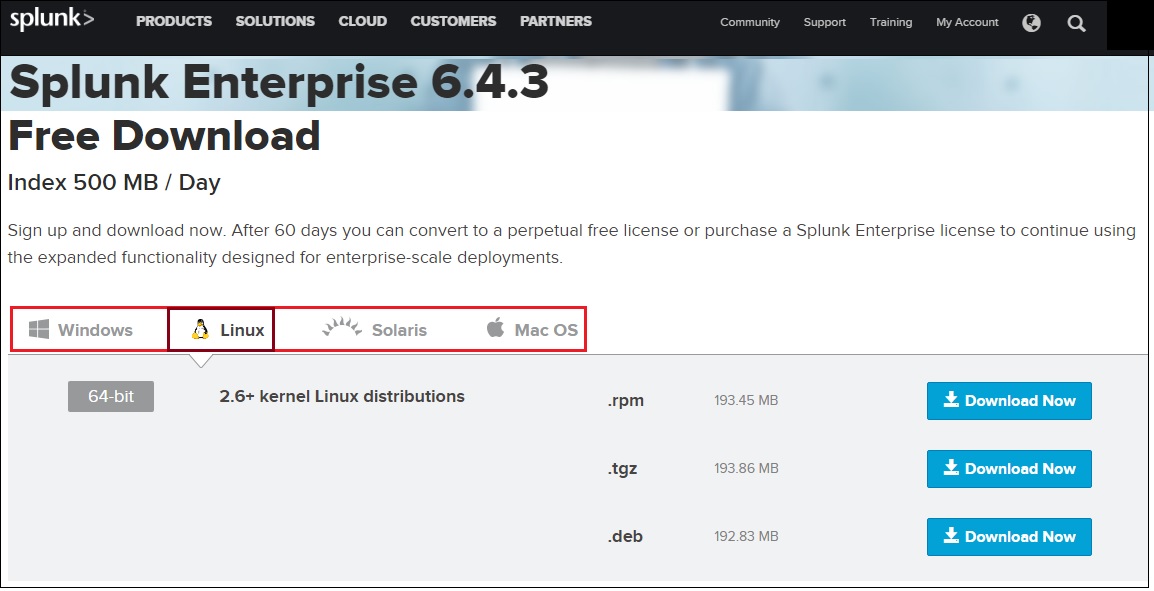
Download and extract the Splunk Enterprise version
Create a Splunk account and download the Splunk software from their official website here.
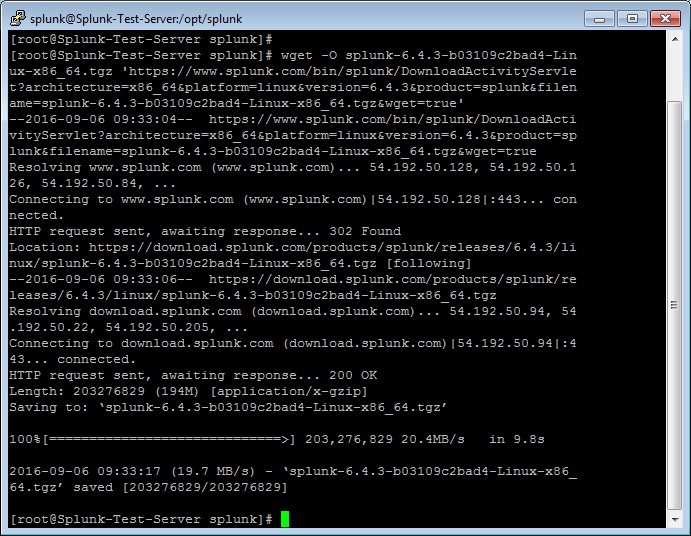
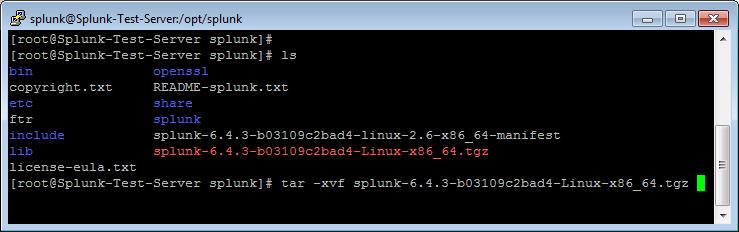
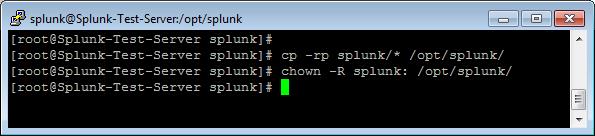
Now extract the tar file and copy the files to the Splunk application folder namely /opt/splunk created.
Splunk Installation
Once the Splunk software is downloaded, you can login to your Splunk user and run the installation script. We will choose the trial license, so it will take it by default.
[root@Splunk-Test-Server splunk]# su – splunk
Last login: Tue Sep 6 09:21:18 UTC 2016 on pts/1
[splunk@Splunk-Test-Server ~]$
[splunk@Splunk-Test-Server ~]$ cd bin/
[splunk@Splunk-Test-Server bin]$ ./splunk start –accept-license
This appears to be your first time running this version of Splunk.
Copying ‘/opt/splunk/etc/openldap/ldap.conf.default’ to ‘/opt/splunk/etc/openldap/ldap.conf’.
Generating RSA private key, 1024 bit long modulus
………………………………………………….++++++
e is 65537 (0x10001)
writing RSA key
Generating RSA private key, 1024 bit long modulus
e is 65537 (0x10001)
writing RSA key
Moving ‘/opt/splunk/share/splunk/search_mrsparkle/modules.new’ to ‘/opt/splunk/share/splunk/search_mrsparkle/modules’.
Splunk> See your world. Maybe wish you hadn’t.
Checking prerequisites…
Checking http port [8000]: open
Checking mgmt port [8089]: open
Checking appserver port [127.0.0.1:8065]: open
Checking kvstore port [8191]: open
Checking configuration… Done.
Creating: /opt/splunk/var/lib/splunk
Creating: /opt/splunk/var/run/splunk
Creating: /opt/splunk/var/run/splunk/appserver/i18n
Creating: /opt/splunk/var/run/splunk/appserver/modules/static/css
Creating: /opt/splunk/var/run/splunk/upload
Creating: /opt/splunk/var/spool/splunk
Creating: /opt/splunk/var/spool/dirmoncache
Creating: /opt/splunk/var/lib/splunk/authDb
Creating: /opt/splunk/var/lib/splunk/hashDb
Checking critical directories… Done
Checking indexes…
Validated: _audit _internal _introspection _thefishbucket history main summary
Done
New certs have been generated in ‘/opt/splunk/etc/auth’.
Checking filesystem compatibility… Done
Checking conf files for problems…
Done
Checking default conf files for edits…
Validating installed files against hashes from ‘/opt/splunk/splunk-6.4.3-b03109c2bad4-linux-2.6-x86_64-manifest’
All installed files intact.
Done
All preliminary checks passed.
Starting splunk server daemon (splunkd)…
Generating a 1024 bit RSA private key
……………………………++++++
writing new private key to ‘privKeySecure.pem’
Signature ok
subject=/CN=Splunk-Test-Server/O=SplunkUser
Getting CA Private Key
writing RSA key
Done
[ OK ]
Waiting for web server at http://127.0.0.1:8000 to be available… Done
If you get stuck, we’re here to help.
Look for answers here: http://docs.splunk.com
The Splunk web interface is at http://Splunk-Test-Server:8000
[splunk@Splunk-Test-Server bin]$
The Splunk web interface is at http://splunk@Splunk-Test-Server:8000
Access your Splunk Web interface at http://IP:8000/ or http://hostname:8000. Confirm the port 8000 is open in your server firewall.
Configuring Splunk Web Interface
This completes installation and now Splunk Service up & running in your server.
Next step is to set-up Splunk Web interface.
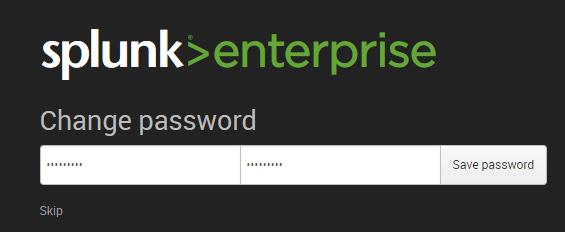
Access Splunk web interface and set administrator password.
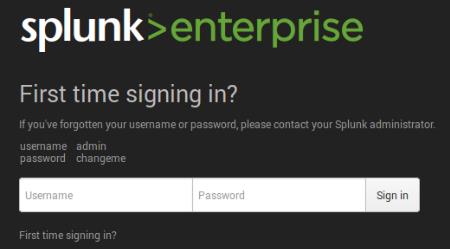
First time when you’re accessing the Splunk interface, you can use the user/password provided in the page which is admin/changeme in this case. Once logged in, on the very next page it will ask to change and confirm your new password.
Now start using the Splunk Dashboard !!
https://www.splunk.com/web_assets/v5/book/Exploring_Splunk.pdf
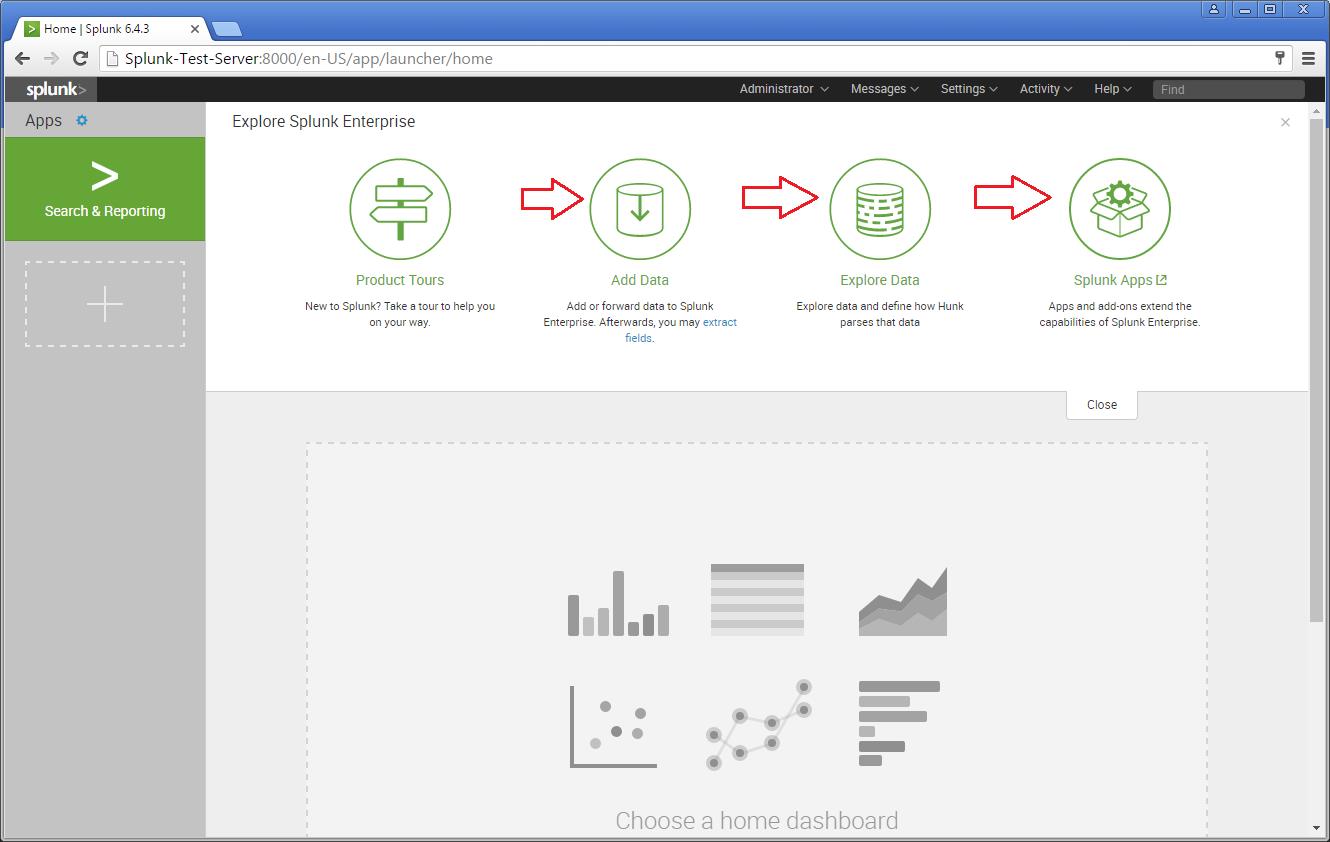
There are different categories listed over in the home page. You can choose the required one and start splunking.

There are different categories listed over in the home page. You can choose the required one and start splunking.
Adding a task
I’m adding an example for a simple task which is been added to the Splunk system. Just see my snapshots to understand how I added it. My task is to add /var/log folder to the Splunk system for monitoring.
Step 1 >> Open up the Splunk Web interface. Click on the Settings Tab >> Choose the Add Data option.
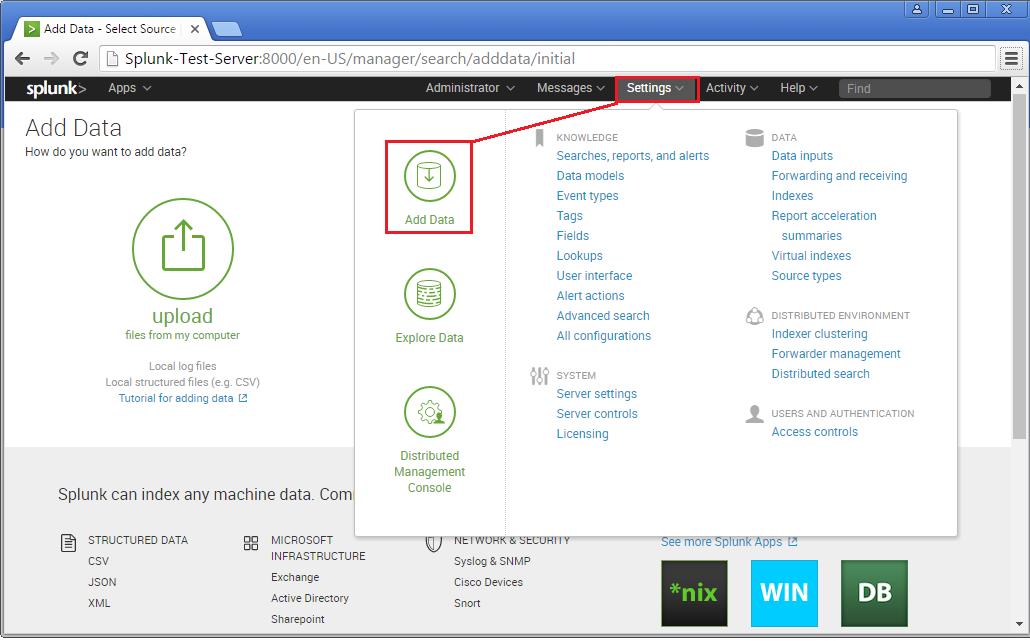
Step 2 >> The Add Data Tab opens up with three options : Upload, Monitor and Forward. The task here is to monitor a folder, hence will go ahead with Monitor.
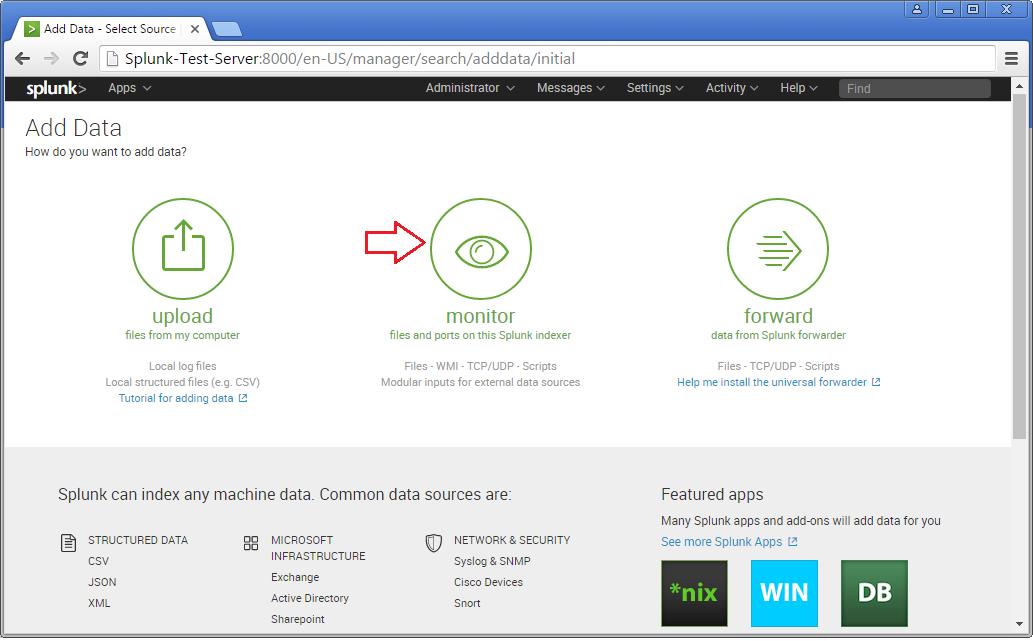
In the Monitor option, there are four categories as below:
File & Directories : To monitor files/folders
HTTP Event Collector : Monitor data streams over HTTP
TCP/UDP : Monitor Service ports
Scripts : Monitor Scripts
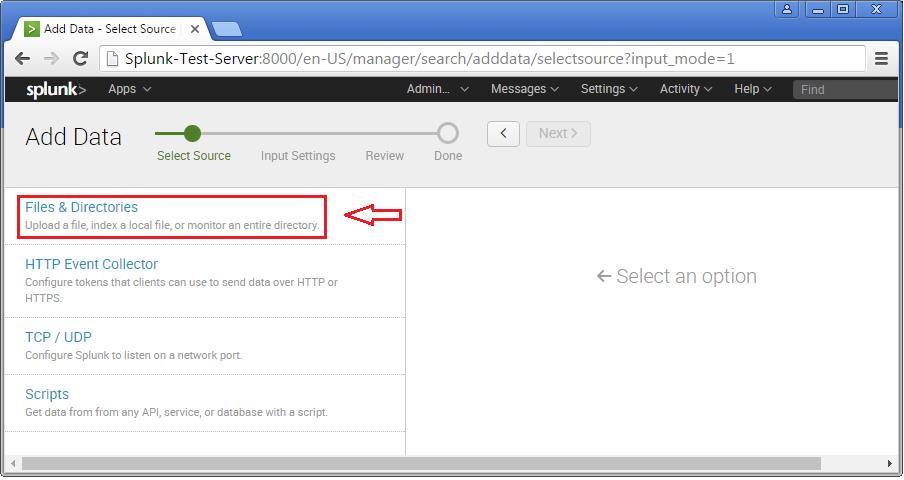
Step 3 >> In this example, lets choose the Files & Directories option.
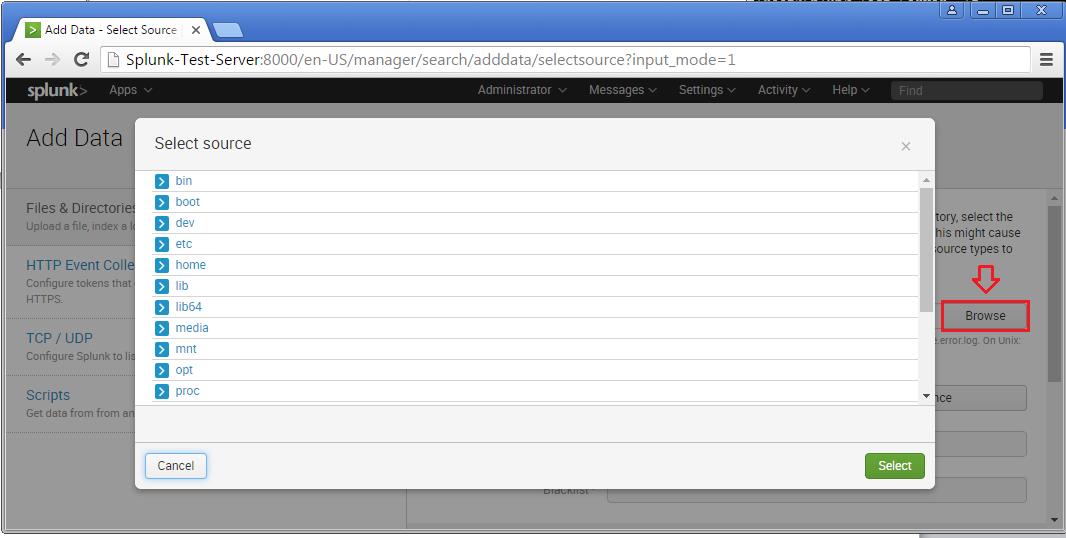
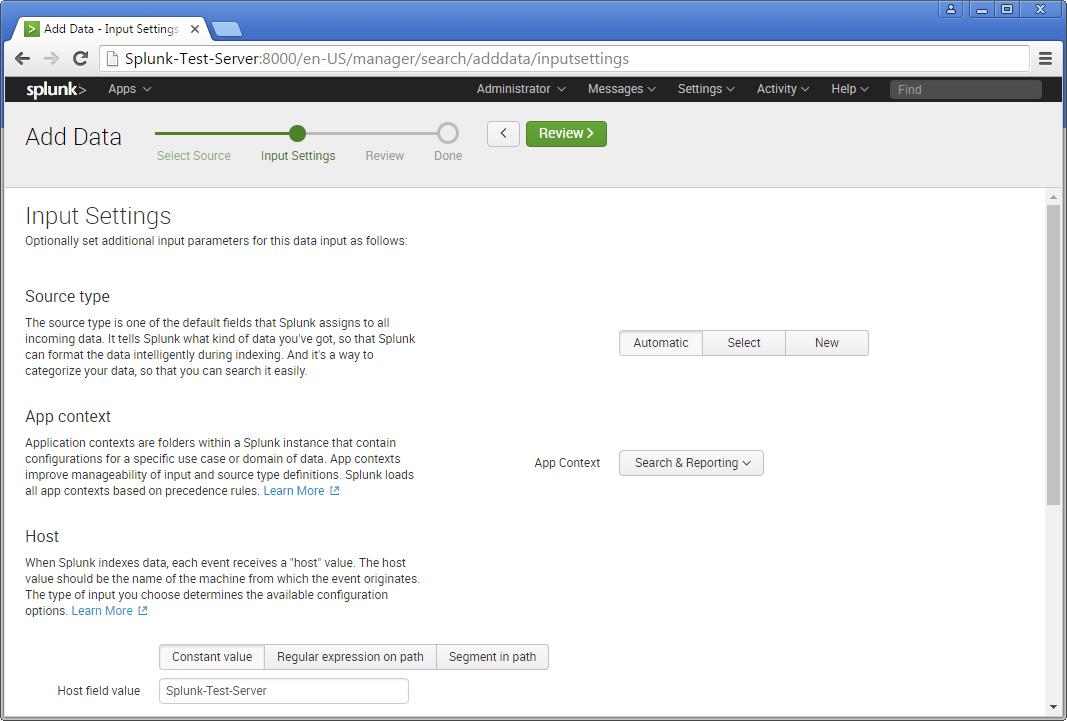
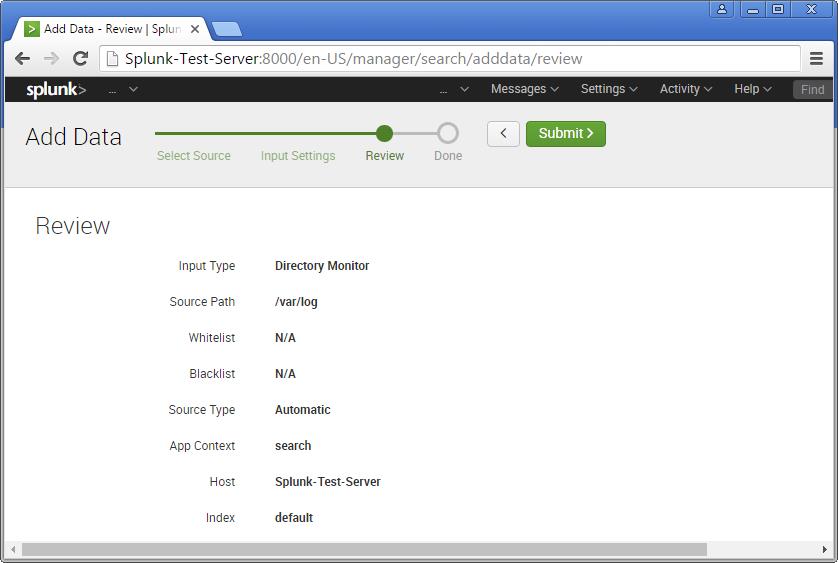
Step 4 >> IN this example choose the exact folder path from the server to monitor. Once you confirm with the settings, you can click Next and Review.
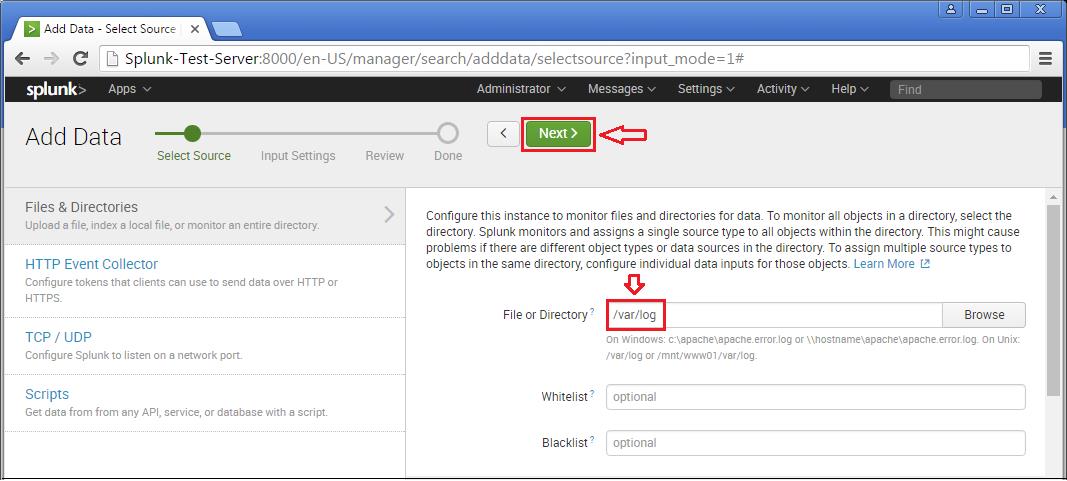
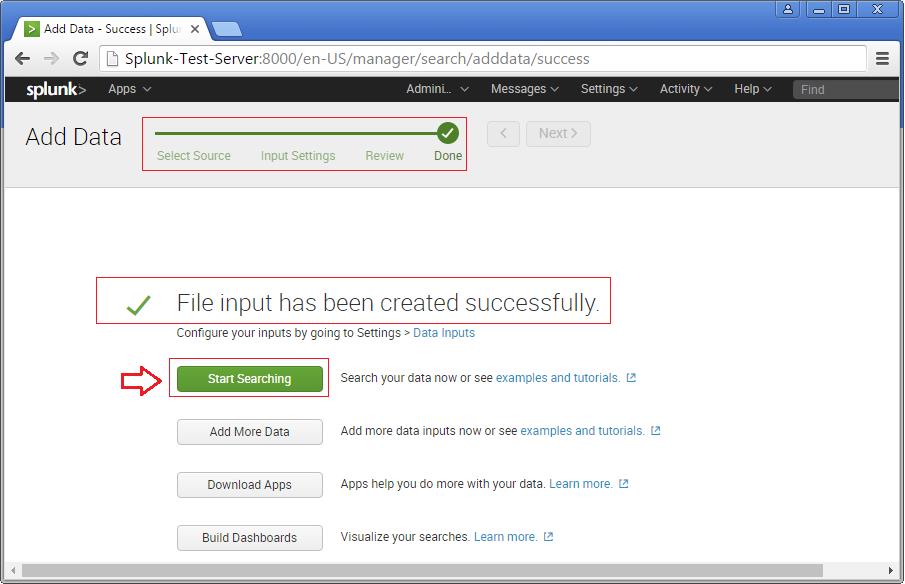
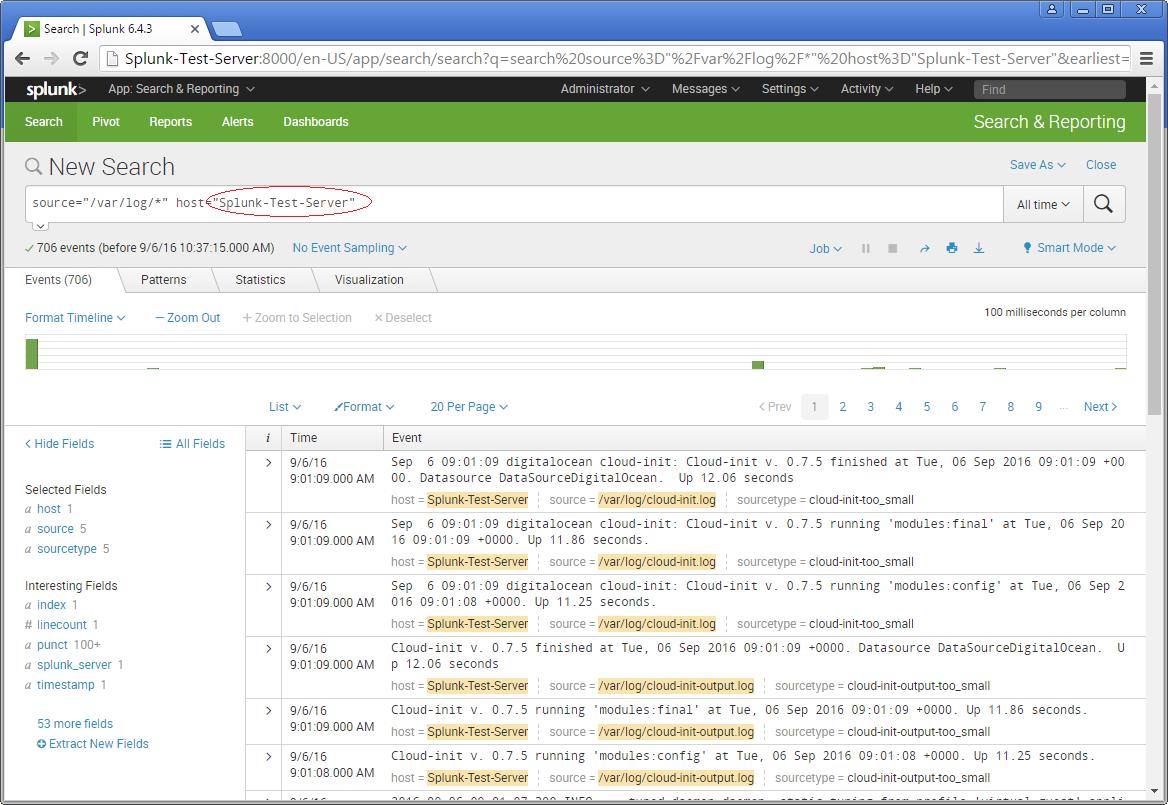
Now you will see the logs on the sample Splunk-Test-Server.
Please consider the above as an example for Splunking. It all depends upon the number of tasks you add to explore your server data. Happy Splunking !!
GNU/Linux Distributions & CI Tools

If you are newly introduced to the world of Linux, soon you will notice that it has mutiple faces or distributions. Once you know how distributions differ from each other then it can help you a lot in building your Linux experience. However, not every distributions are meant to be used by everyone hence it is important to select or indentify the right distro and at the same time nothing wrong to try out any distributions.
 CentOS Linux is a community-supported distribution derived from sources freely provided to the public by Red Hat for Red Hat Enterprise Linux (RHEL). As such, CentOS Linux aims to be functionally compatible with RHEL. The CentOS Project mainly change packages to remove upstream vendor branding and artwork. CentOS Linux is no-cost and free to redistribute. Each CentOS version is maintained for up to 10 years (by means of security updates — the duration of the support interval by Red Hat has varied over time with respect to Sources released). A new CentOS version is released approximately every 2 years and each CentOS version is periodically updated (roughly every 6 months) to support newer hardware. This results in a secure, low-maintenance, reliable, predictable and reproducible Linux environment.
CI – Opensource Tools
Red Hat Enterprise Linux 7 – Integrating Linux Systems with Active Directory Environments
 Many IT environments are heterogeneous. In a mixed environment, there has to be some way to join systems to a single domain or a forest, either directly as clients or by creating separate domains or forests connected to each other. Red Hat Enterprise Linux can help a Linux system or an entire Linux forest integrate with an Active Directory environment.
The System Security Services Daemon (SSSD) provides access to different identity and authentication providers. This service ties a local system to a larger back end system. That can be a simple LDAP directory, domains for Active Directory or IdM in Red Hat Enterprise Linux, or Kerberos realms.
realmd to connects to an Active Directory Domain. realmd simplifies the configuration. realmd can run a service discovery to identify different, available domains ( both Active Directory and Red Hat Enterprise Linux Identity Management ), and then join the domain and manage user access. realmd can discover and support multiple domains because the underlying service (SSSD) supports multiple domains.
OpenStack – Building and managing public and private cloud computing platforms
- Compute (Nova)
- Object Storage (Swift)
- Block Storage (Cinder)
- Networking (Neutron)
- Dashboard (Horizon)
- Identity Service (Keystone)
- Image Service (Glance)
- Telemetry (Ceilometer)
- Orchestration (Heat)
- Database (Trove)
- Bare Metal Provisioning (Ironic)
- Multiple Tenant Cloud Messaging (Zaqar)
- Elastic Map Reduce (Sahara)
- Container Infrastructure Management Service (Magnum)
- Key Manager Service (Barbican)
| Service | Project name | Description |
| Dashboard | Horizon | Provides a web-based self-service portal to interact with underlying OpenStack services, such as launching an instance, assigning IP addresses and configuring access controls. |
| Compute | Nova | Manages the lifecycle of compute instances in an OpenStack environment. Responsibilities include spawning, scheduling and decommissioning of virtual machines on demand. |
| Networking | Neutron | Enables network connectivity as a service for other OpenStack services, such as OpenStack Compute. Provides an API for users to define networks and the attachments into them. Has a pluggable architecture that supports many popular networking vendors and technologies. |
| Storage | ||
| Object Storage | Swift | Stores and retrieves arbitrary unstructured data objects via a RESTful, HTTP based API. It is highly fault tolerant with its data replication and scale out architecture. Its implementation is not like a file server with mountable directories. |
| Block Storage | Cinder | Provides persistent block storage to running instances. Its pluggable driver architecture facilitates the creation and management of block storage devices. |
| Shared services | ||
| Identity service | Keystone | Provides an authentication and authorization service for other OpenStack services. Provides a catalog of endpoints for all OpenStack services. |
| Image Service | Glance | Stores and retrieves virtual machine disk images. OpenStack Compute makes use of this during instance provisioning. |
| Telemetry | Ceilometer | Monitors and meters the OpenStack cloud for billing, benchmarking, scalability, and statistical purposes. |
| Higher-level services | ||
| Orchestration | Heat | Orchestrates multiple composite cloud applications by using either the native HOTtemplate format or the AWS CloudFormation template format, through both an OpenStack-native REST API and a CloudFormation-compatible Query API. |
| Database Service | Trove | Provides scalable and reliable Cloud Database-as-a-Service functionality for both relational and non-relational database engines. |
OpenStack releases – MITAKA ( Current Stable Release )
| Series | Status | Release Date | EOL Date |
|---|---|---|---|
| Queens | Future | TBD | TBD |
| Pike | Future | TBD | TBD |
| Ocata | Next Release | TBD | TBD |
| Newton | Security supported | 2016-10-06 | |
| MITAKA | Security supported | 2016-04-07 | 2017-04-10 |
| Liberty | Security-supported | 2015-10-15 | 2016-11-17 |
| Kilo | EOL | 2015-04-30 | 2016-05-02 |
| Juno | EOL | 2014-10-16 | 2015-12-07 |
| Icehouse | EOL | 2014-04-17 | 2015-07-02 |
| Havana | EOL | 2013-10-17 | 2014-09-30 |
| Grizzly | EOL | 2013-04-04 | 2014-03-29 |
| Folsom | EOL | 2012-09-27 | 2013-11-19 |
| Essex | EOL | 2012-04-05 | 2013-05-06 |
| Diablo | EOL | 2011-09-22 | 2013-05-06 |
| Cactus | Deprecated | 2011-04-15 | |
| Bexar | Deprecated | 2011-02-03 | |
| Austin | Deprecated | 2010-10-21 |
Core OS & Docker Container Virtualization
CoreOS is an open source lightweight operating system based on the Linux kernel and designed for providing infrastructure to clustered deployments, while focusing on automation, ease of applications deployment, security, reliability and scalability.

CoreOS is a powerful Linux distribution built to make large, scalable deployments on varied infrastructure simple to manage. Based on a build of Chrome OS, CoreOS maintains a lightweight host system and uses Docker containers for all applications. This system provides process isolation and also allows applications to be moved throughout a cluster easily.
To manage these clusters, CoreOS uses a globally distributed key-value store called etcd to pass configuration data between nodes. This component is also the platform for service discovery, allowing applications to be dynamically configured based on the information available through the shared resource. Offering Linux as a service, CoreOS has become the preferred distro for Docker and may go a long way toward making data centers more cloudlike.
In order to schedule and manage applications across the entirety of the cluster, a tool called fleet is used. Fleet serves as a cluster-wide init system that can be used to manage processes across the entire cluster. This makes it easy to configure highly available applications and manage the cluster from a single point. It does this by tying into each individual node’s systemd init system.
CoreOS is a fork of Chrome OS, by the means of using its software development kit (SDK) freely available through Chromium OS as a base while adding new functionality and customizing it to support hardware used in servers.
As of July 2014, CoreOS is actively developed, primarily by Alex Polvi, Brandon Philips and Michael Marineau, with its major features (other than etcd and fleet) available as a stable release.
Docker is an open platform for developers and sysadmins to build, ship, and run distributed applications. Consisting of Docker Engine, a portable, lightweight runtime and packaging tool, and Docker Hub, a cloud service for sharing applications and automating workflows, Docker enables apps to be quickly assembled from components and eliminates the friction between development, QA, and production environments. As a result, IT can ship faster and run the same app, unchanged, on laptops, data center VMs, and any cloud. Docker makes virtualization light, easy, and portable.
Docker is an open source framework that provides a lighter-weight type of virtualization, using Linux containers rather than virtual machines. Built on traditional Linux distributions such as Red Hat Enterprise Linux and Ubuntu, Docker lets you package applications and services as images that run in their own portable containers and can move between physical, virtual, and cloud foundations without requiring any modification. If you build a Docker image on an Ubuntu laptop or physical server, you can run it on any compatible Linux, anywhere.
In this way, Docker allows for a very high degree of application portability and agility, and it lends itself to highly scalable applications. However, the nature of Docker also leans toward running a single service or application per container, rather than a collection of processes, such as a LAMP stack. That is possible, but we will detail here the most common use, which is for a single process or service.
CoreOS allows you to set up your infrastructure in Docker containers, which may mean that you need to rethink the way your applications are built out. Basically, you would want to set up each “service”, like an app server or a database server, in its own Docker container. These Docker containers can be forwarded traffic from their host system if desired.
Docker has its own recommendations for how to handle things like databases inside containers and connecting applications to storage. What CoreOS allows you to do is manage your Docker-ized infrastructure in a reliable, scalable manner. So once you have containers configured to communicate with each other, you can tell CoreOS to deploy a certain number of them in a specific configuration across your cluster using fleet. The cluster can monitor downtime and automatically move over services when there are machine failures. If you have configured your containers to monitor etcd values and update their own configurations when a change is detected, you can get automatic service discovery.
Basically, CoreOS is an incredibly flexible platform that can be used to build up very scalable solutions. You may have to rearchitecture some of your application designs, but the benefits are usually worth the effort.
fleet is a cluster manager that controls systemd at the cluster level. To run your services in the cluster, you must submit regular systemd units combined with a few fleet-specific properties.
Features >>
> Deploy docker containers on arbitrary hosts in a cluster
> Distribute services across a cluster using machine-level anti-affinity
> Maintain N instances of a service, re-scheduling on machine failure
> Discover machines running in the cluster
> Automatically SSH into the machine running a job
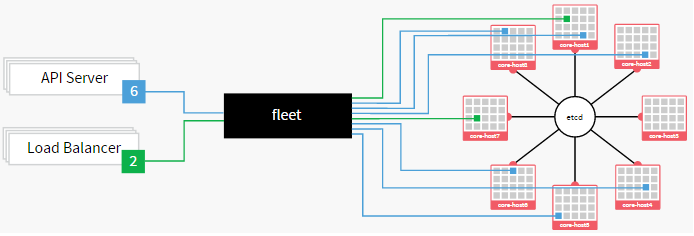
With fleet, you can treat your CoreOS cluster as if it shared a single init system. It encourages users to write applications as small, ephemeral units that can easily migrate around a cluster of self-updating CoreOS machines.
By utilizing fleet, a devops team can focus on running containers that make up a service, without having to worry about the individual machines each container is running on. If your application consists of 5 containers, fleet will guarantee that they stay running somewhere on the cluster. If a machine fails or needs to be updated, containers running on that machine will be moved to other qualified machines in the cluster.
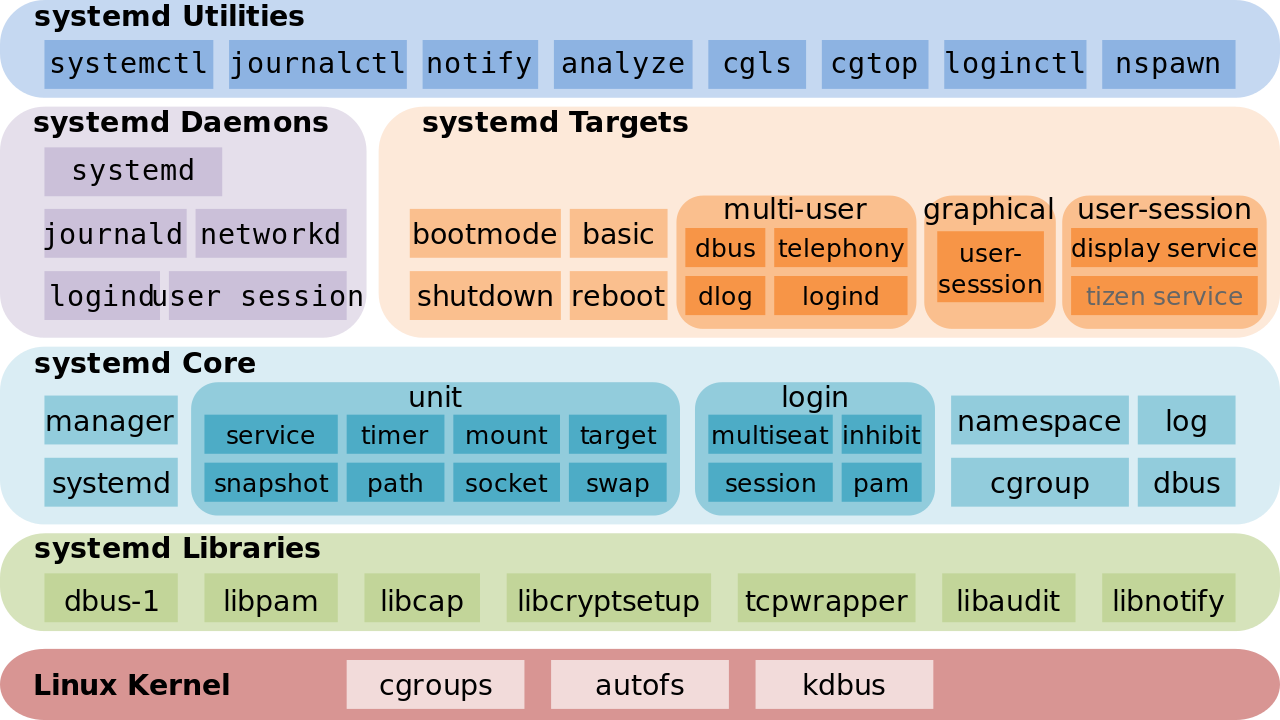
What is systemd ?
systemd is a suite of system management daemons, libraries, and utilities designed for Linux and programmed exclusively for the Linux API.
Systemd authors characterize the software suite as a “basic building block” for an Operating System.
The daemon systemd is the first process that is executed in user space during the Linux startup process.
systemd serves as the root of the user space’s process tree.
The name systemd adheres to the Unix convention of making daemons easier to distinguish by having the letter d as the last letter of the filename.
OpenSource Software
Centralized Identity Management Solutions
OpenSource Directory Servers
* OpenLDAP – http://openldap.org
* 389-DS – http://directory.fedoraproject.org
* Apache-DS – http://directory.apache.org
* OpenDS – http://opends.java.net
Single Sign On
* MIT Kerberos – http://web.mit.edu/kerberos/
Domain Name Service
* ISC Bind – https://www.isc.org/software/bind
* PowerDNS – http://www.powerdns.com
DHCP Server
* ISC DHCP – http://www.isc.org/software/dhcp
Version Control System
* Git – http://git-scm.org
* Subversion – http://subversion.apache.org
* Mercurial – http://mercurial.selenic.com
* Bazaar – http://bazaar.canonical.com
Backup Software
* Amanda – http://www.amanda.org
* Bacula – http://www.bacula.org
Central Repository Server
* DebMirror for Debian – https://help.ubuntu.com/community/Debmirror
* Rsync – Usually used for mirroring – http://rsync.samba.org/
Antivirus
* ClamAV – http://clamav.net
Network Imaging Solution
* Clonezilla – http://clonezilla.org
* fog – http://www.fogproject.org
* G4L – http://g4l.sourceforge.net
Software and Hardware Inventory
* OpenAudit – http://www.open-audit.org
* OCSInventory – http://www.ocsinventory-ng.org
* FusionInventory – http://www.fusioninventory.org
* GLPI – http://www.glpi-project.org
* Tracmor – http://www.tracmor.com
Content Management System
* Alfresco – http://www.alfresco.com
* Joomla – http://www.joomla.org
* Drupal – http://www.drupal.org
* Typo3 – http://typo3.org
* Concrete5 – http://www.concrete5.org
* Plone – http://plone.org
* OpenCMS – http://www.opencms.org
* Locomotive – http://locomotivecms.com
Network Monitoring and Dashboard
* Nagios – http://nagios.org
* Centreon – http://www.centreon.com
* Icinga – http://www.icinga.org
* Ninja – http://www.op5.org/community/plugin-inventory/op5-projects/ninja
* OpenNMS – http://opennms.org
* Zenoss – http://community.zenoss.org/index.jspa
* Zabbix – http://www.zabbix.org
Mail Servers
* Zimbra ZCS – http://www.zimbra.com/downloads/os-downloads.html
* iRedOS – http://www.iredmail.org/
* DeepRootLinux – http://www.deeproot.in
Reverse Proxy Servers and Web Servers
* Apache Httpd – http://httpd.apache.org
* Nginx – http://nginx.org/en
* Lighttpd – http://www.lighttpd.net
* Varnish (proxy only) – http://www.varnish-cache.org
Web Proxy Server
* Squid Proxy Server – http://www.squid-cache.org
Network Access Control
* Packetfence – http://packetfence.org
Management Tools
* Ovirt – http://ovirt.org
* Karesansui – http://karesansui-project.info/
* Archiphel – http://archipelproject.org/
* Ganeti – http://code.google.com/p/ganeti/
Cloud Software
Iaas
* Openstack – http://www.openstack.org
* Cloudstack – http://www.cloudstack.org
* Eucalyptus – http://www.eucalyptus.org
PaaS
* OpenShift Origin – https://openshift.redhat.com/community/open-source
* WSO2 Stratos – http://wso2.com/cloud/stratos
* CloudFoundry – http://www.cloudfoundry.org
Virtual Private Network
* OpenVPN – http://openvpn.net
VOIP
* Asterisk – http://www.asterisk.org
* FreeSwitch – http://www.freeswitch.org
Chat Server
* Ejabberd – http://ejabberd.org
* Openfire – www.igniterealtime.org/projects/openfire/
Team Collaboration Tools
* OpenAtrium – http://www.openatrium.org
* Redmine – http://redmine.org
* Teambox – http://teambox.com
Security Tools
* OpenVAS – http://www.openvas.org
* Snort – http://www.snort.org
Configuration Management Tools
* Puppet – http://puppetlabs.com
* Chef – http://opscode.com/chef
* Cfengine – http://cfengine.com
* Salt – http://saltstack.org